
Create products
This article describes the process of adding new products in your Shopware backend.
Follow Items > Create to open a new detail page. This is where all basic configurations for your new product will take place.
In the first part of this article we will show you how to create a new product with all required information in five steps. Later the individual sections are described in more detail.
Five steps for creating a new product
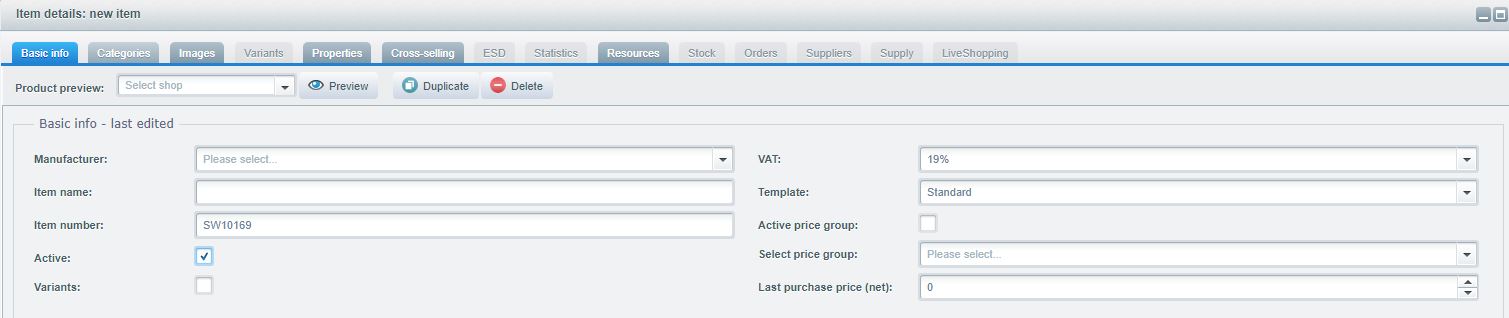
Step 1 - basic information
Assign a manufacturer to the product. You can either choose from the pulldown menu or add a new manufacturer under Items > Manufacturers.
Enter a name for your product.

Step 2 - prices
Define the price of the product - the value entered here will appear in the storefront.
Please bear in mind that all prices are stored as net prices in the database. This means that the defined tax rate of the country is added to each net price. So if you have defined different tax rates per country, the gross price in the frontend will also change accordingly as soon as the country is changed. Cross-country, uniform gross prices cannot be mapped by default in Shopware.

Step 3 - description
Enter a product description. Here you are provided with several tools, which ought to be familiar from word processing programs. You also have the option of working directly with the code itself by clicking HTML editor (< > button).

Step 4 - category
Switch to the Categories tab and select the desired category under Assigned categories.

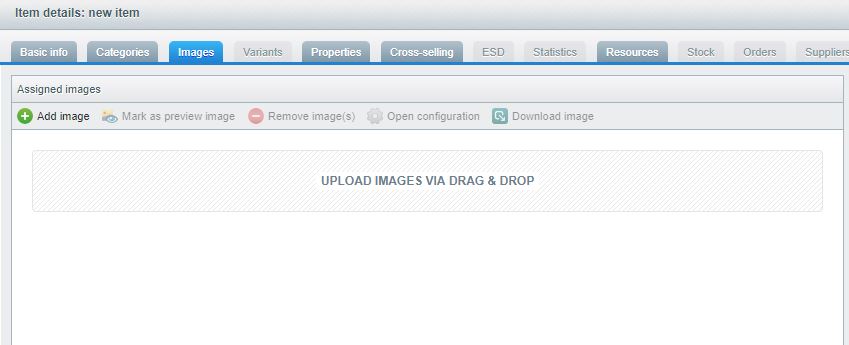
Step 5 - images
Also in the Images menu, you can upload an image directly. Either drag & drop an image into the space provided or manually select and upload an image.
Completion
Now you must click Save item. The new product will now appear under Items > Overview. You can now edit the product at any time by selecting the pencil symbol (or deleting with the red symbol).
Basic info
Manufacturer
Enter the manufacturer of the product. Available manufacturers are listed in the dropdown menu. If a manufacturer has yet to be added to your shop, you may enter their name directly. You can later edit the manufacturer in Items > Manufacturers (i.e. add a logo and description).
Template
Here you are able to choose the template that will be used for the product. By default, only the "Standard" template is available for a product. Additional templates can be developed individually, making it possible to offer different product presentations in the frontend.
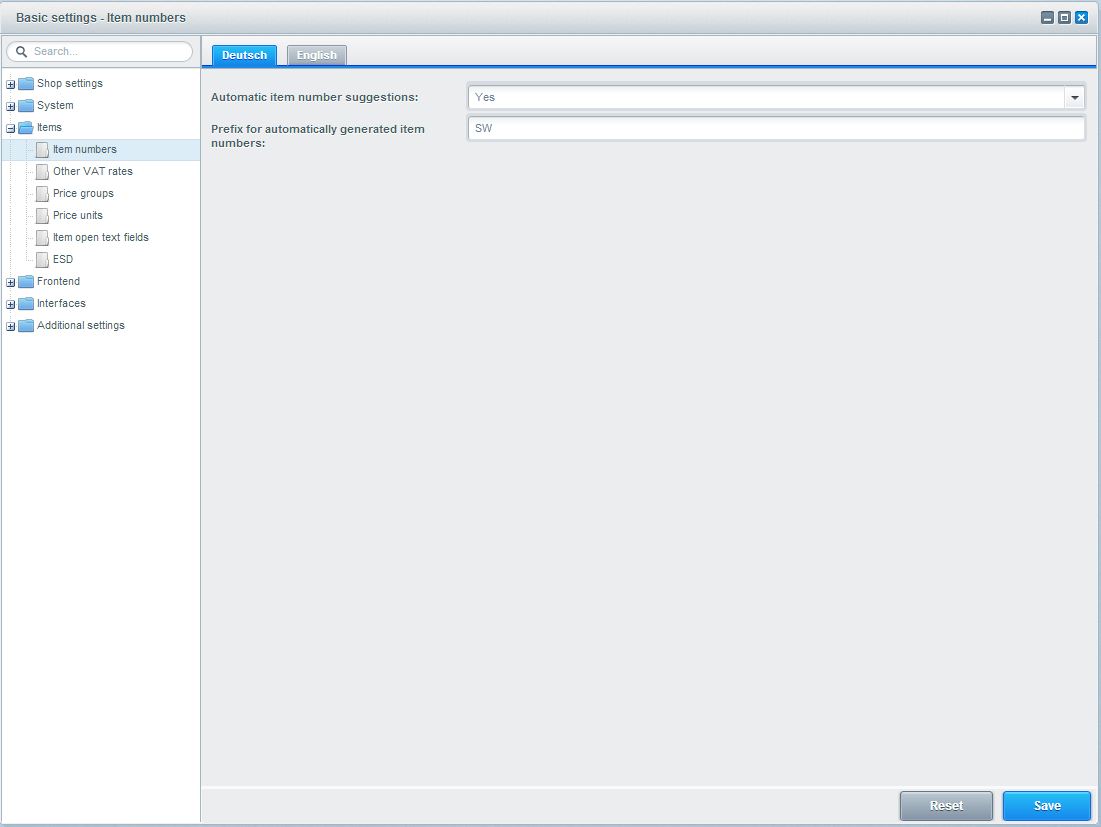
Item number
This is a unique ID assigned to the product. This is automatically generated and includes a prefix (these settings can be defined in Configuration > Basic settings > Items > Item numbers). This prefix is entered at "Prefix for automatically genereated item numbers".
A prefix must always be used together with item numbers. If no prefix is used, then Automatic item number suggestions must also be disabled.
Once this ID is created, variants receive an independent sequential number (SW100, SW101, etc.), and configurator products receive decimals (SW100, SW100.1, SW100.2, etc.).
Item numbers are unique to the product and can only appear once. They can have a maximum length of 255 characters.
Item number structure in Shopware
The item number must contain a combination of at least 4 alphanumeric characters must be unique in the entire shop!
Allowed characters are:
- Alphanumeric characters: 0-9 A-Z
- Additional characters: . - _
Example:
A.123-456
A-123-456
A_123-456
A.123_456
A-123.456
etc..
As a general rule you shouldn't use spaces or only numeric item numbers. Also the item number can contain 255 characters at maximum!
Additional characters will not be saved, in this case you'll get a message or the item number field will be highlighted in red.
Price group
If you work with different price groups, here you can select the price group of the product. Price groups are useful if you are working with global price graduations. You can create individual price groups under Configuration > Basic settings > Items > Price groups. If you do not work with price groups, simply leave the selection on "Standard".
Active price group
If you work with price groups, you have to check this dialog box again. In this way you confirm that the price group selected above will be applied to this product. If you don’t check the dialog box, the price group is not active and you are able to define individual price graduations.
Item name
Enter the product name here. This text will be displayed within the listings/detail page in the frontend.
Active
If this field is selected, the item is displayed in the frontend. If an item no longer needs to be displayed it is not necessary to delete it immediately; it can be set as inactive instead.
Variants
This is where you define whether or not a product will have variants. Select this box and select Save item to activate the Variants tab, where all variant configuration takes place.
Please refer to this wiki if you want to turn a variant product back into a lead item.
VAT
This is where you select the corresponding VAT rate for a product. It is possible to define individual VAT rates in the basic settings under Item > Item VAT rates.
Description

Here you have the option of describing the product in detail and formatting the text. A range of different tools are available, which ought to be familiar from word processing programs. You can edit the HTML text directly by selecting the < > button.
Please note that HTML formats which were copy & pasted from external portals may have a negative influence on appearance of the product detail page.
Meta information
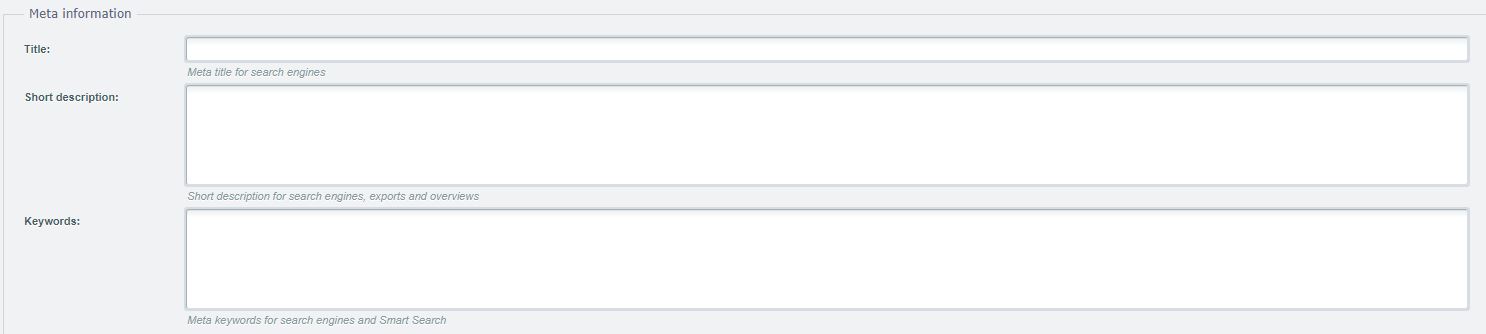
Title
With the meta title you can define an individual title tag on your product page. If this field is empty, Shopware will use the item name as the title by default.
Description
You can enter a brief description of the product here for use by search engines, product exports and overviews. This brief description is also displayed as a meta description in the page source text. If the brief description is left empty, the system makes use of the description for listing texts (such as the category listing). Please note that no formatting is adopted here (i.e. bold, italic, etc.).
Keywords
The keywords are used by search engines and Search. The keywords are listed as meta data in the website source code of the page. The individual keywords can be separated with commas.
Quotation marks should be used at this point (" ") because this renders the website source code unusable by Google.
Prices

This is where you define the price for product and separate customer groups. In this example the price for the default customer group is defined. Here you can also create a "pseudo price", which is displayed in the frontend with a line through it. The purchase price can also be entered. This is only for internal purposes (i.e. if you want to later see original purchasing price of the product). The purchase price is not taken into account for statistic evaluations and is therefore only optional.
An additional option is the specification of graduated prices. To do this, click on "Arbitrary" under "To". In this input field you can define the price up to a specific purchase quantity. Confirm the input with the tab key. More input fields will then be made available automatically for the next graduation. This list can be extended indefinitely and all price scales will be shown in the frontend. A product is then displayed with a "Price from" depending on the configuration (Consider product graduation for cheapest price calculation), which can be the cheapest possible price or the price for one unit.
It's possible to tag your prices particularly by filling the new snippets frontend/detail/data/priceDiscountInfo and frontend/detail/data/priceDiscountLabel. Label is located before the price, Info behind. By doing this you can realize pseudo price labels like "instead of 19.99£ RRP". Consider that this snippet is shown globally, you can't set an individual snippet for single items. Since this is a snippet, you can translate it for your different language- and subshops.
Cheapest price for the last 30 days
As per EU law, after may 2022, you have to declare the cheapest price for the last 30 days seperate. With version 5.7.8 we added a separate field Cheapest price (last 30 days gross /net) to specify it.

You can specify the price in this field in addition to the pseudo price. The price will be displayed separate in the frontend.

In addition to the price (1) and the pseudo-price (2) the cheapest pice within the last 30 days will be displayed as previously (3).
If you work with product-specific graduated prices, you should not assign the product to a price group!
Varying prices for customer groups can only be saved if the customer group is not assigned a global discount. If a global discount is saved for the customer group, the tab for this customer group does not appear in the price screen.
Shopware saves the prices at net value. Remember when adding gross prices, they will be converted to the net amount. The standard rate of taxation is always used by default! Additional countries which were assigned varying tax rates in the basic settings cannot be taken into consideration.
The field percent discount is not meant to enter discounts manually but is automatically calculated when a graduation is entered.
Base price calculation

Utilizing the automatic base price calculation in your shop enables you to present comparable prices in your shop and at the same time strengthen your customer's loyalty towards your business. The following items are needed for a successful calculation.
Unit of measurement
Choose how your item's quantity is measured and displayed in your shop. Options available for a unit's measurement are gram, kilogram, running meter, litre or package. You can always add additional units of measurement via your basic settings > Items > Price units.
Contents
State here the quantity per unit of measurement. If you e.g. are selling bottled water, 'contents' refers to a bottle's capacity. This might be for example 0.75 oder 1.0 oder 1.5 L(itres).
Base unit
Define a base unit here. In most cases a figure of "1" is the right choice here. Although there are most likely cases in which a base unit of, say 5 litres or 10 kilogram might be feasible.
Packaging unit
Define a unit that is added to the quantity selection dropdown-menu. If you keep the field empty there will be no seperate unit displayed in the dropdown-menu. Valid selections for example are: packet(s) or bottle(s).
You can set up which base price you want to display when you're using a minimum order quantity. You can base the default listing price off one item or the minimum order quantity. More information can be found here.
Settings.
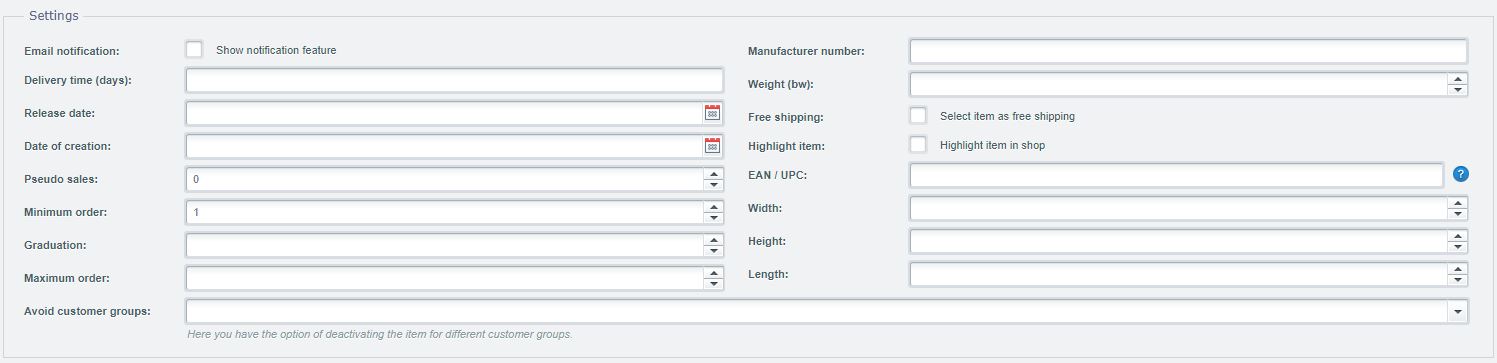
Email notification
If an article is not in stock, you can provide your customer the possibility to register for a notification, when its in stock again. To use this feature, you have to take care of the following requirements:
- The plugins Notification and Cron have to be installed and active.
- The cronjob Email notification has to be active.
- Email notification in the article has to be active.
- The article must have less than 1 of stock.
- The article can be on sale, the notification will also be displayed in the frontend.
In the frontend it will look like this:

If an email will be entered, the shop sends an email with a confirmation link. Only if this link is clicked by the user, he will be registered for the notification!
The already registered notifications can be seen in the backend module in Marketing > Analysis > Email notification. Here you can see all articles, for which the notifiation is active and its registed users:
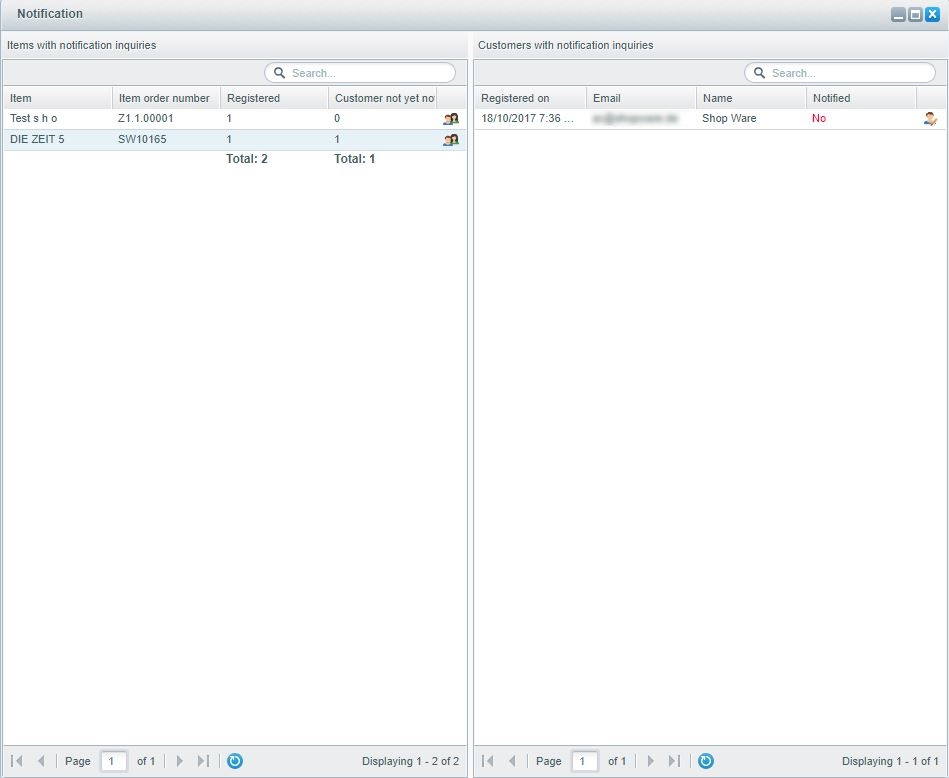
At the left you see the articles with its counter of registered users and not yet notified users. At clicking the action button (the user icon) all related users, which are registered for notification will be displayed. Also the status (Notified Yes / No) will be shown. Note that the name in some cases can be empty, this happens, when the user, which wants to be notified, was not logged in as he requested the notification.
To send the notification, the articles simply must have a stock of 1 or more, the cronjob Email notification will afterwards send all the mails to the users automatically and changes the "Notified"-status to "Yes".
The email templates, which were sent are sACCEPTNOTIFICATION & sARTICLEAVAILABLE, they can be modified like you want to.
Every user will be notified only once per article and registration. If the Stock will get negative again, the user has to register again for notification.
Delivery time (in days)
Enter the delivery time of a product that does not have any stock. This delivery time will only be stated in the frontend if the stock level is less than 0.
Detailed information can be found in the Displaying stock and availability of items wiki.
Stock level
The current stock level can be entered here.
Minimum stock level
At this point you can define a minimum stock level. This value can be used with the email notification for the "Stock level falls short".
Release date
The release date can be used for products which can only be delivered in the future. The date entered here appears on the product detail page and allows customers to place an order in advance. The message "Available from xx.xx.xxxx" appears in the frontend. This message can be edited in your Snippet administration.
Date of creation
The date the product was created is automatically entered here. You also have the option of manually adding this date. The appearance of your "Newcomer" products is managed by manipulating this date.
Pseudo sales
If you want to influence the list of top sellers, you can use this field to create pseudo sales. The value entered here represents the popularity of the product in your store. This value is then exclusively used for the calculation of the display of the top sellers - it goes without saying that it is not used for statistical evaluations. Therefore if you enter a high value here, this product will be displayed in the frontend as a top seller.
Minimum order
Use this field to define a minimum purchase quantity. This minimum quantity has to be accepted by the customer in order to be added to the shopping cart.
this field only supports whole numbers! Decimal points or fractions will not be recognized.
Graduation
This field can (optionally) be used in combination with the minimum purchase quantity. Similarly, this fiend only supports whole numbers.
the scaling has to be identical to the minimum purchase quantity!
Maximum order
A maximum purchase quantity can be defined here. This is the maximum quantity that can be placed in the shopping basket and/or purchased.
this field only supports whole numbers! Decimal points or fractions will not be recognized.
Manufacturer number
Here you have the option of entering the item number of the manufacturer, acting as an internal reference number for the product. It is not displayed to the customer in the frontend. This is useful if, for example, you want to locate the item on the website of the manufacturer.
Weight (in kg/body weight)
Enter the weight of a product in kilograms. This information may be required for calculating the shipping costs according to weight. Enter the weight as follows: 0.5 (for 0.5 kg).
Free shipping
If you activate this checkbox, this product is calculated without delivery costs. The behavior of shopping carts that contain "free delivery" products can be defined in the delivery type settings.
Highlight item
With this option it is possible to highlight specific products in the frontend. These products are then displayed with a "Tip icon" by default.
On sale
If you highlight a product for sale it's availability is limited to the existing inventory. Products whose inventory fall to zero during an order process can be deactivated. Open Configutation > Basic settings > Frontend > Shopping cart / item detailsand set the option Do not show on sale products that are out of stock: to Yes.
In the current version this setting must be set per variant!
EAN
You can enter the EAN for an item here. In the standard configuration this serves the purpose of internal information only, and has to be included in the template separately for display purposes.
Width, height, length
You can specify the dimensions of a product here. These fields only serve as internal information (i.e. for the calculation of individual delivery costs).
Avoid customer groups
This is where you can exclude the product from individual customer groups. For selected customer groups, this product no longer appears in the category listing in the frontend and therefore cannot be purchased.
free text fields
These free text fields represent the attributes you already created under configuration > free text fields management. If you have not already done so, you can find more information on configuring free text fields here.
Free text 1 and free text 2
These text fields can be used to display additional product information on the detail page. These variables are already embedded in the standard template, therefore when filled, automatically appear on the product detail page.

Comment
This is where you as the shop owner can include a personal comment on the product. This comment is displayed directly below the long description on the detail page.
Other Properties
Properties

If you haven't already done so, property groups and options can be defined in Items > Properties.
To configure the characteristics of a product, select a property group from the pull down menu - a window will then appear with all available options. To change these options, click in the second column and select the variant(s) from the combination field (multiple selections are possible). Allocation is possible from one product group per product.
If you do not want to work with properties, simply leave this field empty.
Be sure that when changing the settings of a property group, the options assigned to the former group are removed!
Cross-Selling
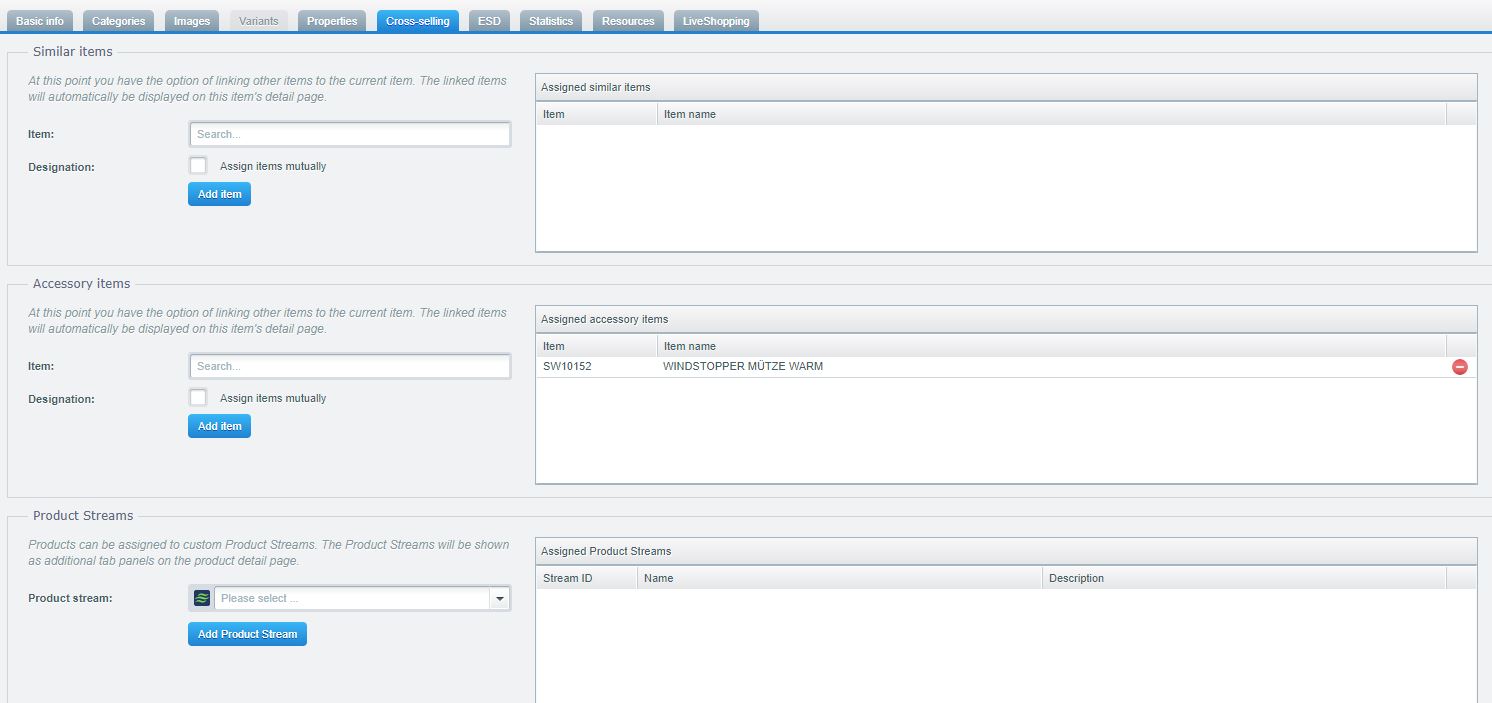
To make the shopping process as easy as possible for the customer you can enter direkt links to other products here. The linked products are displayed directly on the product detail page. You only have to enter the item number of the product to link them. The option "Assign items mutually" can be used to automatically link both items to eachother.
You can only use products as linked products which have no variants or configurators.
Further information about the cross-selling tab in shopware can be found here.
ESD
In this tab you can define your article as an ESD article. ESD articles are digitally available articles, such as pure software products.
More information about the ESD articles can be found here.
Preview, duplicate, delete item
These features are now pinned to the basic info in the module. Functional there are no changes.

Resources
The resources of the article are available in the Resources tab.
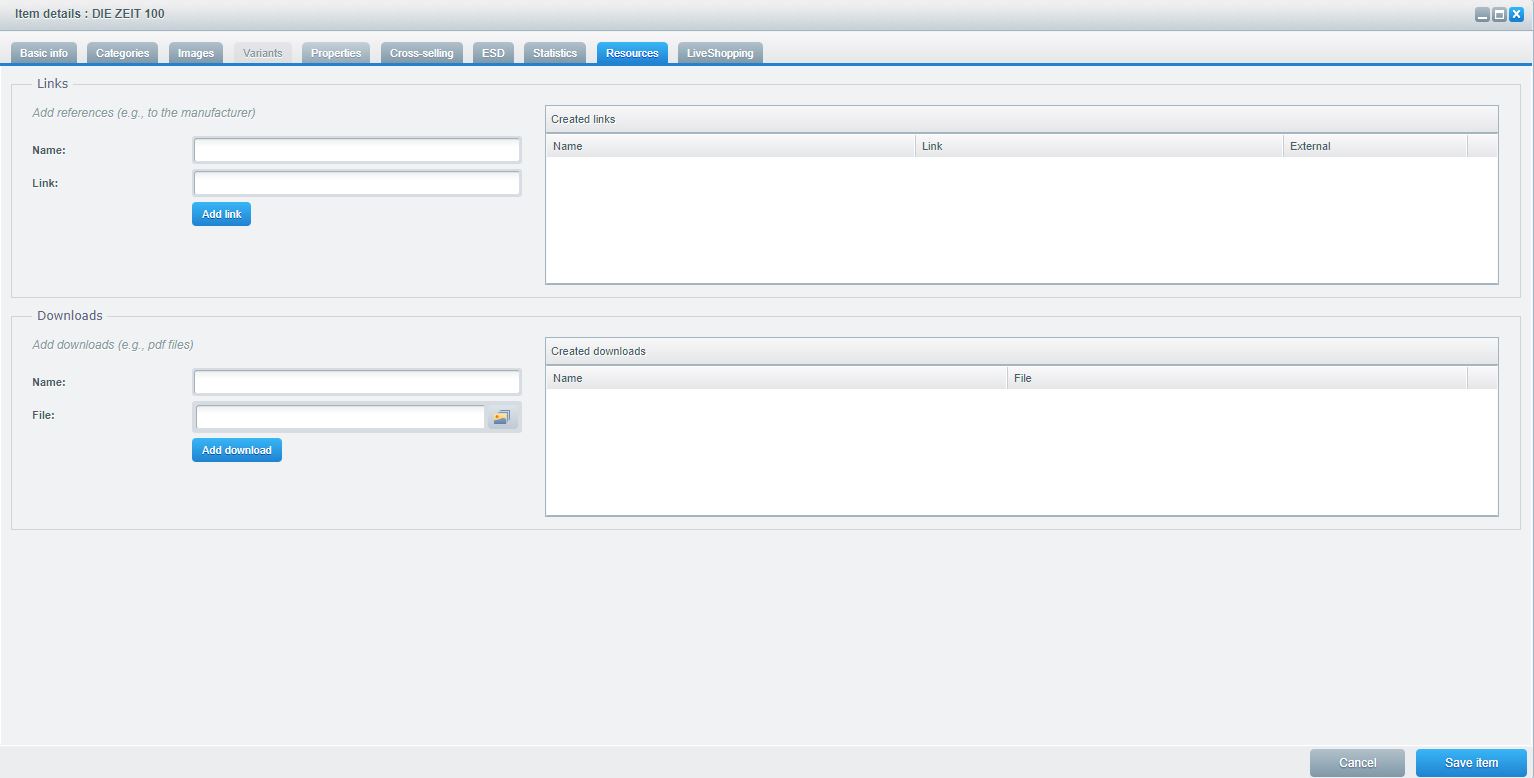
Here you can provide links and downloads that are displayed on the item detail page.
Free items
Shopware can't simply create items with a price of 0, because of that we have to trick for free items:
- Premium items: By using premium items you can offer free items in the checkout from desired cart values. This is a possibility to increase your customers cart values and also a pretty easy way to create free items.
- Free items by using price groups: By using price groups it's possible to rebating items completely. Example: Create a price group for a desired customergroup with a discount of 100%. Subsequent you open the desired item and activate the price group, after saving the item, it's free for the configured customergroup.
Block items and categories for defined customergroups
With Shopware you can make either items or categories invisible for defined customergroups. So you get the possibility to combine your b2c with your b2b shop. Together with the plugin Business Essentials you can cover the complete bandwidth of b2b.
Items
Every item can be inivisible for defined customergroups, just open your desired item in the backend. At Avoid customer groups (1) you can use the Dropdown to select your desired customergroup, which shouldn't get access to this item. In this dropdown you can select multiple entries. In this example the item is invisible for customers of the Default group, which is the default customergroup in Shopware. Note that this setting is most usable for the default customergroup because the user who is not signed in would see the item, but it would disappear after login.

Categories
Making invisible works also for categories. Just open the category module and select the desired category, click the tab Restrict category (1). In the left window you see the Available customer groups (2) which can see the category and on the right you see the Blocked customer groups (3) which can't see the category.

Plugin: Business Essentials
If you are acting in a b2b environment, we recommend to use the plugin Business Essentials. With this plugin you can extend your shop for usage with many different customergroups which can be designed individually and make them (un-)available. This means the display of different offers, prices and more, this is made possible by using different register sites for each customergroup and activation workflows for each customergroup.