
Variants
By using the product variants you as a shopowner have the possibility to create one or multidimensional products.
When creating an item, you have the possibility of assigning as many variants as required. To assign variants, check the Variants box in the item detail window then click save. The Variants tab will now be available for the item.

Variant display styles

Your variants can be displayed in a number of different styles. In the Configurator type dropdown menu, select from one of the following (all of which are described in more detail below):
- Standard
- Selection
- Picture
After creating your variants, you can change the display at any time without losing data.
Standard
The standard type shows a set of variants by default, which the customer can change without proceeding through a specific order. When working with this display, the customer can select the Add to shopping cart button at any time, as every variant field already contains default data.
To assign a default variant (the variant which will appear automatically on the product detail page), click the Available variants tab and select from one of the variants in the Preselection column. Please note that variants must have been already generated prior to this step.
This is how the standard display looks in the storefront:

If a variant is selected that is no longer active, the main variant is loaded as a fallback. If you select a sales item without stock, you will be shown that this item is currently not available.

Selection
When using this display, the customer must manually select their preferences, one after the other. Only after making the first selection the following selection is enabled. This is particularly useful for variant groups that depend on one another. The item can only be added to the shopping cart once the customer makes their final selection. Prior to this point, the Add to shopping cart button cannot be selected.
This is how the selection display looks in the storefront:

The selection configurator also shows you directly that inactive variants or sales items without stock are not available.

For variants with more than 2 levels (groups), there is a fallback to the main variant if a variant is not available. In this case the display "Not available" is omitted.
Image
The image configurator was introduced as a standard feature with Shopware 5. This display represents variant options with an image rather than text. Images will only appear when mapped to a variant. If a variant is not assigned an image, the variant name will be displayed in text.
This is how the image display looks in the storefront:

After creating your variant groups and options (described below), you can assign images to variants in the Images tab. After uploading an image and saving, click Open configuration (1). After that click Add mapping (2) and map to which variants (3) the image should apply.

If a variant is not available in the image configurator (sales item without stock or inactive variant), this variant cannot be selected.

For inactive variants with more than 2 levels (groups), a selection is possible on the other hand, but here a fallback to the main variant takes place.
Change configurator type in the database
We have 3 options to display the item variants in the frontend. If you want to set the variant selection for all items equal you can edit in the database the table "s_article_configurator_sets". Here you need to adjust the column "type" accordingly.
- '0' Standard
- '1' Selection (Please Select)
- '2' Picture
You can use the following SQL-Statement: UPDATE `` type` s_article_configurator_sets` SET = '0'
This database query changes your database without asking, please do that only, if you know, what you're doing and backup your shop before!
Groups
To create variants, you will need to create groups followed by variant options for these groups. All management of groups and options take place beneath the Configuration tab.

You will manage your groups in this window. Groups are created globally, which means a group and its variant options will be taken into consideration when generating variants with other groups and options.
Mode (1)
The pull-down menu specifies the mode of the variant group. When set to Create & activate, your new group is activated for the item and saved under Active groups (2). When set to Create, the new group is saved at Inactive groups (4). Groups can be activated or deactivated any time by clicking the checkbox.
Delete, edit and translate groups (3)
Each group can be individually deleted, edited or translated.
- Delete: It is not possible to delete a group if it is assigned to an item.
- Edit: Click the pencil icon to edit the name and description of the group. The description will appear in the storefront directly below the group name.
- Translate: When applicable, you can translate the group names and descriptions for each individual language shop by selecting the globe icon.
Active groups (2)
These groups are taken into consideration when creating item variations. Simply click on a group to change its available options.
Inactive groups (4)
You have the option of assigning inactive groups to the item. Until this point, they remain on stand-by and are not taken into consideration when creating item variations.
Options
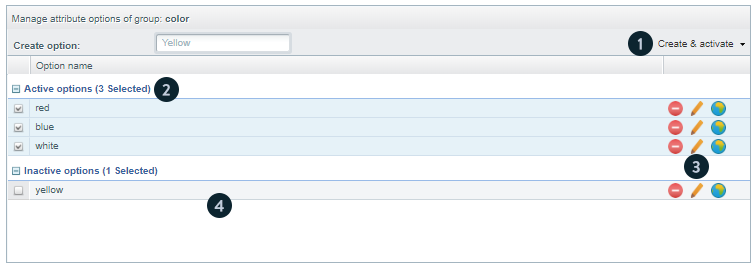
You can create options the same way you created your groups.
Only an active group can be assigned options, which are managed from this window. Please keep in mind that variations are created globally, which means every group option will be connected to the options of other active groups.
Mode (1)
First select the group, then specify the mode in the pull-down menu. When set to Create & activate, the option be activated for the group (2). When set to Create, a new option is created but not enabled - the option will appear under Inactive options (3). Options can be easily activated or deactivated by clicking the checkbox.
Active options (2)
The group will take these options into consideration when generating variants.
Delete, edit and translate options (3)
An option can be deleted as long as it has not been assigned to any items. Option names can be editing by clicking the pencil icon. You can translate translate/localize (i.e. empirical/metric system) the options for your separate language shops by selecting the globe icon.
Inactive options (4)
These are available but not currently assigned to the group. These can be recycled and assigned to other groups.
Sorting variants in the frontend
Sorting variant groups and options happens in the articles backend module:

By default the variant groups (1) and options (2) were sorted by ID.
To change the sorting you have to change the sorting by drag&drop in the active groups / options, for inactive ones the sorting won't work.

After change the sorting you have to save (1) the configurator set and may clear the theme cache. After doing this, the sort has changed also in the frontend.
Set
Save set
Active groups with activated options can be saved as a set. The set can be saved as public, which means that it can be recycled for used with other items. This is convenient for creating new variants for the same type of item type (i.e. t-shirts).
If a set is saved as public, upon opening a new item the set will reappear, but as a duplication. This makes it possible to make adjustments without affecting other items using the same set.
Load set
There is a selection menu with all previously saved sets. These sets can be loaded into the item, meaning that extensive variant configurations can be created quickly and easily. Please note that when working with a saved set, you cannot delete options or groups - only deactivation is possible.
Set dependency
In this area you have the possibility to set restrictions for generating item variants. You can define combinations, which are excluded when creating variants. Restrictions are applied as a rule set, which offers the option of excluding multiple combinations of attribute groups and options. To define a restriction, select the attribute group and the option in the selection boxes that you wish to exclude for the item generation.
Define price variations

There is a possibility of defining various premiums and discounts to variations. You can also specify whether the price variations should be net or gross.
Open Define price variations (1) and select Add variation (2) to see all active variations. Select the variant you would like to create a price adjustment for.
You can select and save one option per group at a time. After saving you will automatically return to the overview, where you can set the price variation and define whether it should be net or gross.
Define configurator template

When you generate variants, Shopware sets the base data of the article as configurator template. This template will be used for generating all variants and their dependencies e.g. surcharges. So please take care, that your configurator template is also up to date when you configure variants. In this template, all basic info for the item can be edited. For example the price be changed on which the surcharges are based.
Generate variants
When new variants are generated, existing variants will be overwritten. The window also displays approximately how long the process will take. The time displayed is depending on your system resources and are therefore displayed with an estimated value.

Override
Use this option if you wish to generate completely new variants. In this case, all order numbers will be regenerated.
Merge
When generating variants, selecting the Merge option means that new variants will be added to existing ones.
This is practical, for example, if an existing item variant is expanded with new variants. Thus the item number doesn't need to be regenerated.
Additional text
Each variant is automatically assigned an additional text field (1). This makes the variant easier to identify in the shopping cart during the checkout process. This field is generated based on the names of the individual option and attached as an extension of the original item name.


Dynamic variant text
To better facilitate internationalization, the system can now dynamically create and assign additional text for item variants. Please note that will only work if you have already translated your groups and options.
Available variants

All generated variants are listed here. Double click on a variant to edit it directly within this view. You can define the stock, price, order number and active/inactive variant status.
If an item is inactive, it cannot be ordered. The variant is still displayed in the frontend but cannot be selected.
The Preselection box is automatically set to the master item and cannot be changed. The Preselection will only be selected automatically if the item uses the standard configurator.
The delete function helps you to convert a variant product into a default product. You can find more information about this function in the section "Turning a variant item back into a default product".
Deleting variants is not a suitable way to hide them in the frontend. Deleting variants here can lead to data inconsistencies!
Inheriting default data
In this area, you can select item information and assign it to selected variants. If no variant is selected, the information will be assigned to every variant. This information can include: price, base price, properties and attribute configurations.
Generating new order numbers
You have the option of regenerating order numbers for all variants. The syntax for generation is specified by the text in the listing toolbar.
Regarding the syntax, the following conditions apply:
- The properties referred to are case-sensitive
- Every syntax fragment is displayed in brackets, i.e. ( {...} ).
By generating new order numbers, you can access all data assigned to the item. Below are a few examples:
- {mainDetail.number}: Derived from the order number of the master item
- {n}: Serial number
- {options.name}: Name of the option
- {options.group.name}: Name of the group
- {attribute.attr1}: Value of the first item attribute
If you would like to assign your own item numbers for variants and have several options to choose from, you can define the order of the options by doing the following:
- Generate the desired groups and options
- Put the groups in the correct order via drag & drop and regenerate the variants (they should be overwritten, NOT merged) - the order number of the groups determines the order of the {options.name} in the order number.
- Generate the item numbers in the desired syntax.
- The item numbers should now be generated in the desired order.
When you create order numbers with your own syntax, there must not be any spaces in the item number after it is created. Make sure that the options groups and attributes do not contain any spaces. Further information about item numbers can be found here.
Database structure
The following tables are accessed:
- s_article_configurator_dependencies: Restrictions (T-Shirt XXL only available in Red)
- s_article_configurator_groups: Configurator groups (Size, Color)
- s_article_configurator_options: Group options (red, yellow, XXL)
- s_article_configurator_option_relations: The item "SW-2000.{1}" has been generated with the options "red, XXL"
- s_article_configurator_price_surcharges: Price premium (T-Shirt in XXL always costs 2€ more)
- s_article_configurator_sets: All defined configurator sets (T-Shirt-Set, PC-Set)
- s_article_configurator_set_group_relations: The "T-Shirt-Set" uses the groups "Size", "Color", etc...
- s_article_configurator_set_option_relations: The "T-Shirt-Set" uses the options "Yellow, Blue", etc...
- s_articles_details: Here the variant data is saved
Turning a variant item back into a default product
We recommend that you always create a new product to avoid data fragments, which can have an effect on the display in your shop.
You need to remove all variant items except the lead item from the tab variants manually. Afterwards uncheck the box Variants in the tab Basic info. This way you can be sure that no other former variant items exist in the database.
If you already unchecked the checkbox for variant products without deleting the variants, this variant will remain in the database as orphaned data. Those would still be known and for example visible in the export.
Before you use the following query please do always create a backup of the database you could use as a fallback in the case of an error!
You can delete damaged variants in your database, which are no longer assigned to a parent article by executing following query:
DELETE d, at
-- SELECT d.*
FROM s_articles_details d
JOIN s_articles a
ON d.articleID = a.id
AND a.configurator_set_id IS NOT NULL
JOIN s_articles_attributes at
ON d.id = at.articledetailsID
LEFT JOIN s_article_configurator_option_relations cr
ON cr.article_id = d.id
WHERE cr.id IS NULL
AND d.articleID = a.id
In addition, the linking of the variant options (e.g. group: color, option: red, etc.) for the remaining main article must now be removed via the database.
This has to be done via the database and therefore you have to make sure that you have created a backup of the database before!
To remove the obsolete option assignment, execute the following query:
DELETE
-- SELECT *
FROM s_article_configurator_option_relations
WHERE article_id in
(SELECT ad.id FROM s_articles_details as ad
join s_articles as a ON ad.articleID = a.id
WHERE a.configurator_set_id is NULL)
Unique URLs for each variant
Individual variants can now be opened directly. Just place the parameter ?number=SW1200.12 after the item's URL. Shopware will then open the detail page of the individual variant.
Shopware already applies this functionality to all necessary locations in the default template (i.e. the wish list or shopping cart).
Reload data via Ajax
The detail page can change variants without reload. That means, that the Detail pages for variant articles now loads new variant data via AJAX, instead of the previous full page reload. This feature is optional and enabled by default. You can configure it in your theme settings (here).
Variant Information in article overview

There is a function which is showing the AdditionalText from the variants in the article overview list. Moreover a new column "Variant active" was added that specifies which versions of the master article are active and which are not.
As in previous versions, the parent item and the pre-selection must be active here, otherwise the product does not appear in the listing.