
Plugin: PayPal Express
Paypal Express
Installation
This extension can be found in our Shopware Store, the easiest way to find a specific plugin is the search-bar. Complete the order process and login to the backend of your store. Navigate to Configuration > Plugin manager > My purchases. You need to login and click the refresh button. Your new extension is now listed and can be installed. After installing the extension go to the menu entry installed and refresh. Activate the extension. Finally delete the cache under Settings > Cache/Performance > Clear Shop Cache and refresh the backend.
Configuration
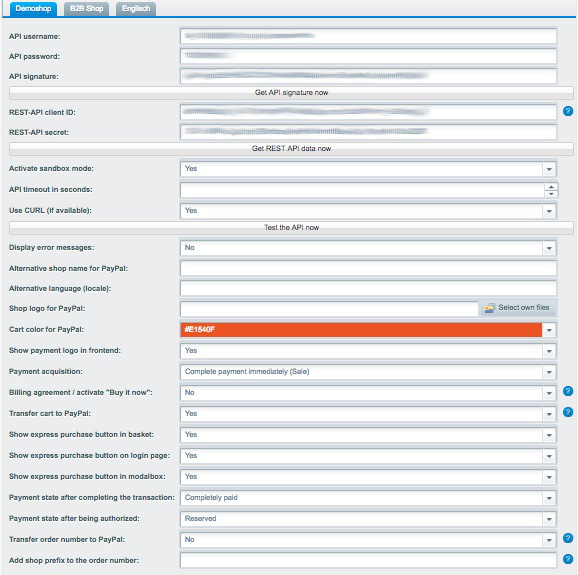
- API username: Enter your API username which you got from PayPal.
- API password: Enter your API password which you got from PayPal.
- API signature: Enter your API signature which you got from PayPal.
- REST-API Client ID: Enter your REST-API Client ID which you got from PayPal, this is necessary for PayPal Plus.
- REST-API Secret: Enter your REST-API Secret which you got from PayPal, this is necessary for PayPal Plus.
- Activate sandbox mode:' If you have a PayPal developer account, you can use this sandbox mode with dedicated API credentials. In the developer mode you got different test users for test purposes. If a real user wants to order with his real PayPal account, this will cause in an error.
- API-Timeout in seconds: This defines the API-Timeout in seconds, if the API doesn't respond, the Plugin will wait this time before the connection will be interrupted.
- Use Curl (if available): With this config you can let PayPal use Curl, if it's available on your server.
- Display error messages: This defines, wheather the PayPal plugin will display errors or not.
- Alternative shop name on PayPal's site: This defines an alternative name on the PayPal site. If you leave this config empty, your shop name will be used.
- Alternative language (LocaleCode): With this option you can set a deviant language for the PayPal site, if needed. If nothing is set here, your shop language is used.
- Shop image for PayPal: Here you can choose your shop logo for the PayPal site. Otherwise no image will be shown.
- Color of the basket on PayPal: Here you can define the color of the cart on the PayPal site.
- Show payment logo in frontend: This shows the PayPal logo in your Frontend.
- Payment acquisition: This setting defines, wheather you want to acquisit your transaction directly or collect later.
- Billing aggreement / Activate "Buy it now": To make ESD items or abonnements buyable per 1-Click, activate this setting. This option (Recurring billing) has to be activated for your PayPal account first!
- Transfer basket to PayPal: Transfers the cart to PayPal
- Show express-purchase button in basket: Shows the PayPal Express button in the cart.
- Show express-purchase button in modalbox: Shows the PayPal Express button in the modalbox.
- Payment state after completing the transaction: This payment state will be set after the transaction was finished.
- Payment state after being authorized: This payment state will be set after the transaction was authorized. This option can only work if you have the option "Billing aggreement / Activate "Buy it now"" active!
- Transfer order number to PayPal: Transafers the order number to PayPal. This is necessary for some commodities management software.
- Add shop prefix to the order number: If you use one PayPal account with more shops, you can avoid multiple order numbers by divorcing the shops by this prefix.
PayPal in subshops
To be completely independent for subshops the configuration has different configuration tabs for each of your subshops or language shops. If you leave the entries empty, they will be inherited from the main shop. Yes/No settings can be inherited by "Inherit". Just enter the desired data in the depending shop.
If you don't want to use PayPal in your language shops, enter invalid API data into the language shops configuration to "break" the inheritation.
PayPal Plus
Introduction
- The product „PayPal PLUS“ has to be activated for each merchant individual, if not yet happened, request the activation at: www.paypal.de/paypal-plus. PayPal PLUS is currently available for german customers only.
Requirements
To use PayPal Plus, the following requirements have to be met:
- PayPal PLUS must be activated for your account. Please mind that you have to activate payment via invoice separately.
- The PayPal plugin is installed, configured and active.
- The PayPal plugins REST-API Client ID and REST-API Secret must be entered! You get the these date from PayPal, you get a guideline in the attached PDF.
Installation
The PayPal Plus Plugin is downloadable over the german Shopware store, because english is currently not supported.
Configuration
The configuration can be made over the plugin settings in the plugin manager or in "Configuration > Basic settings > Payment methods > PayPal PLUS":
- Countries where to display "PayPal PLUS": This defines, in which countries PayPal PLUS will be displayed. Notice, that debit and invoice currently only work in germany!
- Hide payment method chooser in checkout (Shopware 4): This option defines, wheather the PayPal PLUS payment method chooser is displayed in the checkout of Shopware 4. If you set "No", your customer can change the PayPal PLUS payment method only in the account payment settings.
- Overwrite payment method name: Here you can define the name of the PayPal PLUS payment mean which your customer will see before he can choose between the PayPal payment methods.
- Overwrite payment description: Hereby you can overwrite the payment methods description.
Configuration of the webhook
It's important to configure the webhook for PayPal PLUS to avoid problems with changing payment states e.g. a transaction is reserved first and has to get "done".
To configure this webhook, open developer.paypal.com, in "Dashboard" you'll find "My Apps and Credentials". If you choose your App from the "REST API Apps", you can find the webhooks there. To add a webhook, click "Add webhook".
As webhook a URL must be entered which has the following format:
- 'http://www.myShop.de/shop/payment_paypal/webhook' or 'http://myShop.de/payment_paypal/webhook'
- Its the base domain URL with shop path if needed.
- This URL corresponds the notify URL but with "webhook" at the end.
Configuring the "Event Types" you have to configure "All events" also.
Display in the frontend

The single payment means (PayPal, debit, credit card, invoice) will be displayed in an iFrame in the checkout and replace the Shopware integrated payment means. Reuirement for this is, that the customer chooses "PayPal" as payment mean.
The iFrame also has the logic, that if the user still has "PayPal" selected, it will show itself also in "step 3" of the checkout.

How can I test?
In the sandbox mode you can test with your test credentials, which can be added at https://developer.paypal.com/. The easiest way to test this is in the ELV mode, for this you need a real bank code and a random 8 character bank account number.
Sandbox transactions will be concluded in a test environment, no real bank account will be used. But note, that the test environment may not as stable as the productive environment.
FAQ - error codes
10004
Transaction refused because of an invalid argument. The transaction id is not valid
The in-payment could not be confirmed by PayPal, the user has made the payment in his PayPal account, but this could not be verified by PayPal. This may be a technical problem, but can also be a real transaction problem e.g. if the customers bank account or credit card is not flushed.
For Shopware this transaction is not made, in this case an invalid transaction ID (Express checkout token) will be assigned, which starts with EC- . You can find it in Customers->Payments->PayPal. Because the payment is not completed, the payment state will be Open, in such cases, you should check the in-payment in your PayPal account.
After finishing the order and getting back to Shopware the customer will see a message, that problem occured with this transaction and PayPal could not assign a valid transaction ID. The user will see the following message: "An error has occurred and the order could not be finished."
If this behavior is not desired and you don't want to get invalid PayPal orders, deactivate the config option "Transfer order number to PayPal", with this configuration, the user gets back into the Shopware checkout process and is requested to choose another payment method.
At invalid transaction IDs we recommend to check the API timeout first, by default this is set to 60 seconds, if you set it much lower, increase the value gradually until 120-160 seconds. Also deactivate Transfer order numbers to PayPal.
Authentication / Authorization Failed
The API credentials are incorrect.
10002
Security error. Security header ist not valid
The API key is incorrect.
Duplicate invoice
Payment has already been made for this InvoiceID
The order number range is too small, the order numers are still assigned in PayPal.
Shipping Adress State Empty
The field "Shipping Adress State" is required
States are not configured, the following countries requires states:
- USA (US)
- Canada (CA)
- (Mainland) China (CN)
- Japan (JP)
- Mexico (MX)
- Brasil (BR)
How to configure the states you can find in our country settings in the basic configuration.
Invalid transacionID. Transaction id is invalid
The config option "Only authorioze payments" is active, but not active for your merchant PayPal account.
Express Checkout PayerID is missing
The option "Billing aggreement" is active but your merchant Account is not activated for this feature.
Error in cURL request
Operation timed out after 5000 milliseconds with 0 bytes received
This error happens, when the PHP configuration doesn't have a valid set curlopti_timeout.
List of all PayPal error codes
You can find a list of all PayPal error codes at the PayPal developers site. These codes were displayed over the PayPal plugin in the backend of Shopware. Please note, that these error codes are PayPal error codes, which are disowned by Showpare.
PayPal Plus: Access not allowed
This message appears always, when the used PayPal PLUS account is not yet enabled for the live environment.
Don't use PayPal in language-/ subshops
As other plugins too PayPal inherits his settings from the main shop to the language & subshops if no configuration is entered. To disable PayPal in Subshops, just enter invalid API credentials, so that the fallback will be interrupted.