
Plugin: Shopping Worlds Advanced / Storytelling
Installation
This extension can be found in our Shopware Store, the easiest way to find a specific plugin is the search-bar. Complete the order process and login to the backend of your store. Navigate to Configuration > Plugin manager > My purchases. You need to login and click the refresh button. Your new extension is now listed and can be installed. After installing the extension go to the menu entry installed and refresh. Activate the extension. Finally delete the cache under Settings > Cache/Performance > Clear Shop Cache and refresh the backend.
Basic principle
Let’s begin with the most important point: Storytelling – so to convey a compelling narrative – is done predominantly through the use of visuals. This means the story will be told with photos, videos or illustrations. Of course you can conjure rich emotions and images with text—just as a novel demonstrates—however we do not see this often on the internet, especially in the context of sales. This is because for narratives told with text, it could take the reader hours to gradually sink into the history and lives of the story and characters. Online sales does not have time on its side. The average amount of time a visitor spends on the landing page lingers around 20 seconds. If the first impression doesn’t impress, this could be even shorter!
To build your shopping world, we will be using elements which focus on images: banners, banner sliders, Sideview and videos. This is because images are processed in split seconds and engage the viewer on multiple levels. With careful planning, you can use the power of images to captivate the visitor in a very short time. Therefore the focus of your shop will not be on the products alone, but rather their function and how they can provide value to the customer. With the additional information and content you create using Storytelling, you secure a stronger brand identity and encourage the customer to return to the shop.
Overview - what must be done?
Develop a story:
- What do you want to convey to each target group?
- Which story do you want to tell?
Compile your images and content
- Collect photos / videos
- Arrange text, information and products
Design a blueprint:
- What should the different sections contain?
- What should the grid look like on which you build your story?
- Where should specific elements be placed?
- How should the individual elements behave?
- How should your shopping world appear on different devices?
Implementation in Shopware:
- Create a shopping world as “Type: Storytelling"
- Define the grid, assign a category and assign viewports where this shopping world will appear
- Create sections and fill them with content
- If necessary, duplicate and adjust the shopping world for different viewports
Develop a story
In the first step, you need to consider the basic structure of your story. Should the content be displayed full screen, divided by chapters (“Type: Storytelling”) or should the features of Storytelling—such as Quickview and Sideview—appear within the format of a classic shopping world (“Type: Classic shopping world”) with resize/masonry effect?
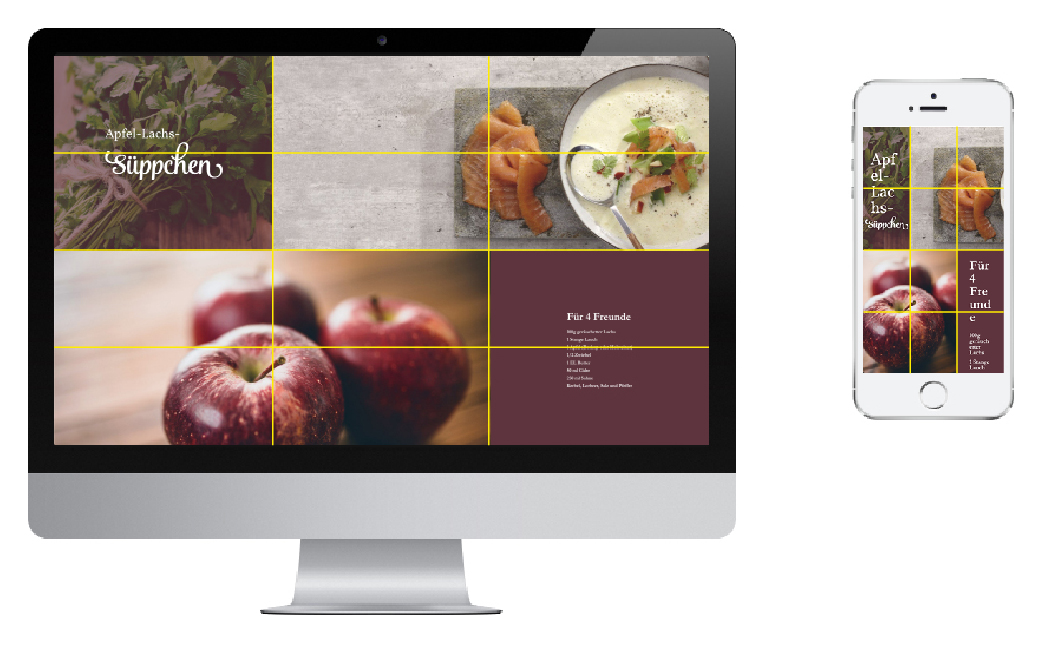
There is no general rule of thumb when each type should be used—in fact, there are actually benefits to using both. However, two benefits are connected specifically to stories which are delivered in chapters (“Type: Storytelling”): firstly, users memorize stories notably better if the content is presented section wise; secondly, content can be best summarized when grouped in useful sections. As an example, a culinary shopping world could be called “Recipes”, in which each section contains one recipe with instructions, images and the products required to make the recipe connected with a Sideview element. Grouped together, the visitor is given valuable information that can be quickly understood. Depending on the product range offered in the store, there are several scenarios in which telling a story through sections can be utilized to bring greater user experience. To strengthen the personality of the story, it also makes sense to plan the order of the sections, so that each section leads in to one another to build a complete story together. Returning to the example of the “Recipes”, this shopping world covers a complete menu. For the appetizers (soup and salad), then the main course followed by a desert and digestive to cap off the meal. Just a small teaser precedes the whole story. A special spice section is inserted in the middle of the story to bring in a bit of contrast.
First you should consider both what you want to convey and to whom this story should be told. Should a single product or complete product rage be advertised? Should a product or product range be promoted through the story? Do you want to promote your company and strengthen your brand? Are you using a story to reach out to end customers or B2B customers? What is the age group and lifestyle of your target group?
Logically constructed stories infuse your products with value, which leads to deeper customer engagement. Of course, this method of engagement suits emotionally charged branches such as fashion, food, toys, etc., but even supposedly “dry” branches such as technical equipment, machinery and the like can stand out from the competition by means of storytelling. Take for example: a high-quality tool manufacturer. You can lead section by section through the company’s history, sharing content that infuses the brand not only with high quality, but also tradition, stability, honesty and trust. What about steel parts manufacturers in the automotive industry? Even in the B2B sector a brand can stand out when supported by storytelling. In this case, the customer could be taken through the production process, beginning with the careful selection of raw material to the end stages of fine tuning and precision.
The following information deals expressly with the advantages of creating “Storytelling” shopping worlds.
To consider:
- What do you want to convey?
- What is the purpose of the story?
- Who is your target audience?
- What kind of story will most effectively reach your target audience?
Compile your images and content
Storytelling naturally does very little without the necessary images. In this step you will collect the images and content that will create an atmosphere that compliments the products and story you want to tell. As the price tag for hiring a professional photographer can run into the thousands, few businesses have the resources to create original images for this product staging. Luckily there are several tools available so that you can easily work around this financial obstacle. For stores that sell products from a manufacturer, it is always worth a try to contact the manufacturer directly and request and product images or videos they might have available for you to use.
Another option is to use stock images /videos. There are numerous vendors that have tens of millions of photos available to be purchased. Among the largest and most popular include:.
- istockphoto.com
- shutterstock.com
- fotolia.com
Depending both the provider and quality / size of material, the range of prices span from very little to the hundreds. Discounts might be available depending on the form of payment (credit vs. subscription).
It is also possible to use free images for commercial use. This means you do not have to pay for the rights to use the image. There are dozens of websites which collect these images and make them available for this purpose. From an aesthetic standpoint, often times these are much more modern and exciting. The disadvantage is that these sites are often difficult to browse through and have significantly less material. It also might be difficult to find a series of photos which come from the same photo shoot (and therefore complement one another). Among the better known sources include:
- unsplash.com
- pexels.com
- gratisography.com
There are also numerous sources that compile an overview of the free stock websites (i.e. thesticks.im). The majority of images on these websites are subject to the Creative Commons Zero license (CC0), making them also completely free for commercial use. However, note that some images might require you source the original author. Should this be the case, you will be informed directly on the website.
Worth mentioning: you will find a combination of these options in our Shopware 5 demo. We made use of images provided by the manufacturer, purchased images as well as free stock images.
Now that you have your sources, consider the overarching theme and style of the images. Which images will grab the customer emotionally? The answer largely depends on the products that will be linked to the story and your target audience. Therefore you should consider not only the emotions and values traditionally associated with the products, but also the age and general life style of your target group.
Please note that this concept does not apply to product images (the actual images of the product, usually with a white background)—these are important for listings and detail pages, but not for storytelling. To detail this we can look into the categories “Mountain air & adventure” and “Cooking pleasure & Provence” in our demo store. The “Mountain air” category advertises skis, snowboards and the equipment to match a downhill adventure; “Cooking pleasure” highlights fish, spices and other culinary specialties.
"Mountain air & adventure": Ski & snowboarding is associated with action, adrenaline and shared experiences with friends. For some, this is also a life style and associated with values such as courage, freedom and power. The target audience is typically young / youthful in spirit and looking a memorable adrenaline rush. Therefore we chose to create a story with images that mirror these qualities –action images with high levels of movement and energy, people who are beaming with joy on the mountain, vistas with expansive views and rich contrasting colors.
"Cooking pleasure & Provence": In comparison, this category places the joy of cooking within a calm atmosphere that references evenings enjoying food in the company of close friends. We also chose to invoke the feeling of taking a relaxing trip in order to explore the palate of another culture, conveyed by images of regions with a particular culinary flair. As cooking is also associated with health, organic beauty, quality and tradition, we highlighted quiet images of ingredients and dishes that are reminiscent of a still life painting. When drafting our blue print, we wanted to use the form of storytelling to compliment the feeling of strolling through a market, looking for fresh produce.
This imagery can be strengthened even further when infused with additional content, such as information about ski ranges or ideas for recipes. When compiling the images for your story, you should simultaneously consider the products that will be linked to the story (either by image mapping, Sideview or as a standalone element in the story).
These are the basic components that we need to tell our story. You not only link emotions with your products but also offer customers added value and strengthen our brand identity, in such a way that would not be possible through impersonal marketplaces such as Amazon.
To dos:
- Compile the Images / videos / text / content / and products that you need to tell your story.
Design a blueprint - what must be considered?
After creating a concept for your story and compiling the required images / content, you are ready to bring everything together in the design phase. At this point it makes sense to sketch a rough idea of the structure with pen and paper. If you are comfortable using Photoshop or other design programs, by all means take advantage of these tools. Decide at which story point you should use a specific image / banner / video and determine when you want to link your products using Sideview. At this stage it is also important to consider how the shopping world should behave on smartphones and tablets.
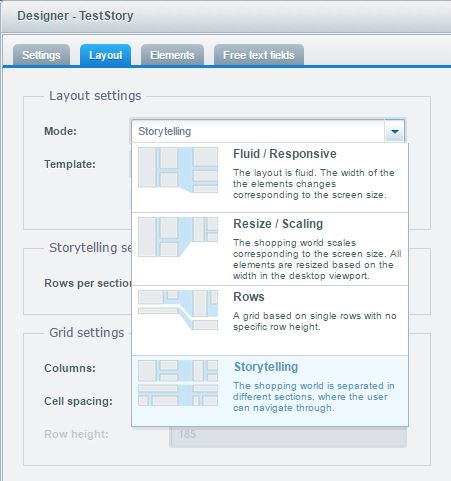
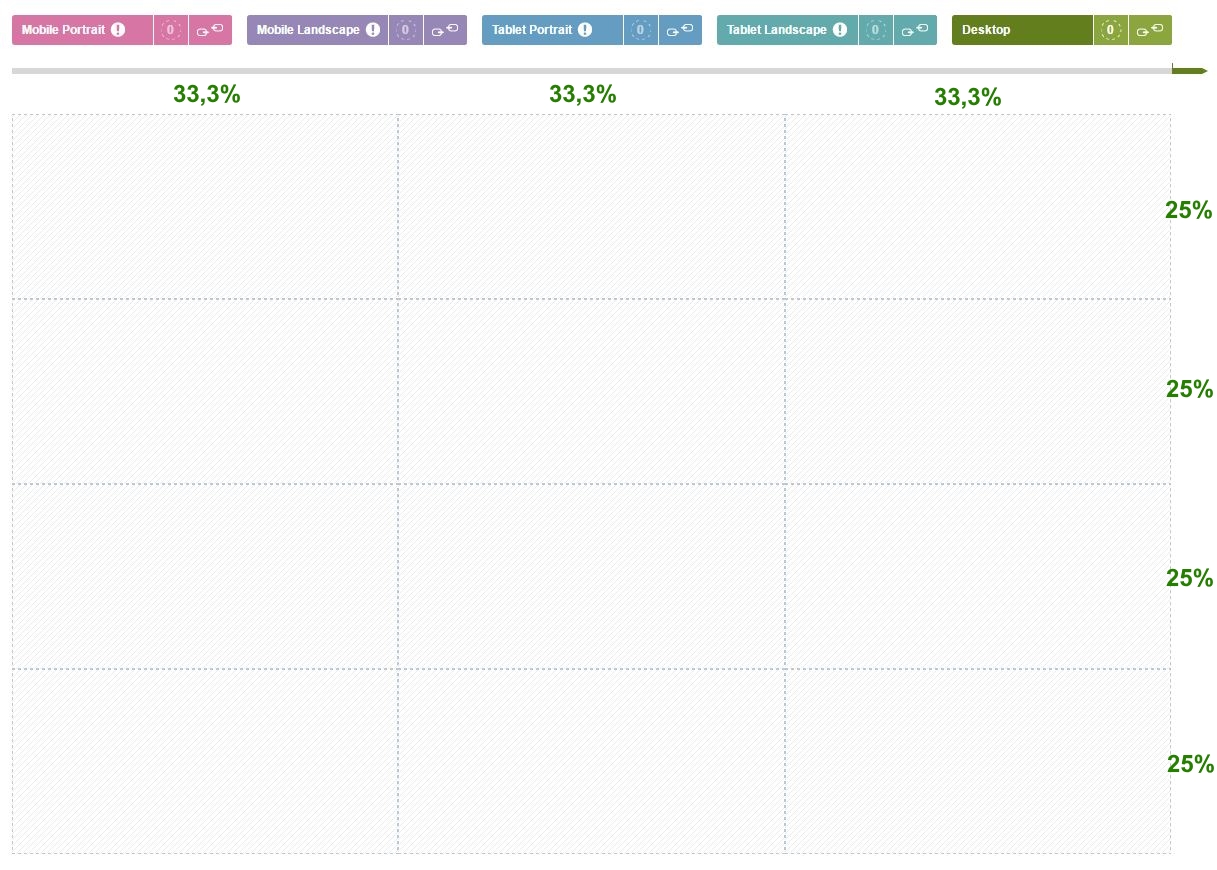
For this you must keep in mind that shopping worlds are built using a grid system. Pages can be divided into any number of rows and columns. When the type is set to Storytelling, each page is presented full screen with sections divided by percentiles. For example, if there are 4 lines and 3 columns per section, each row represents 25% of the total height and each column 33.3% of the total width:
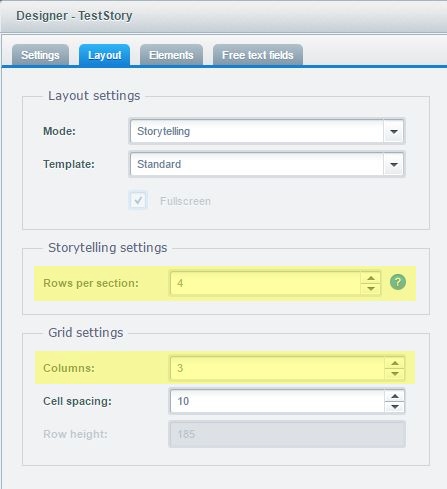
Lines can be configured directly in the settings for every shopping world. For columns, you can either choose from one of the default layouts or create your own divisions in the expert settings. Please note: the settings for “Line Number” and “Cell height” have no influence when the type is set to “Storytelling”, since they are already defined in the shopping world—this setting only applies for “Classic shopping worlds”.
After saving your settings, the grid is ready to be filled with various image-based elements such as banners, Sideview, etc. Here you also have the option to expand an element so that it covers several cells. You should always keep responsivity in mind when deciding where to place an element. In most cases it makes sense to set up the shopping world differently for mobile devices. For example, if you have 4 different elements in a section that behave well on a large screen (or screen that is oriented horizontally), they will appear far too small and restricted on vertical displays, especially on a smartphone. Continuing with the example of a grid with 4 rows and 3 columns:
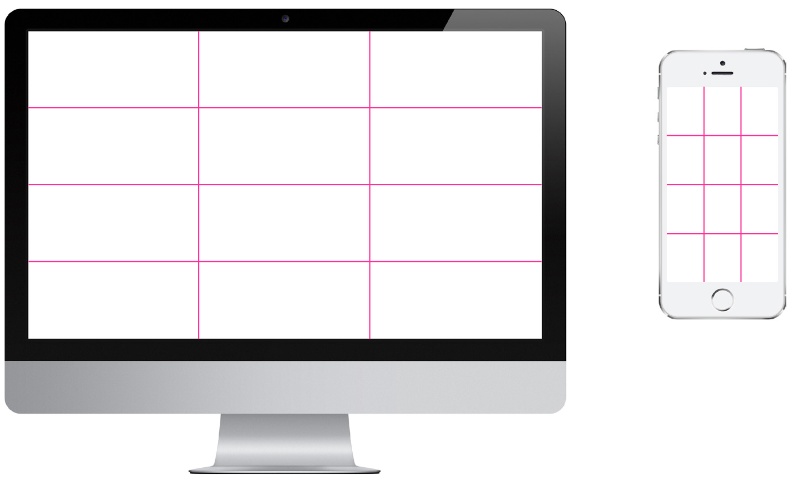
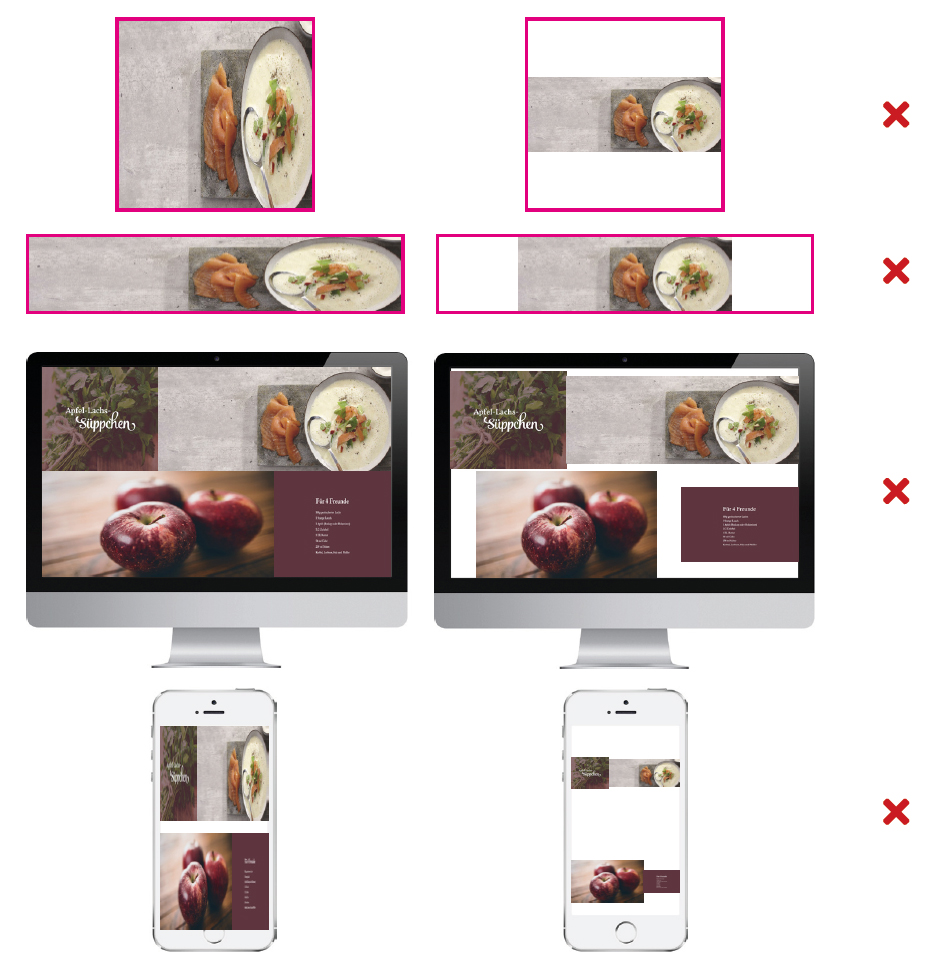
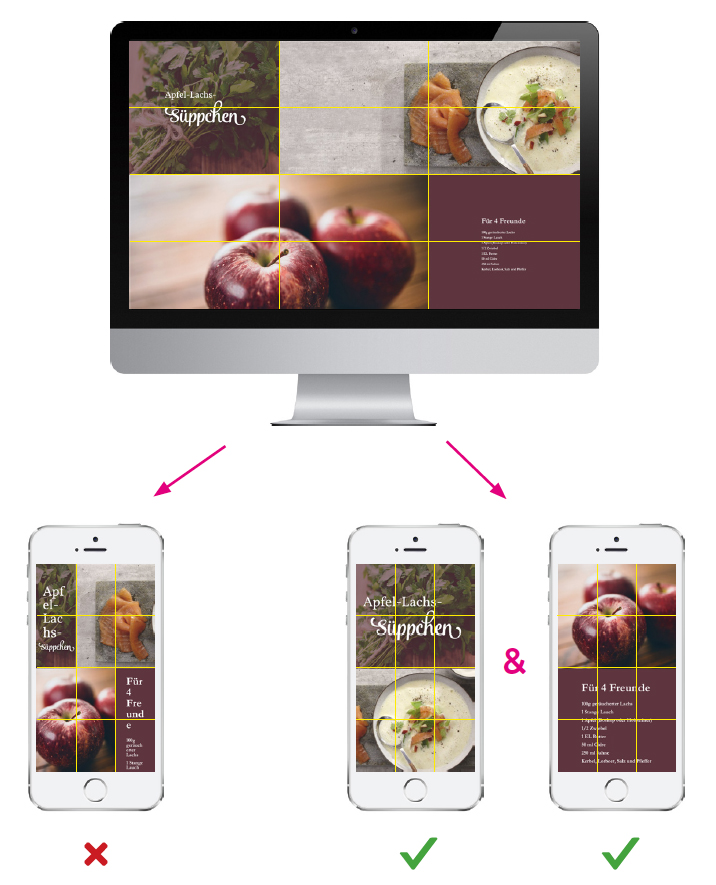
Without adjusting the shopping world for different viewports, an individual section filled with 4 elements (i.e. DigitalPublishing-Banner, Sideview, image or banner slider) would appear as follows:
Here you see the content is not displayed properly for mobile devices. Generally, simple images where the subject is framed in the center (such as the apple) will be properly displayed. However, images that contain text / a subject that is off-centered (such as the soup) must be adjusted in order to appear in the visible range of the grid. In order for background-images and banners to automatically adjust to the height and width of a cell, we are working with the cover method, which behaves like the CSS property background size: cover, therefore the aspect ratio is also maintained.
Important: cover effect in different element sizes:
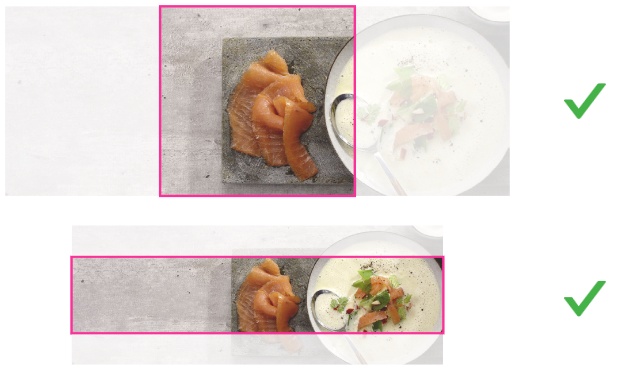
This is the safest option when creating well-rounded, seamless shopping worlds where neither the images are distorted on different devices nor the storytelling loses its affect due to unsightly empty spaces in the display.
With the exception of HTML5 video, all simple image elements (banner, banner slider, Sideview) use the cover method. For DigitalPublishing-Elemnts, this can be configured in the banner itself. For HTML5 video elements, you can choose whether or not the cover method should apply (Video mode: Fill), or to take on the properties of one of the images shown above. We do not recommend “Video mode: Stretch”, as this changes the aspect ratio distorts and the video (as shown in the image to the left). However, “Video mode: Scale” would work well, as any empty space is filled with black bars, as is the standard for YouTube videos.
For banner sliders, each slide is automatically scaled toward the center point. For simple banner and Sideview elements, you can define the direction in which the image should be scaled. This makes it possible to control the display so that the subject is always in view.
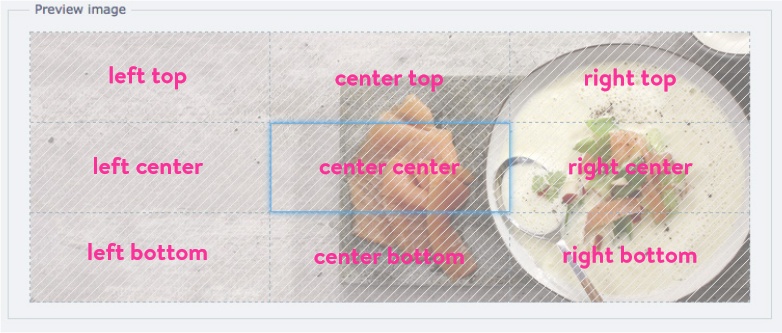
Here there are 9 areas to choose from. These correspond to the CSS properties background position: top / bottom / left / center. Without specifying a direction, the image will automatically scale toward the center point. See the following two examples, which have been assigned different targets:
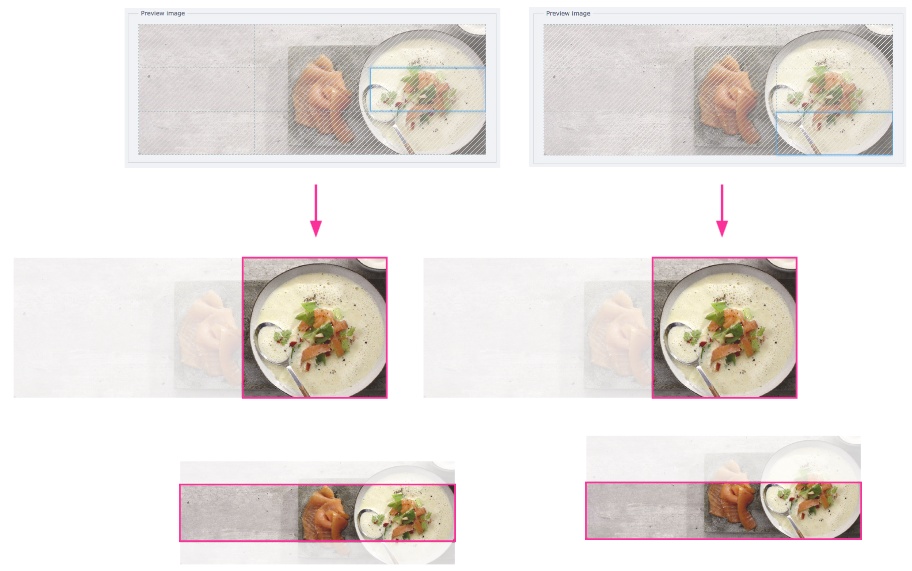
The most important factors to consider when designing a responsive shopping world are grid fluidity and seamless behavior of the elements contained therein. There are thousands of different devices from which shopping worlds can be accessed, all of which may differ in terms of display height & width. Please note: fixed pixel values for the dimensions of images or banners are completely irrelevant! The important thing to consider is the subject of the element and where the focus should lay.
Digital Publishing offers endless possibilities for building custom banners - for more info, visit our wiki here
When customizing a shopping world for different display sizes, it is also important to consider adjusting the layout of the elements. Here you have the option to create an entirely different grid (filled with either the same or completely new content), however in most cases you can simply rearrange the elements to accommodate the new viewport. To detail this: in our example with 4 elements, you can very easily adjust the shopping world for mobile viewports by redistributing the elements across 2 full screen sections. When combined with assigning the target for the image display, the redesigned shopping world looks like this:
Keep these points in mind when drafting the blue print for your shopping world. When designing shopping worlds for multiple devices (as is always recommended), proper planning leads to a much smoother implementation workflow.
Now a few tips:
- Most prefer to start with a concept for larger devices (desktop / tablet landscape) then scale down. However, you start with a concept for smaller devices, it is easier to par down to the essentials and build a crisp, concise story.
- It often makes sense to use less content for mobile devices. This decreases the load time and makes for better usability from the customer’s perspective.
- In most cases, shopping worlds for desktops also work for tablet landscape portraits.
- Mobile landscape displays are often smartphones that are horizontally rotated, therefore they have a low height. The same applies for portrait mode on tablets.
- We recommend working with a simple grid (so no more than 2-3 rows and 3-4 columns), especially for users with beginners design experience. This makes it easier to adhere to a consistent design throughout the story.
- Less is more! Instead of using one element per cell, stretch less elements across several cells. It often suits the design to create a full screen section by stretching one element across every available cell.
To dos:
- What should the different sections contain?
- What should the grid look like on which you build your story?
- Where should specific elements be placed?
- How should the individual elements behave?
- How should your shopping world be displayed on different devices?
The implementation
After laying out the groundwork for your shopping world, you can implement your design using the Shopping Worlds module in your Shopware backend.
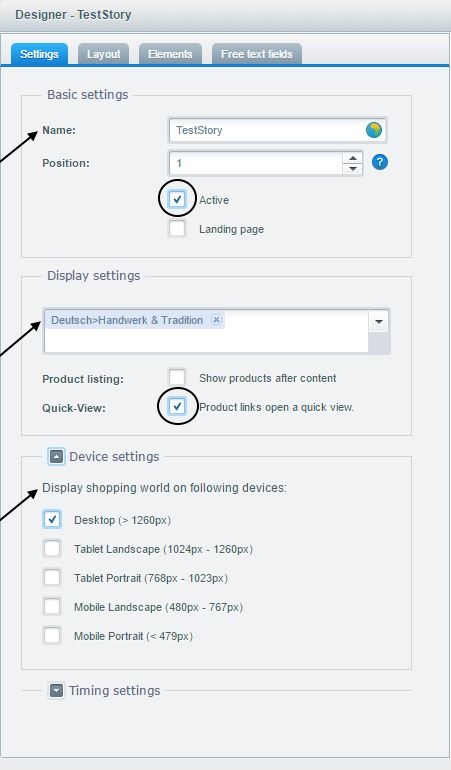
First click on “Add shopping world”, assign a name (i.e. the assigned category), select “Type: Storytelling”, specify the number of rows for every full screen section and select the number of columns for the grid. Select which viewports will display this shopping world in the “Select device” area of the window. Finally, assign a category—this is where the new shopping world will appear in the frontend when “Active” is checked. As a tip, we always recommend activating Quickview, as this displays the details of a product in a modal box and creates for a smoother journey through the story. All other settings, unless relevant, can be left empty in this step.
After saving your settings, you will be redirected back to the overview. Select the edit icon of your new shopping world in order to begin working with the designer:

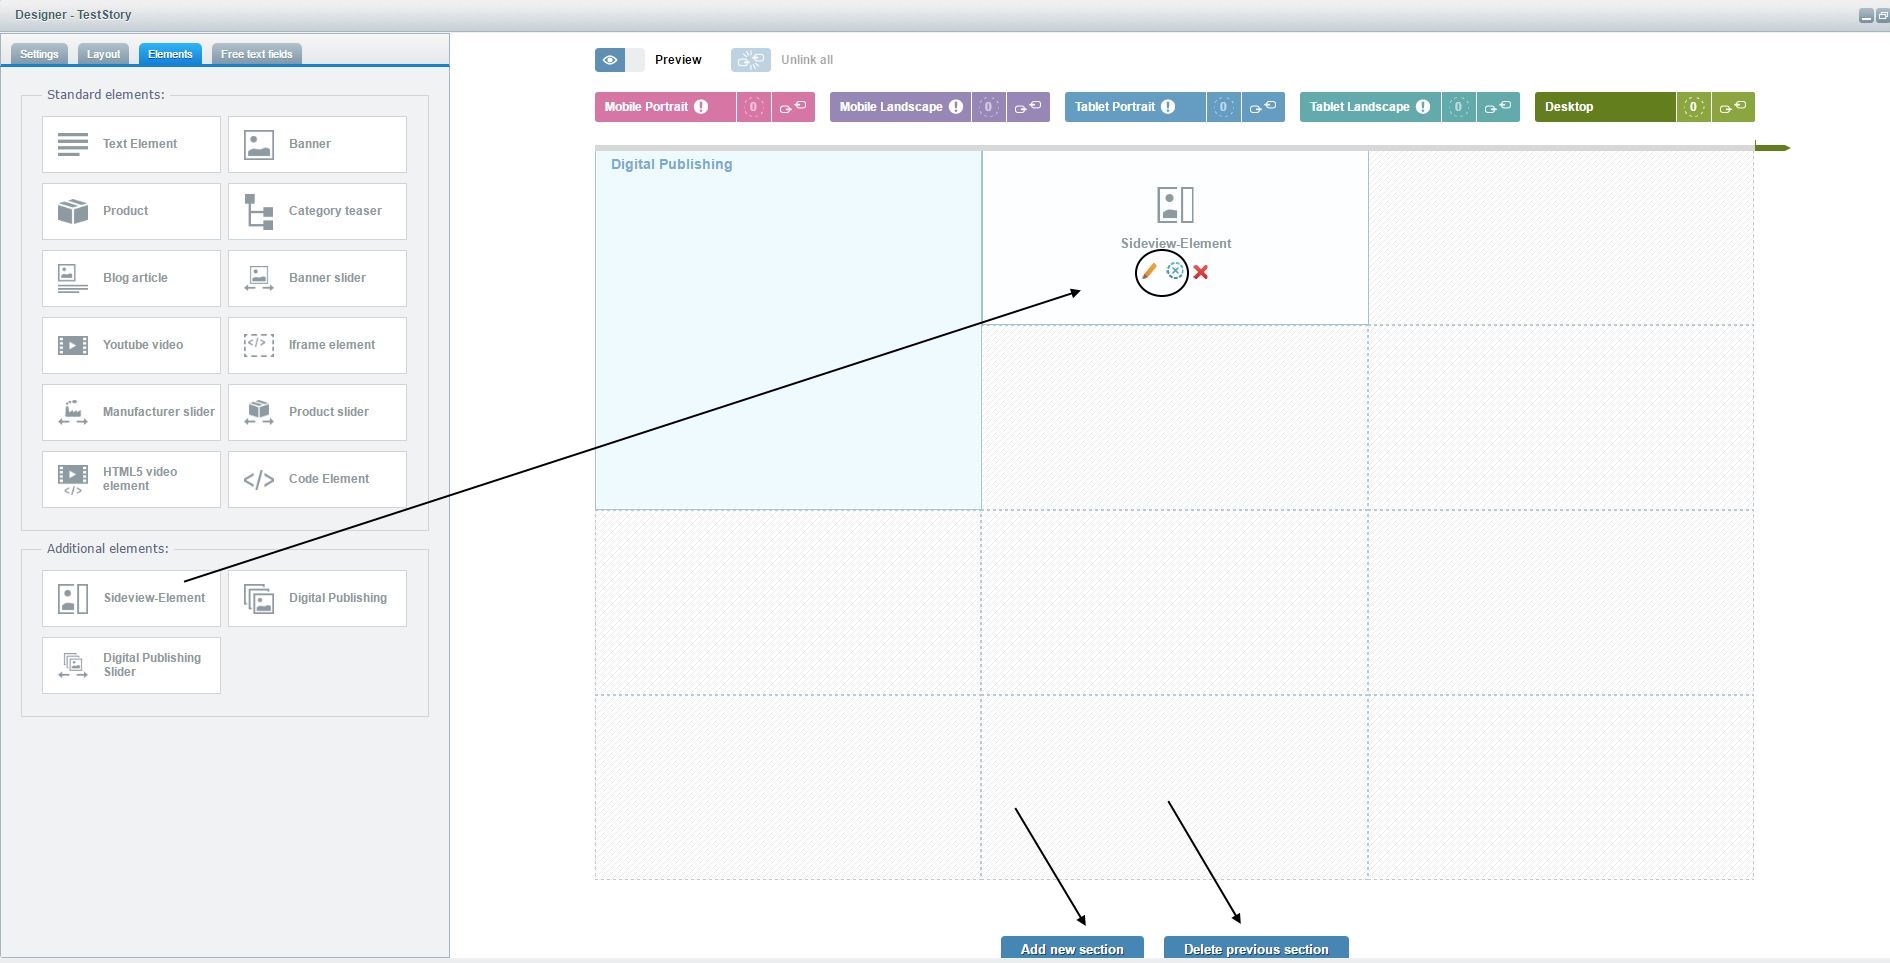
When working with the designer for a new shopping world, only the first section of your new grid is displayed. Select an element from the library and assign it to a cell using drag & drop. After placing an element, you can change the size so that it covers any number of available cells. Click on the edit icon to being adding content to the element.
To add a new section to your story, select the “Create new section” button. In the frontend, these separate sections will appear as buttons, which can be navigated per click or scroll. Caution: when selecting “Remove above section”, all elements contained within will also be deleted!
If you want to delete a section but save select elements that have already been completely configured, simply create a new section, drag in the corresponding elements and delete the undesired section.
When creating a new shopping world, it is absolutely vital that you repeatedly test how it behaves in the frontend of various devices (i.e. several mobile displays), since one cannot know the screen size / aspect ratio of the end users device. Although few people have access to an open device lab, you can still simulate these various viewports by scaling your browser or use developer tools (available in Chrome).
Once you have tested your shopping world and are satisfied with the results, you can duplicate the shopping world so that it can be quickly configured for a different device. When copying a shopping world, all content and settings are also copied. To make a duplication, simply select the copy icon and assign the copy to a device.

After creating a copy, select the edit icon and configure the shopping world for the display of the assigned device. Under the “Settings” tab, you can assign additional devices as well as change the grid, if desired.
To dos:
- Create a shopping world as “Type: Storytelling”
- Define the grid, assign a category and assign viewports where this shopping world will appear
- Create sections and fill them with content
- If necessary, duplicate and adjust the shopping world for different viewports
Conclusion
Storytelling offers a multitude of advantages—it allows you to satisfy the visual appetite of customers browsing from diverse devices, differentiates your shop not only from the competition but also eBay and Amazon, strengthens your brand identity and charges your products with value, especially when presented alongside content regarding its use/application.
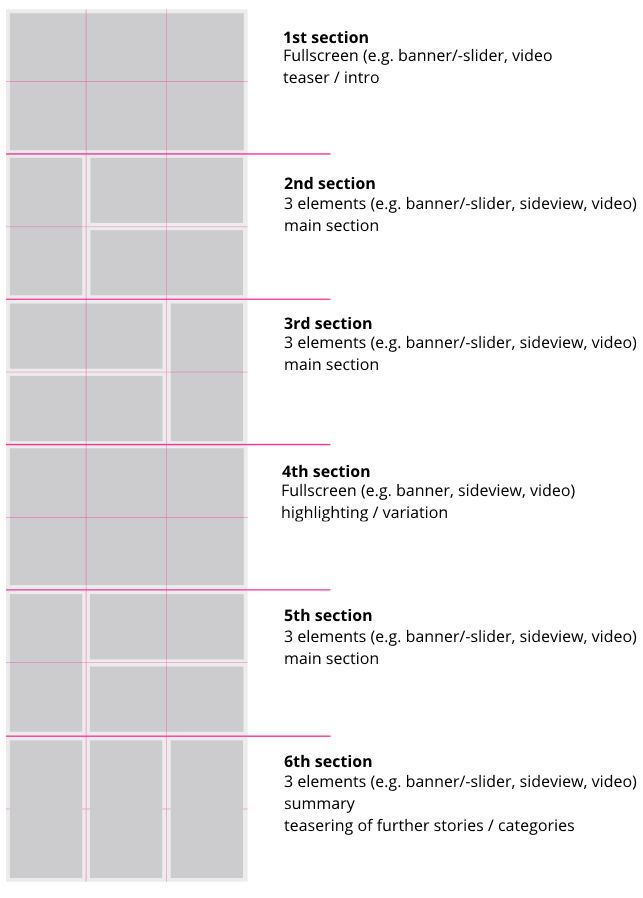
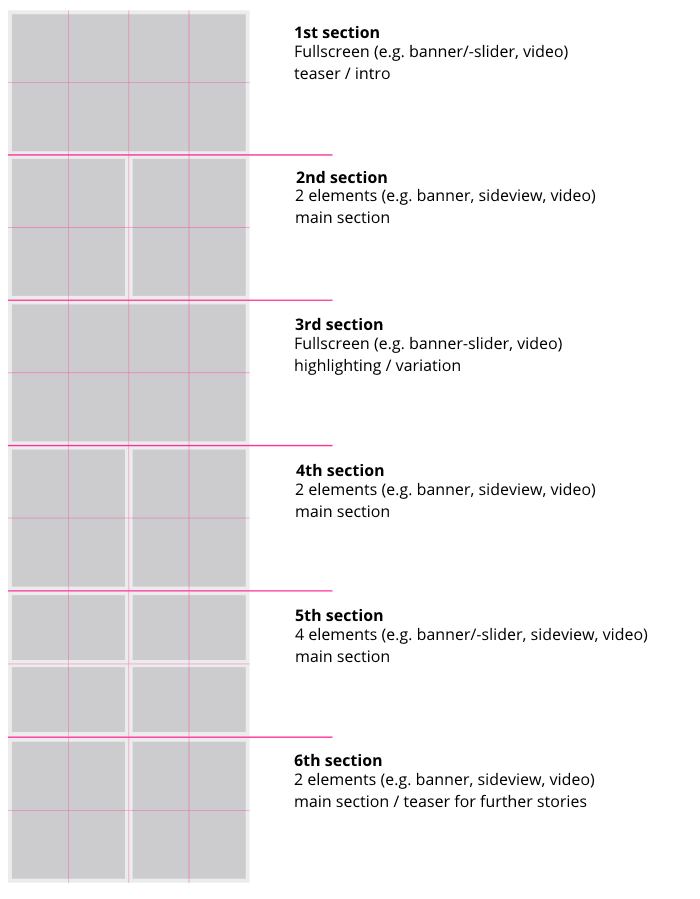
In closing, we have put together some suggestions how a simple grid can be used to create a diverse collection of well-designed shopping worlds.
Appendix 1
Appendix 2
hier
Quickview in the frontend
Since Shopware 5.3 it is possible to use the product quickview in product listings and sliders. Before, this was only possible in shopping worlds.
Settings in backend

To enable this feature, open the plugin settings for the Storytelling plugin from the Plugin Manager. There are three configurable options for the quickview:
- No: Quickview in listings and sliders
- Quick view in all listings and sliders: also when clicking on product name or image
- Only when clicking the details button: Predominantly useful for products with variants in conjunction with the buy from listing feature described above.
Display in frontend
Regular Product
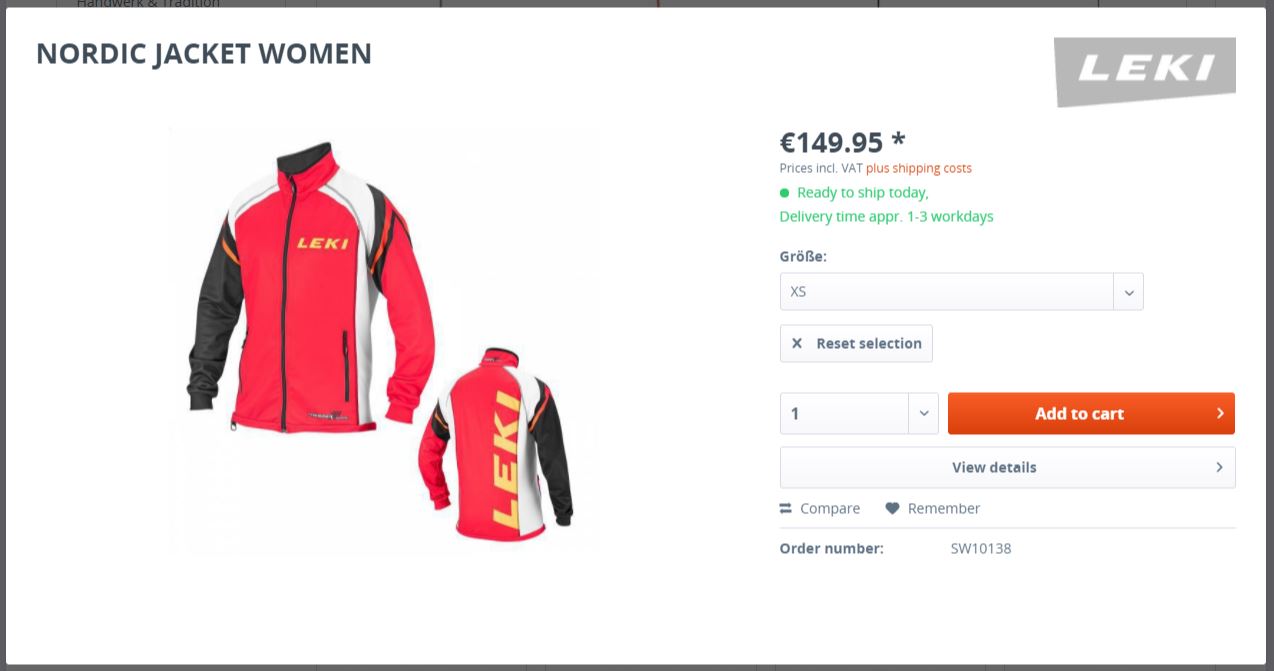
A quickview of a regular product with no variants contains all basic information plus the 'Add to cart button. Additionally, the user can open the detail page by clicking on a deticated Details button.
Variant Product

The quickview for a product with a variant additionally contains the variant configurator, which allows the customer to select and buy a variant right from within the quick view.