
Plugin: backend orders
The backend orders plugin is ideal for creating orders from the backend. In case of your customers call, fax or email you and want to buy something, you can easily place the order via backend. The module is also able to classify the incoming orders by type in the anlysis module.
Installation
This extension can be found in our Shopware Store, the easiest way to find a specific plugin is the search-bar. Complete the order process and login to the backend of your store. Navigate to Configuration > Plugin manager > My purchases. You need to login and click the refresh button. Your new extension is now listed and can be installed. After installing the extension go to the menu entry installed and refresh. Activate the extension. Finally delete the cache under Settings > Cache/Performance > Clear Shop Cache and refresh the backend.
Plugin settings
After installing the plugin you can setup it directly in the plugin page or via Configuration > Basic settings > Additional settings > Backend orders:

Guest account e-mail (1): This email is used for guest accounts, which are created when your customers don't have an account in your shop and want to order by phone for example.
Desktop types (2): With the desktop typesyou can set the channels on which the orders come in, for example, phone, fax or email. Different entries have to be separated by a comma (,).
Send confirmation mail as default (3): If enabled the system sends a automatic order confirmation upon creating an order in the backend.
Create an order

After installing the plugin you get the additional button create order (1) in the order overview to place orders in the backend.
Create a new order

User account (1): Create a new user account.
guest account (2): Create a quest account.
existing customer (3): Search for an existing customer.
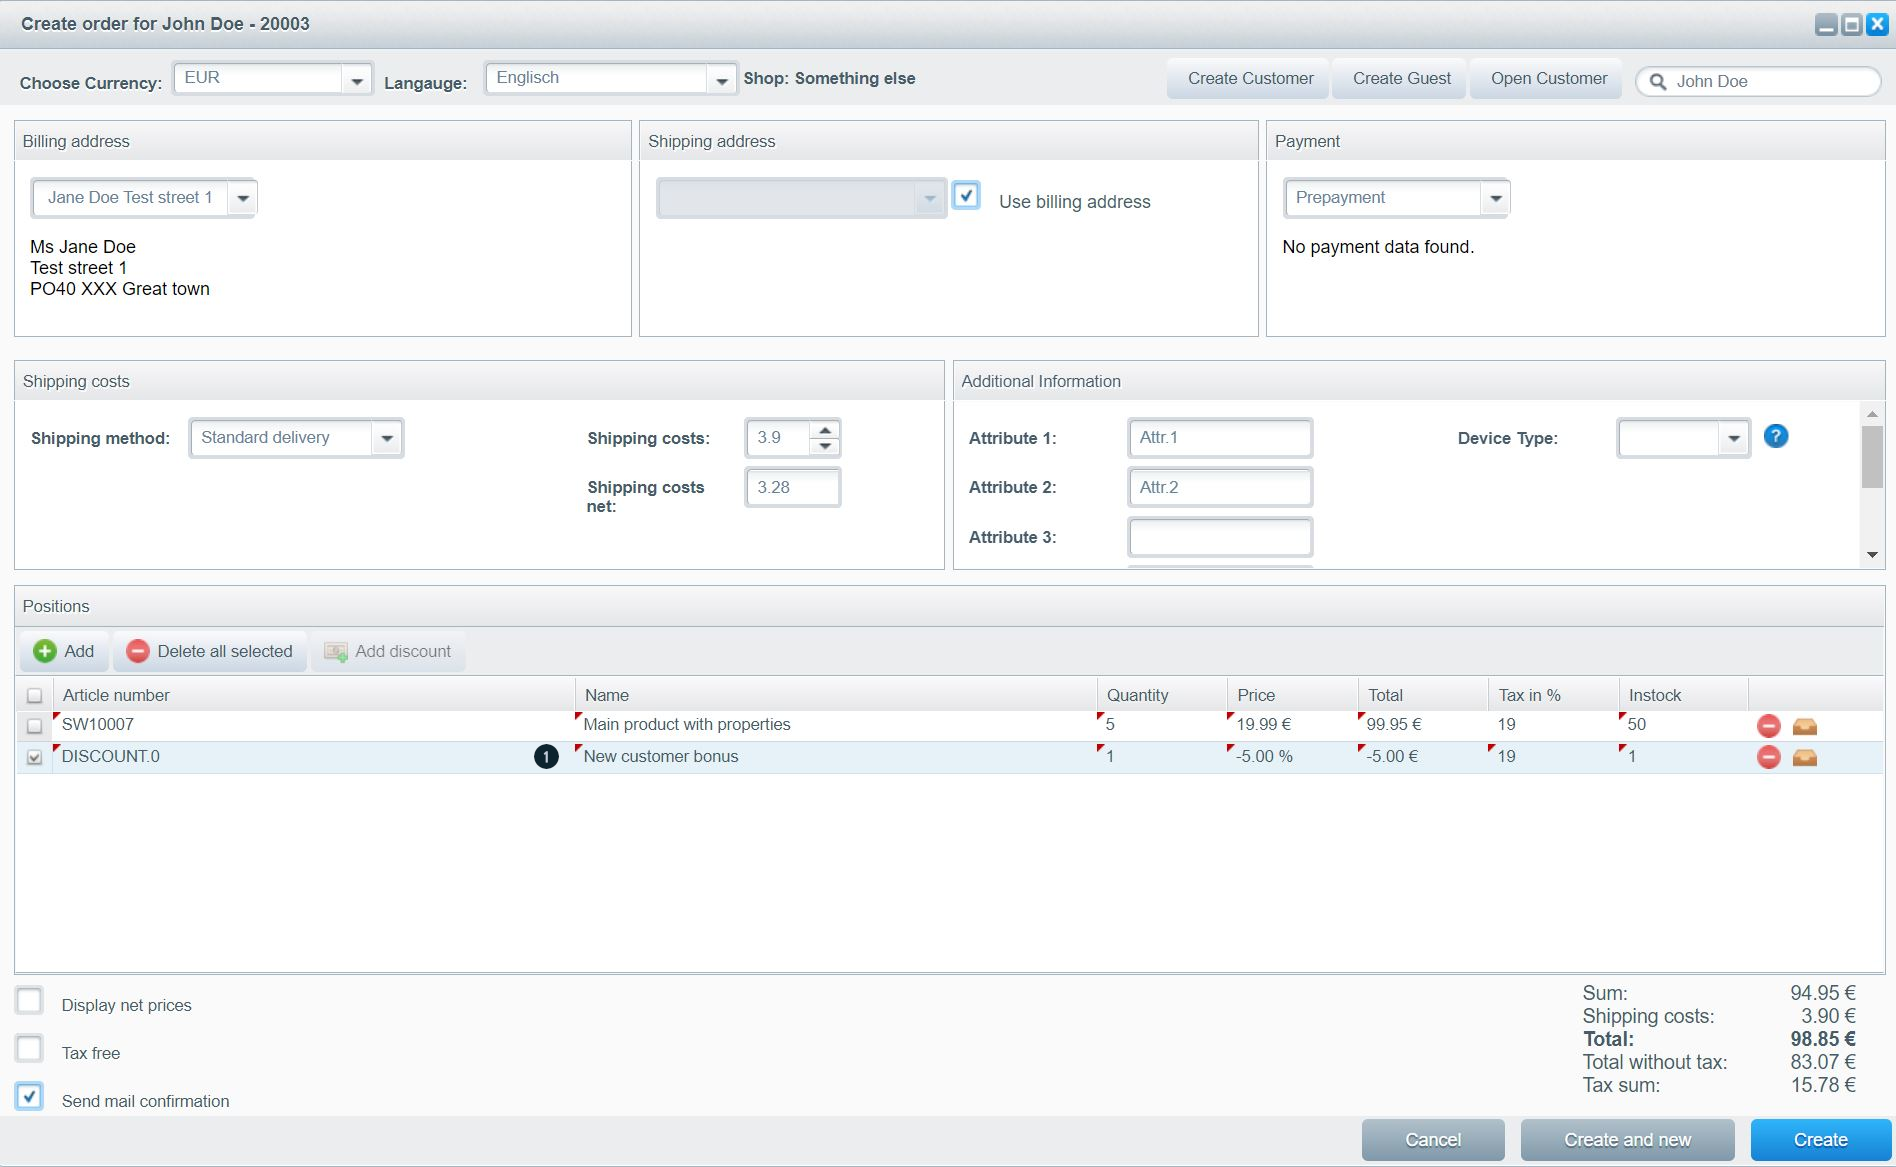
Customer details

Billing address (1) : Use the drop down menu to select an existing billing address for this order.
Shipping address (2) : If the shipping address is the same as the billing address, press the checkbox. If not, you can choose an existing shipping address from the drop down menu.
Payment method (3) : Select an existing payment method from the drop down menu here.
Order information

Shipping costs
Choose the shipping method (1) you want to ship with, the shipping costs will be entered automatically. If you want to override the default shipping costs, you can do this in shipping costs (2) and shipping costs net (3).
Additional information
In the free text fields (4) you can set the free text fields if you work with them. Additionally you can set the device type (5), this is the channel, over which the order has been placed (phone, fax, etc.).
Positions

Add (1): Lets you add positions to your order.
Add discount (2): Lets you add an individual discount to this order. You can only add one discount per order.
Article number (3): Search by order number or name, click to add the article to the order. The article details will be filled in automatically.
Name (4): Search by name or order number, click to add the article to the order.
Quantity (5): Enter& the desired article quantity that you want to add.
Price (6): Is automatically filled, but can be changed by clicking the field.
Total (7): Shows the sum of this position.
Tax in % (8): Shows the tax rate which is used for this item. This can be changed by clicking in the field.
Instock (9): Shows the amount of items in stock.
Delete position (10): Lets you delete the entry, a pop-up will ask for confirmation.
Open position (11): Opens the article.
Cart value (12): Shows the amount of your order live. After any action, it will recalculates itself.
Add discount

The discount is using four settings:
- Type (1): Choice between an absolut and procentual discount
- Tax (2): Which tax is used on the discount
- Value (3): The value of the discount
- Name (4): The name of the discount, which will be displayed in the order confirmation or the order documents.
The discount (1) is displayed like an article, but can not be altered afterwards. To change aspects of a discount you have to delete the old one and create a new one right away.
Create (and new)

In the lower right corner you'll find three buttons to cancel or create the order:
Create and new (1): issues the order and directly opens the backend order window again. This is most sensible if you plan on making up several orders in a row.
Create (2): issues the order, closes the current window and opens the order's details page.
Analysis
Our comfortable analysis gives you a nice overview of the amount of orders which have been places by the different devices.
The analysis can be opened using Marketing > Analysis > Analysis > Turnover by device type

Shop (1): Choose the shop for your analysis.
Filter (2 & 3): You can set a date range to filter the result.
Update (4): Updates the results based on the filter.
Export (5): Use this to export your filtered results as a CSV file.
Display as table/chart (6): This button lets you toggle between a chart and table view.