
Shopware Payments
Shopware Payments is a standalone Shopware product built on PayPal infrastructure. The solution is fully integrated into Shopware and managed directly through the Administration.
It allows you to manage, activate, and optimize payment methods directly within your Shopware Administration - without additional systems or complex integrations.
The solution is based on PayPal's global infrastructure. This enables you to offer international payment methods and benefit from reliable payment processing, integrated compliance, and a scalable technical architecture. Transactions, operational processes, and support are centralized in one place, reducing administrative effort and simplifying onboarding.
At the same time, your payment strategy remains flexible. Shopware Payments is not a closed payment ecosystem and does not replace existing payment service providers. Thanks to its open architecture, you can continue using external PSPs or integrate additional providers. This allows you to build a payment ecosystem that matches your individual requirements - without lock-in or restrictions.
Requirements
Supported Versions
Shopware Payments is supported for the following Shopware versions:
Shopware 6.5 starting with version 6.5.7.0
Shopware 6.6 starting with version 6.6.3.0
Shopware Payments is available as a service starting with Shopware version 6.7.1.0.
Merchant Requirements
Valid Shopware installation
PayPal Business Services in a supported region
Depending on your business model, additional verification and compliance checks may be required.
Availability
Shopware Payments is available in all Shopware plans:
Shopware Community Edition
Shopware Rise
Shopware Evolve
Shopware Beyond
The basic support model remains identical across all plans. Response times and SLAs depend on your respective Shopware plan and can be reviewed on our website.
Regional Availability
Shopware Payments is currently available for merchants in Germany and Austria.
Additional EU markets as well as the United States will be added gradually. Availability depends on the regulatory and operational requirements of the respective region.
Getting Started
Installation Note
Depending on your Shopware version, Shopware Payments is provided differently.
Shopware 6.7.1.0 and later
Starting with Shopware 6.7.1.0, Shopware Payments is part of Shopware Services.
You can activate Shopware Payments in the Shopware Administration under Settings > System > Shopware Services.
Once activated, you can access Shopware Payments directly in the Shopware Administration:
- Main navigation > Shopware Payments
- Settings > Payment methods > Shopware Payments
From there, you can start the onboarding process immediately.
Shopware 6.5.7.x to 6.6.10
For Shopware versions 6.5.7.x to 6.6.10, Shopware Payments is provided as an app.
To install the app:
Open the Shopware Administration.
- Go to Extensions > My Extensions > Apps.
Search for Shopware Payments.
Install and activate the app.
After activation, you can begin the onboarding process.
Overview
The overview page serves as the central entry point for Shopware Payments.
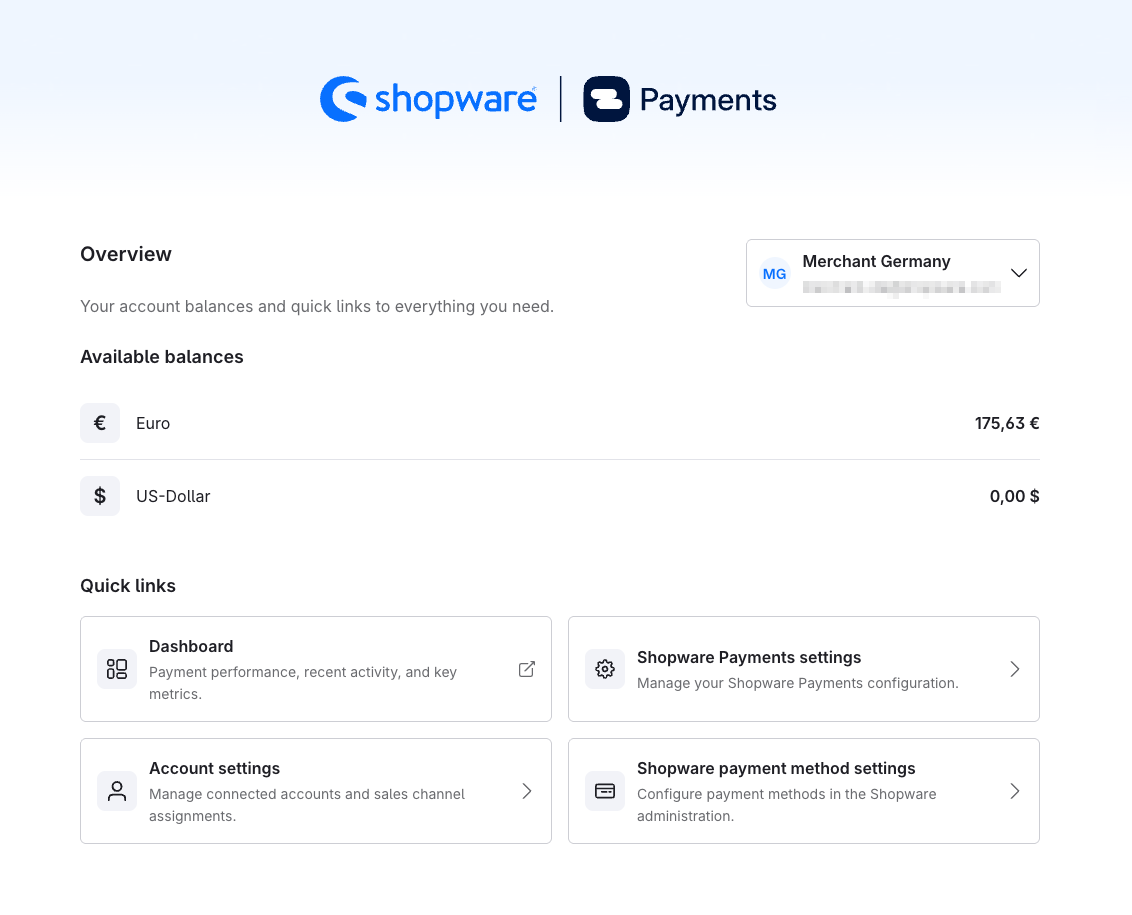
It provides an overview of the most important information about your connected Shopware Payments account, as well as quick access to key configuration and management areas.
Setup Assistant
If Shopware Payments has not yet been fully configured, the overview page provides a setup assistant to guide you through the next required steps.
The assistant is displayed, for example, if no sales channels have been assigned to a Shopware Payments account yet or if no Shopware Payments payment methods have been activated for the corresponding sales channels.
This allows you to complete the setup step by step and start using Shopware Payments in production.
Select Account
The account selector allows you to switch between connected Shopware Payments accounts.
The information displayed on the overview page always refers to the currently selected account.
Available Balances
The Available Balances section displays the currently available balances of the selected Shopware Payments account.
Depending on the payment and payout options configured for the account, balances may be shown in multiple currencies.
This gives you a quick overview of the currently available funds per currency.
Quick Links
Quick links provide direct access to the most important Shopware Payments areas.
Dashboard: Opens the Shopware Payments dashboard with information about payment activity and key metrics.
Shopware Payments Settings: Opens the Shopware Payments configuration.
Account Settings: Opens the management of connected accounts and their sales channel assignments.
Payment Methods: Opens the management and configuration of available payment methods.
Quick links allow you to navigate directly to the corresponding management areas without using the navigation menu.
Settings
General
In Shopware Payments > Settings > General, you can configure global settings for payment processing, saved payment methods, security features, Express Checkout elements, and the display of PayPal buttons and Pay Later banners.
Select Sales Channel
Using the All Sales Channels option, you can define which sales channel the settings apply to.
All Sales Channels: The settings apply to all sales channels.
Single Sales Channel: The settings apply only to the selected sales channel.
Payment Collection
In this section, you define when payments are captured.
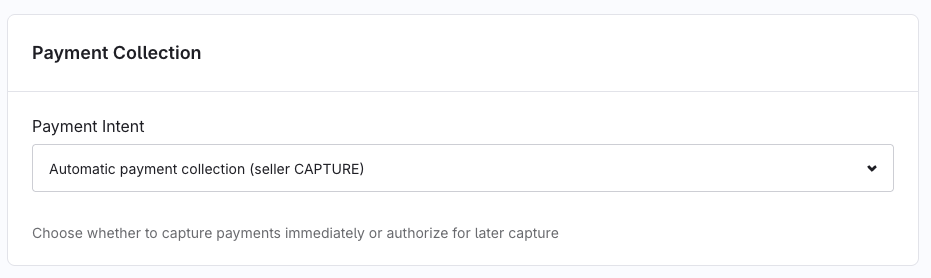
The Payment Intent setting determines whether payments are captured immediately or only authorized initially.
Manual payment collection: The payment amount is initially reserved. The actual charge is performed at a later point in time.
Review orders before shipping
Capture payments only after shipment
Support pre-orders or extended delivery times
Automatic payment collection: Captures the payment amount right away.
Vaulting
This feature allows customers to save their payment information for future purchases.
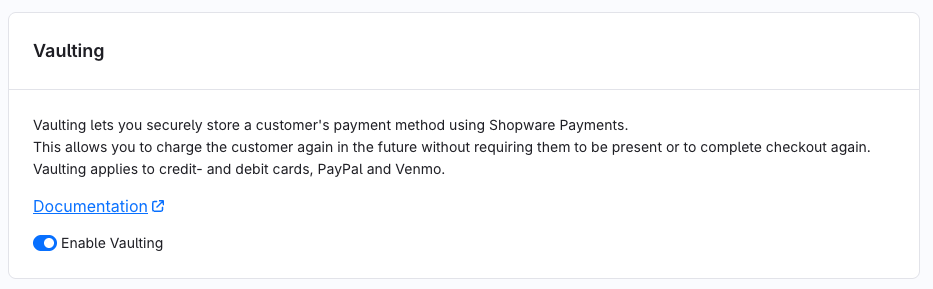
Enable Vaulting to securely store supported payment methods.
This allows customers to complete future purchases more quickly without having to enter their payment information again.
Supported payment methods include:
Credit cards
Debit cards
PayPal
To allow customers to use recurring payments, for example, for a subscription, Vaulting must be enabled for PayPal.
Security
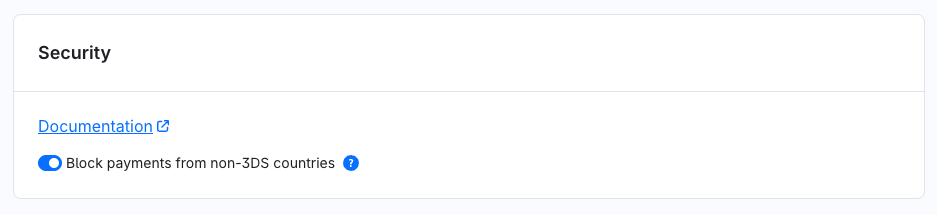
- Block transactions without 3D Secure: If enabled, payments without successful 3D Secure authentication will be declined.
Higher security
Better fraud protection
Reduced chargeback risk
Note: Not all cards support 3D Secure. This particularly affects cards issued outside the European Economic Area (EEA).
If this setting is enabled, payments made with cards that do not support 3D Secure or fail authentication may be declined.
Therefore, carefully evaluate whether this setting is appropriate for your target markets. For shops with a large share of international customers, enabling this option may reduce card payment acceptance rates.
Text specifications
In this section, you define information that is displayed to customers in connection with Shopware Payments.
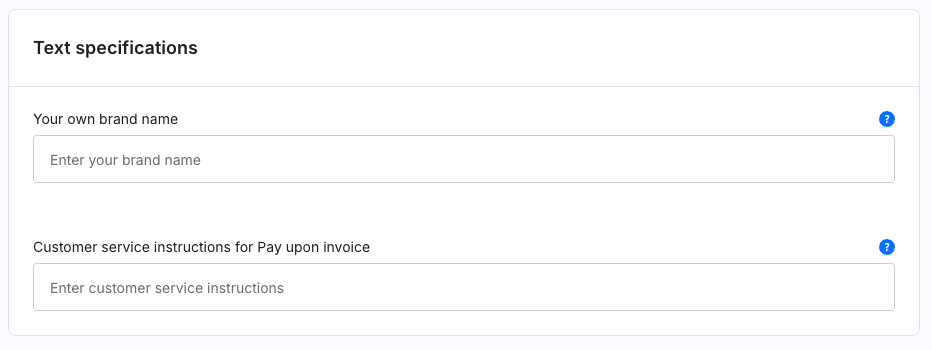
- Your own brand name: Enter the name of your brand or company. This information may be displayed during the checkout process.
Customer service instructions for Pay upon invoice: Provide information for customers who require assistance.
Example: Customer service details can be found on our website.
PayPal Express Checkout
Note: PayPal Express Checkout is available starting with Shopware 6.7.4.0 only.
Due to technical limitations of the app system, this feature cannot be used in earlier Shopware versions.
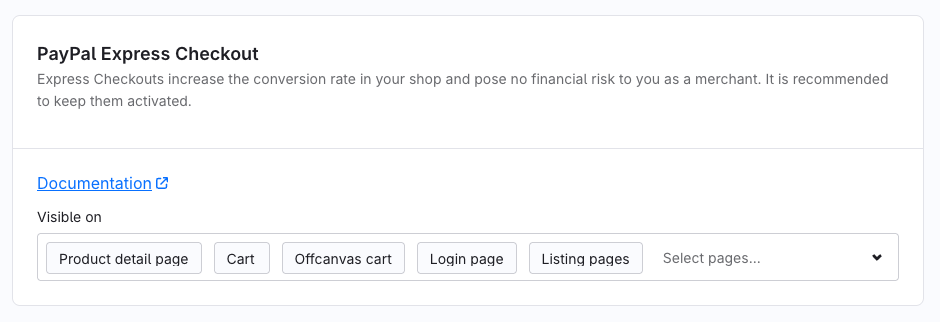
Express Checkout allows customers to pay with PayPal directly from selected pages.
Visible on: Select the pages on which the PayPal Express Checkout button should be displayed.
| Position | Description |
|---|---|
| Product Detail Page | Displays directly on the product page. |
| Cart | Displays in the shopping cart. |
| Off-Canvas Cart | Displays in the side cart panel. |
| Login Page | Displays on the login page. |
| Listing Pages | Displays on category and product listing pages. |
PayPal Pay Later advertising
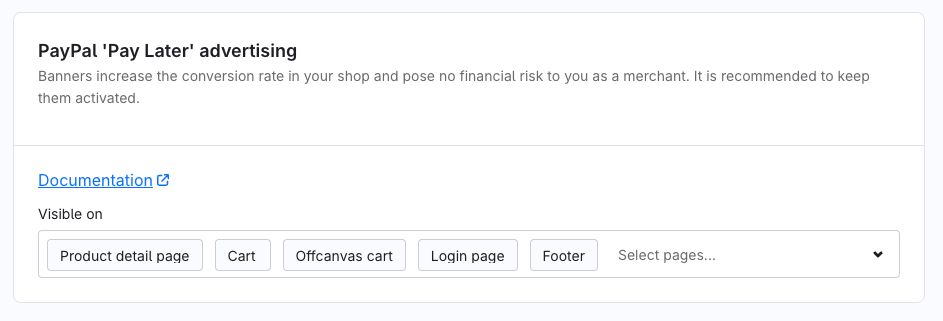
This feature displays Pay Later banners that inform customers about available financing and installment payment options.
Visible on: Select the pages where Pay Later banners should be displayed.
| Position | Description |
|---|---|
| Product Detail Page | Displays directly on the product page. |
| Cart | Displays in the shopping cart. |
| Off-Canvas Cart | Displays in the side cart panel. |
| Login Page | Displays on the login page. |
| Listing Page | Displays on category and product listing pages. |
| Footer | Displays in the shop footer. |
PayPal Smart Payment Button Appearance
In this section, you can customize the appearance of PayPal buttons.
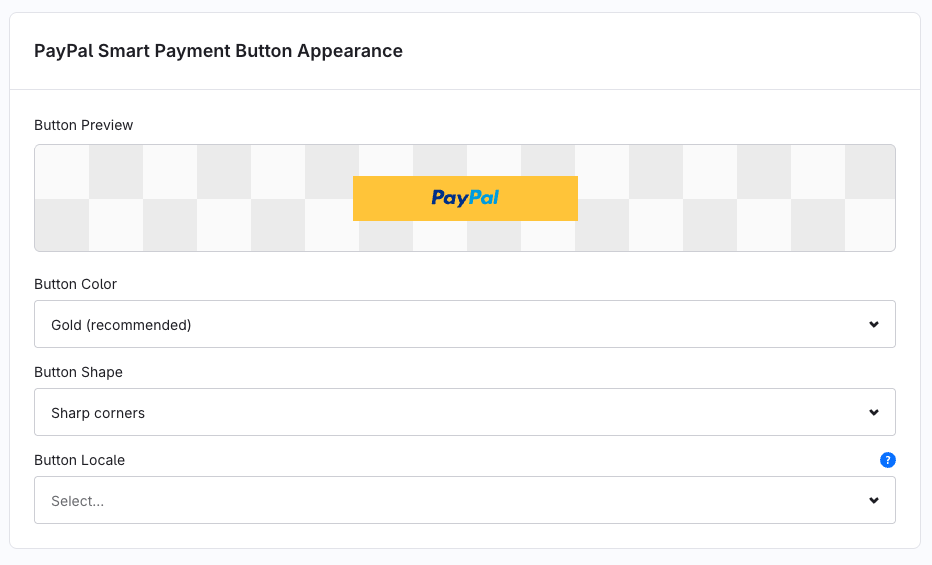
- Button Color: Define the color of the PayPal button.
Button Shape: Define the shape of the PayPal button.
Button Locale: Select the language displayed on the PayPal button. The selected language affects only the PayPal button itself and does not change the language of your shop.
Save Settings
After making changes, click Save Settings to apply the configuration.
Unsaved changes will be lost when leaving the page.
Payment Methods
In Shopware Payments > Settings > Payment Methods, you can manage the payment methods provided by Shopware Payments.
Here, you can view the status of individual payment methods, open their configuration, and define whether a payment method should be active.
Each payment method is displayed as a separate entry in the list.
Available Payment Methods
Depending on your Shopware Payments account and the supported countries, different payment methods may be available.
Examples include:
PayPal
Pay Later
Klarna
Credit or Debit Card
Apple Pay
Google Pay
Bancontact
SEPA Direct Debit
Venmo
BLIK
EPS
Payment Method Status
Each payment method displays its current status. This status indicates whether the payment method is ready to use or whether additional actions are required.
- Additional Data Required: This status indicates that the payment method has not yet been fully configured. Before the payment method can be used, additional information must be provided or the setup process must be completed.
- Blocked: This status indicates that the payment method is currently unavailable. Possible reasons include restrictions imposed by the payment provider, missing approvals, or unmet requirements.
- Active: The payment method has been fully configured and can be offered to customers during checkout. No further action is required.
- Under Review: The payment method setup has been completed, but the submitted information is still being reviewed. During the review process, the payment method may not yet be available. Once the review has been successfully completed, the status automatically changes to Active.
Edit Payment Method
Click Edit to open the detailed configuration of the selected payment method.
Depending on the payment method, you can configure additional settings such as country-specific options or payment-method-specific features.
Activate or Deactivate a Payment Method
Use the Active toggle to define whether the payment method should be available in your shop.
- Enabled: The payment method is available to customers during checkout, provided that all other requirements have been met.
Disabled: The payment method is not displayed to customers during checkout.
Existing orders are not affected by this change.
Availability Notes
Not every payment method is available in every country or for every currency.
Availability depends on several factors, including:
Merchant country
Customer country
Selected currency
Enabled features in the Shopware Payments account
Requirements of the respective payment provider
Apple Pay
In Shopware Payments > Settings > Apple Pay, you can manage the Apple Pay configuration for your merchant accounts connected to Shopware Payments.
To allow customers to use Apple Pay as a payment method, the domains used by your shop must be registered for the respective merchant account.
Requirements
An active merchant account is required to use Apple Pay.
The shop domain must be registered and successfully verified for Apple Pay.
Note: Apple Pay is not supported in the Shopware Payments test account.
If you want to register domains for Apple Pay, you must assign them to an active production account.
Select Merchant Account
Use the Account field to select the merchant account for which Apple Pay domains should be managed.
The displayed domains always belong to the currently selected account.
Add Domain
Click Add Domain to register a new website for Apple Pay.
This opens the Register Website for Apple Pay dialog, which guides you through the required steps.
1. Add Website
Enter the full domain of your website.
Only enter the domain name without the protocol.
Examples:
example.com
shop.example.com
2. Download the Domain Association File
Download the provided apple-developer-merchantid-domain-association file.
This file serves as proof that you own the specified domain and are authorized to use Apple Pay on it.
3. Upload the Domain Association File
Upload the downloaded file to your web server.
The file must be accessible at the following location:
https://your-domain/.well-known/apple-developer-merchantid-domain-associationExample:
https://example.com/.well-known/apple-developer-merchantid-domain-associationEnsure that the file is publicly accessible and can be downloaded without authentication or redirects.
Register Domain
After successfully uploading the file to your website, click Register Domain.
Shopware Payments will verify the domain and register it for Apple Pay.
Once the registration is successful, the domain appears in the list of registered domains and can be used for Apple Pay.
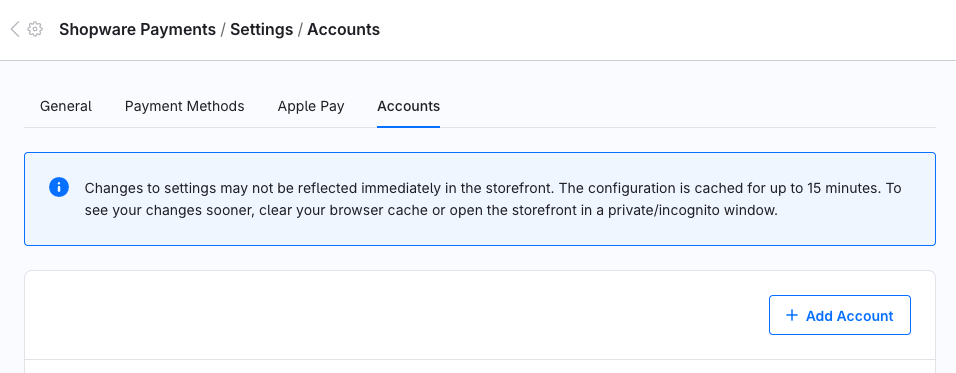
Accounts
In Shopware Payments > Settings > Accounts, you can manage the merchant accounts connected to Shopware Payments and assign them to your sales channels.
Assigning accounts to sales channels allows you to use different Shopware Payments accounts within a single Shopware installation.
Connected Accounts
The account overview displays all currently connected Shopware Payments accounts.
The following information is displayed for each account:
Account name
Linked email address
Current account status
Assigned sales channels
Account Status
The status indicates whether a connected account can be used for payment processing.
An account with the status Active has been successfully connected and can be used for payment processing.
Sales channels can be assigned to this account and the available payment methods can then be used accordingly.
Add Account
Use Add Account to connect a new or additional Shopware Payments account to your Shopware installation.
This is especially useful if you operate multiple companies, brands, or sales channels using different payment provider accounts.
Connect a New Account
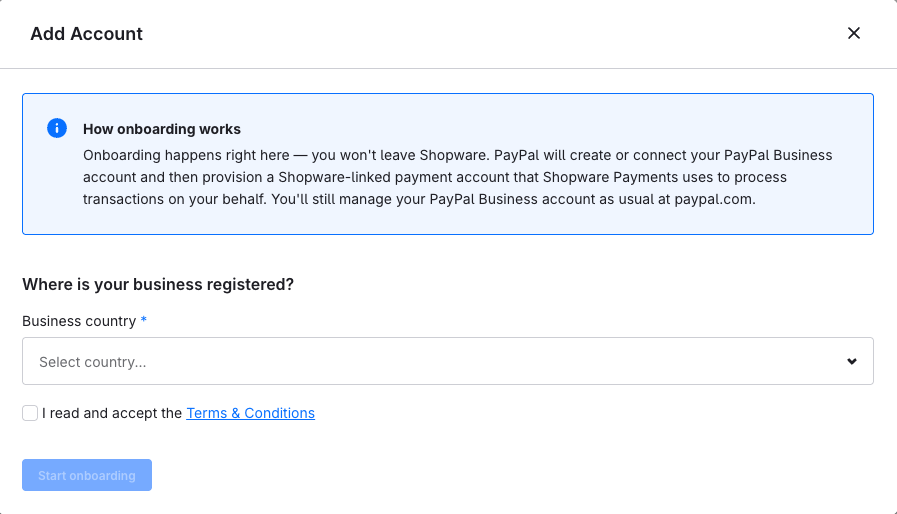
Click Add Account to start the onboarding process.
The onboarding process is completed entirely within the Shopware Administration. You do not need to leave the Administration.
During onboarding, PayPal creates or links your existing PayPal Business account with Shopware Payments. Once the setup is complete, a Shopware-connected payment account is created that can be used to process payments.
Select a Country
Select the country for which you want to create or connect a Shopware Payments account.
Your selection determines which payment services and features are available for the account and which legal requirements must be fulfilled during onboarding.
Click the Country field.
Select the desired country.
Click Start Onboarding.
Start Onboarding
After starting the onboarding process, you will be guided through the steps required to create or connect your PayPal Business account.
Depending on the selected country, business type, and account status, additional information may be required, including:
Business information
Contact information
Tax information
Information about beneficial owners
Identity or business verification documents
Once onboarding has been completed successfully, the new account appears in the account overview and can be assigned to one or more sales channels.
Manage Account
Click Manage Account to open the management interface of the connected account.
Depending on your account, you can:
View account information
Update company details
Manage payout information
Edit verification requirements
Configure additional payment-provider settings
Assign Sales Channels
For each connected account, you can define which sales channels should use that account.
Select one or more sales channels in the Sales Channels field.
Assign a Sales Channel
After selection, the sales channel is assigned to the corresponding Shopware Payments account.
All payments processed through that sales channel will then be handled by the assigned account.
Use Multiple Sales Channels
A single account can be assigned to multiple sales channels.
This allows multiple storefronts or language stores to use the same payment connection.
Typical Use Cases
Managing multiple brands within a single Shopware installation
Operating country-specific stores with separate payment provider accounts
Separating B2B and B2C sales channels for accounting purposes
Using separate accounts for test and production environments
Account Assignment Note
Make sure that each sales channel is assigned to the correct account.
Incorrect assignments may result in payments being processed through a different account than intended.
Test Account
Shopware Payments automatically provides a test account that allows you to test the setup and configuration of Shopware Payments.
No separate sandbox accounts, test credentials, or additional access data are required.
The test account is already available and can be assigned to one or more sales channels like a regular account.
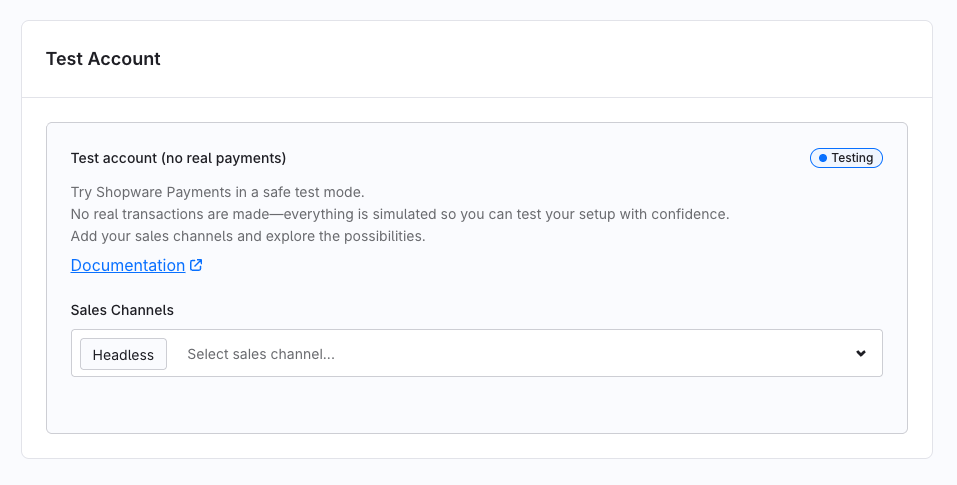
How the Test Account Works
No real payments are processed in test mode.
All transactions are simulated, allowing you to test payment flows and configurations without triggering actual financial transactions.
This enables you to safely configure and verify Shopware Payments before switching to a production account.
Assign Sales Channels
Like production accounts, the test account can be assigned to one or more sales channels.
Select the desired sales channels in the Sales Channels field.
Payments within those sales channels are then simulated in test mode.
Test Status
Accounts running in test mode are marked with the status Test.
This status allows you to immediately identify that no real payments are being processed through the account.
Switching to Production
Once your configuration has been successfully tested, you can assign a production Shopware Payments account to a sales channel.
From that point forward, payments will be processed through the production account.
Order Management
Shopware Payments extends the order details in the Shopware Administration with additional payment-related information. These details are available in the Shopware Payments tab.
This allows you to view and manage payment information directly within an order without switching between different systems.
Payment Information
The Payment section contains all relevant information about payments processed through Shopware Payments.
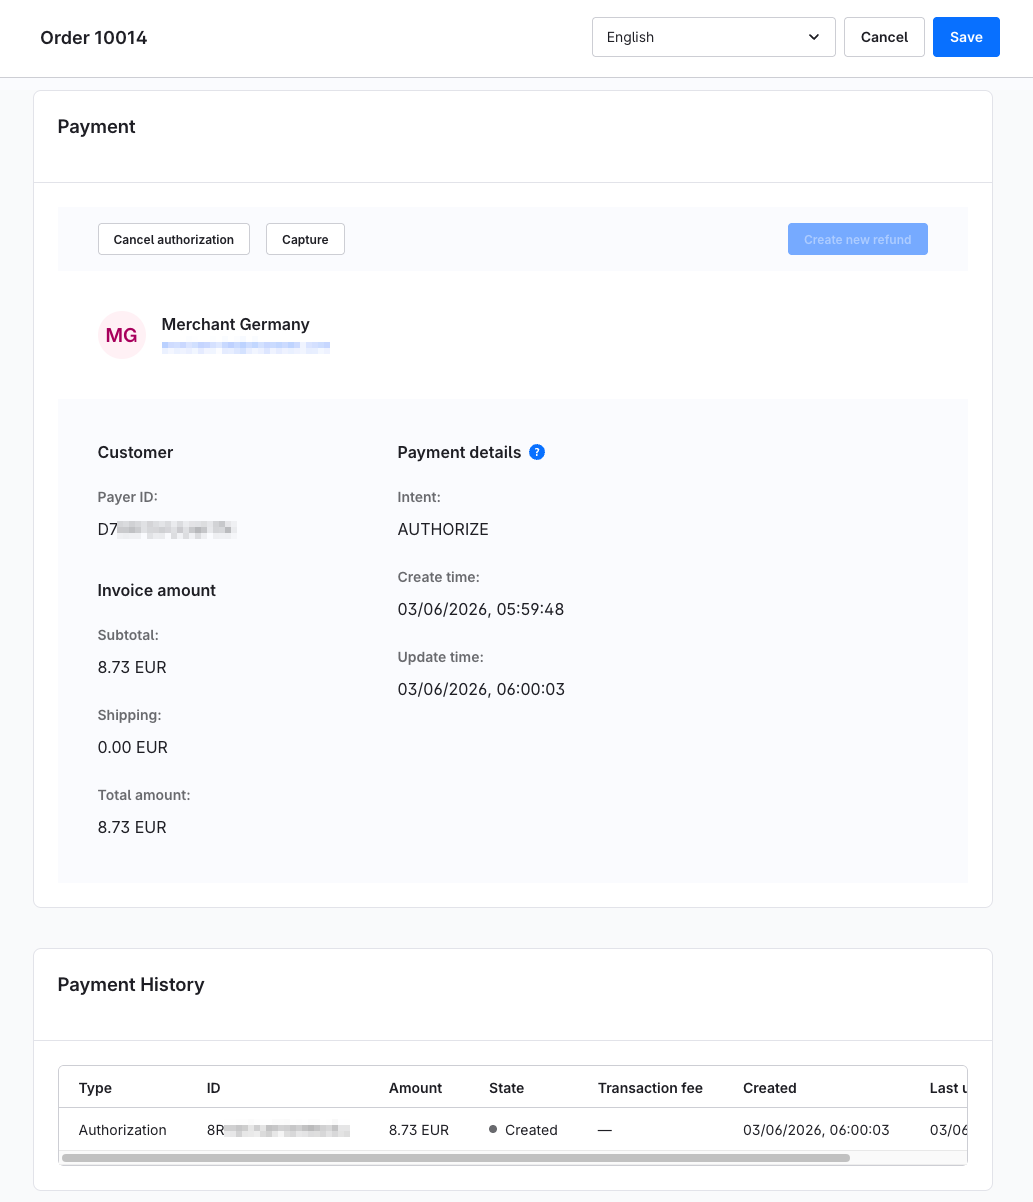
This includes:
Payer information
Payer ID
Invoice amount
Shipping costs
Total amount
Payment intent
Transaction creation date
Last update date
Payment Intent
The payment intent indicates how a payment is processed.
- AUTHORIZE: The payment amount is initially authorized only and can be captured or released later.
CAPTURE: The payment amount has already been captured.
Manual Payment Actions
Depending on the payment intent and the current transaction status, additional payment actions are available within the order view.
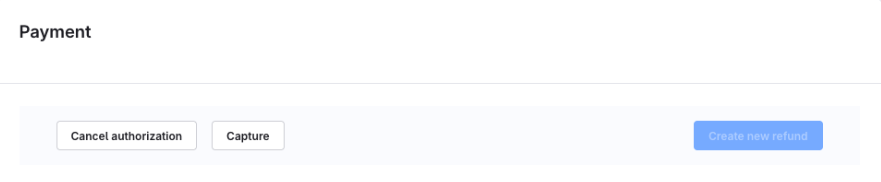
Capture
The Capture action is available for authorized payments.
Capturing a payment charges the previously reserved amount and completes the payment.
This is useful when payments should only be captured after an order has been shipped.
Cancel authorization
The Cancel authorization action allows you to cancel an existing payment authorization.
The reserved amount is released without charging the customer.
This action is useful for cancelled orders or when an authorized payment should no longer be captured.
Create new refund
For payments that have already been captured, you can trigger a refund directly from the order view using the Create new refund action.
The refund is processed through Shopware Payments and the corresponding transaction status is updated.
Payment History
The Payment History section displays all payment activities associated with an order.
The following information is available for each transaction:
Transaction type
Transaction ID
Amount
Status
Transaction fees
Creation date
Last update date
Transaction Status
The transaction status indicates the current state of a transaction.
For example, the status Created indicates a successful authorization, while Completed indicates that a payment has been successfully captured.
Additional statuses may be displayed depending on the payment method and processing stage.
Flow Actions
Shopware Payments extends the Shopware Flow Builder with additional actions for automating payment-related processes.
These actions allow payment operations to be triggered automatically based on defined events or business workflows.
Capture Payment
The Capture Payment flow action captures a previously authorized payment.
This action is available for payments processed using the AUTHORIZE payment intent.
This allows payment capture to be triggered automatically, for example when an order is shipped or reaches a specific order status.
Release Funds
The Release Funds flow action releases reserved or already captured funds.
The exact action performed depends on the current payment status and payment collection method.
For authorized payments, the authorization is voided.
For captured payments, a full refund is issued.
This action is useful for automated cancellations or refund workflows.
Migration from PayPal to Shopware Payments
If you are migrating from the classic PayPal integration to Shopware Payments, you should prepare the migration carefully to avoid interruptions in payment processing.
Check Payment Methods
Before switching, ensure that all payment methods currently used in your shop are available in your Shopware Payments account.
In particular, verify that the payment methods you offer are already configured and ready to use before replacing the existing PayPal integration. This ensures that customers can continue using all desired payment methods after the migration.
Avoid Duplicate Payment Methods
During the migration, you should not offer the same payment method simultaneously through both the classic PayPal integration and Shopware Payments.
Always assign payment methods to only one active integration to avoid duplicate entries during checkout.
Validate Your Checkout Setup
Before using Shopware Payments in production, you should test your payment and checkout processes.
Make sure that:
Payments are processed successfully.
All required payment methods are available.
The checkout behaves as expected.
Orders are created and processed correctly.
This step helps ensure a smooth transition to Shopware Payments without disrupting your day-to-day operations.
Continue Using the Existing PayPal Integration
After the Shopware Payments payment methods have been activated, the corresponding payment methods provided by the PayPal plugin should be deactivated.
From that point onward, new orders will be processed exclusively through Shopware Payments.
However, the PayPal plugin should remain installed and active as long as refunds, customer inquiries, or other processes related to existing orders still need to be handled.
You should only deactivate or uninstall the PayPal plugin once no further actions related to orders processed through the previous PayPal integration are expected.
As long as there are still open or incomplete transactions, the previous PayPal integration should remain active.
Deactivate the Previous PayPal Integration
Only after all open transactions have been completed should you deactivate or uninstall the previous PayPal integration.
From that point onward, all payments will be processed through Shopware Payments while continuing to use your existing PayPal Business account.
Recommended Migration Procedure
Activate and configure Shopware Payments.
Initially deactivate all Shopware Payments payment methods.
Assign the Shopware Payments payment methods to the desired sales channels.
Configure the assignments to match the payment methods previously used by the PayPal plugin as closely as possible.
Activate the Shopware Payments payment methods.
At the same time, deactivate the corresponding payment methods provided by the PayPal plugin.
From this point onward, new payments will be processed through Shopware Payments.
Keep the PayPal plugin installed and active.
Only remove or deactivate the PayPal plugin once no refunds, customer inquiries, or other follow-up processes related to existing orders are expected.
Troubleshooting
Payment Status Is Not Updated
If payment status changes are not reflected in Shopware as expected, first verify that your shop is publicly accessible.
Shopware Payments must be able to communicate with the Shop API in order to transmit payment information and status updates.
If the shop is temporarily unavailable, the following issues may occur:
Payment statuses are not updated.
Transactions are not fully synchronized.
Payment-related actions are processed with delays.
Once your shop becomes available again, pending status updates are often processed automatically.
Check Shop Availability
If Shopware Payments features are not working as expected, verify that your shop is publicly accessible.
Possible causes include maintenance work, network issues, firewall rules, or other restrictions affecting accessibility.
Ensure that the Shop API is accessible without restrictions so that Shopware Payments can exchange data with your shop.
FAQ
What Changes and What Stays the Same?
What Stays the Same
PayPal remains your payment service provider.
Your existing payment infrastructure remains unchanged.
Compliance responsibilities remain clearly defined.
Your existing PayPal Business account continues to be used.
What Improves
Payments are consolidated into a central payment layer within Shopware. This simplifies operational processes and enables more efficient management of payment-related workflows.
A new commercial model and more competitive pricing can improve profitability without requiring fundamental changes to your existing setup or established business processes.
Result
The result is a more transparent and manageable payment system without disrupting existing and proven processes.
Who Is My Contact for Shopware Payments Support?
For merchants, Shopware is always the first point of contact for support requests. If necessary, Shopware coordinates directly with PayPal through established escalation channels.
All plans—from Community Edition to Shopware Beyond—receive full Shopware Payments support directly from Shopware. This includes assistance with onboarding, configuration, operational questions, and troubleshooting.
For payment-specific topics such as compliance, fund management, or transaction processing, clearly defined escalation procedures to PayPal are in place.
The underlying support model remains consistent across all Shopware plans. Shopware Payments does not use a separate support structure. Response times and service levels depend on the support model of your respective Shopware plan. Additional information can be found in the pricing overview.
For Community Edition merchants, Shopware additionally provides an SLA with a response time of five business days during regular support hours (Monday to Friday, 09:00–17:00 CET, excluding public holidays in North Rhine-Westphalia, Germany).