
Promotions
The menu item promotions offers you a module with which you can create discount actions for your sales channels. Within this module you can create rules to set up restrictions for the promotions, as well as limit the promotion to a certain time frame.
Overview
The discount module shows you an overview of all your currently running or configured promotions.
Within this mask you can a create new promotions or view existing promotions.
By clicking on the symbol to the right of an existing promotion, the context menu opens, which offers you the options to edit or remove the existing promotion.

Create a new discount promotion
To create a new discount action you have to click on the button Create action within the mask.
This opens a new mask where you can now set the basic configuration for a new discount promotion.
The advanced configuration regarding rules and discount definition can be defined in the tabs Conditions and Discounts. These are available as soon as the action has been saved for the first time.

General
General settings
Here you will find all the general details of your discount promotion. This is where you can edit and adapt them according to your wishes.

Name (1): Here you can give your action a name / designation.
Priority (2): Define the priority to determine the order in which rules are applied if more than one rule applies.
(A rule with priority 2 is applied before a rule with priority 1, but after a rule with priority 3)
Valid from / Valid until (3): You can use these fields to define whether your action should run for a limited time and, if so, from when to when.
Max. total uses (4): Specify how often the discount promotion can be used in total.
Max. uses per customer (5): Specify how often the discount promotion can be used per customer.
Active (6): This switch can be used to activate and deactivate the promotion. If the promotion is deactivated, it will not be played in the valid period.
Promotion codes

Promotion codes: If you do not want the promotion to be applied directly when one of your customers fulfils the corresponding conditions (e.g. add certain products to the shopping cart or reach a certain value of goods), you can also store a promotion code. The promotion will only be applied when the code is redeemed and the conditions are met.
- No promotional code required:
No separate entry is required for the promotion to be applied. - Fixed promotion code:
This selection allows you to enter a single code that is the same for all customers. For example, this could be a memorable code such as EASTER21 Alternatively, you can use the generate random code button to have the system assign a random code.

- Individual promotion codes:
Here you can use individual codes for each order.

These individual codes can only be redeemed once and will not be accepted if they are entered again. The list of codes tells you straight away whether a code has already been redeemed and, if so, by which customer.To initially create the first action codes, click on the button generate codes (2). A window will open in which you can configure the codes.
If you have already created action codes, you can use the button add codes (1) to generate further codes according to the already defined pattern. This can be useful, for example, if a large part of the generated codes has already been used before the planned end of the action is reached.
Note: It is not possible to apply several different individual codes from a single promotion at the same time.

In the field code length (1) you determine the number of random characters the code should consist of. In addition, you can optionally enter a prefix (2) and suffix (3), which will be prefixed or appended to the code. The characters used here are not counted towards the character length of the random code. In our example in the screenshot above, the prefix is SW- and the suffix is -TEST.
Alternatively, you can use the use custom pattern (4) button to define the pattern according to which the codes are to be structured. This can be both fixed letters and numbers as well as random characters stored by the system. To insert a random letter (A-Z), store %s, for a random number (0-9) %d. In our example, the custom pattern looks like this: SW-%s%d%s%d%s-TEST.
The promotion code preview (5) shows you an example of how the codes will look. Finally, in the field number of promotion codes (6) you determine how many codes are to be generated according to the set pattern.
Please note that the subsequent adjustment and regeneration of the promotional codes will result in the previous codes becoming invalid and therefore no longer redeemable.
Conditions
The Conditions tab offers you the possibility to specify exactly when the promotion is valid and when it is not. This is done by applying specific rules from your rule builder to limit your discount promotion based on given conditions.
Conditions
You can specify here the conditions under which the promotions are to be displayed.

Sales channels: Specify here for which sales channels the promotion counts.
Prevent combination with other promotions: Activate the slider, if no other promotion can be used in the shopping cart, even if their conditions theoretically apply.
Do not combine with: At this point you can add already existing promotions that should not be combinable with this new discount promotion.
Rule based conditions
Conditions can be defined here using the Rule Builder for your target group, the shopping cart or also the entire order, for which exact conditions the promotion is to be applied.

Customer rules (1): Using the customer rules allows you to apply Rule Builder rules to determine which of your shop's customers are entitled to benefit from the action you have created. You can also specify multiple rules here.
The drop-down menu customer rules lists all existing Rule Builder rules that refer to customers and gives you the option of creating new rules for them.
Shopping cart rules (2): You can use these rules to set conditions that need to be met for the contents of the shopping cart. These can be conditions such as "Goods with a total value of 100 euros or more are in the shopping cart" or "There are at least 3 products in the shopping cart".
If multiple rules have been selected, only one of them needs to be triggered to apply the promotion. This improves user-friendliness if a promotion is to be applied to several different conditions. If you intend for all included rules to trigger a promotion together, it is necessary to set up the promotion multiple times.
Order rules (4): Here it is possible to define general conditions that must be met by an order so that the discount promotion can be redeemed. A condition could be, for example, the use or exclusion of certain payment or shipping methods.
Promote sets of products (3): A set of products is a powerful tool for creating complex, product-related conditions that relates to several products at once or that require a given combination of products to be in the shopping cart in order to meet the discount conditions. Concrete examples that can be implemented with the help of product sets or set groups can be found below in the section Examples.
If you activate this option, you can add a set group using the add product set button.

A set group is defined by four properties.
Mode (1): Indicates whether the entry in the Value (2) field refers to quantities in the shopping cart (Number), to the gross price that must be reached by this set group (Value (Gross)) or to the net price (Value (Net)).
Value (2): Entries made here indicate the number or value of products that must be reached to meet the conditions for this set group.
Sorting (3): Specifies whether products are assigned to the set group in ascending or descending order - depending on their purchase price.
Product rules (4): At this point, further Rule Builder rules can be applied that must be met in order for products to become part of this set group.
To better illustrate how set groups can be used, let's take the following example from the screenshot:
In this example, we use "T-Shirt" as the product rule (which ultimately contains a selection of T-shirts - previously defined in the Rule Builder). As soon as there are three T-shirts (because 3 is defined as a value and number as a mode) in the shopping cart, a set group of these T-shirts is formed. It does not matter whether it is the same T-shirt three times or three different T-shirts.
If there are four matching T-shirts in the shopping cart, the three cheapest T-shirts (sorted by "price ascending") are combined into a set group. The fourth, most expensive T-shirt remains "separated".
If there are six matching T-shirts in the shopping cart, two groups of this set are formed. First the three cheapest and then the three most expensive. For further T-shirts, the same principle would be applied.
Advanced Selection
For each rule, you can use the advanced selection (1) to define complex conditions with the Rule Builder - for example, based on customer groups, product categories or shopping basket values.
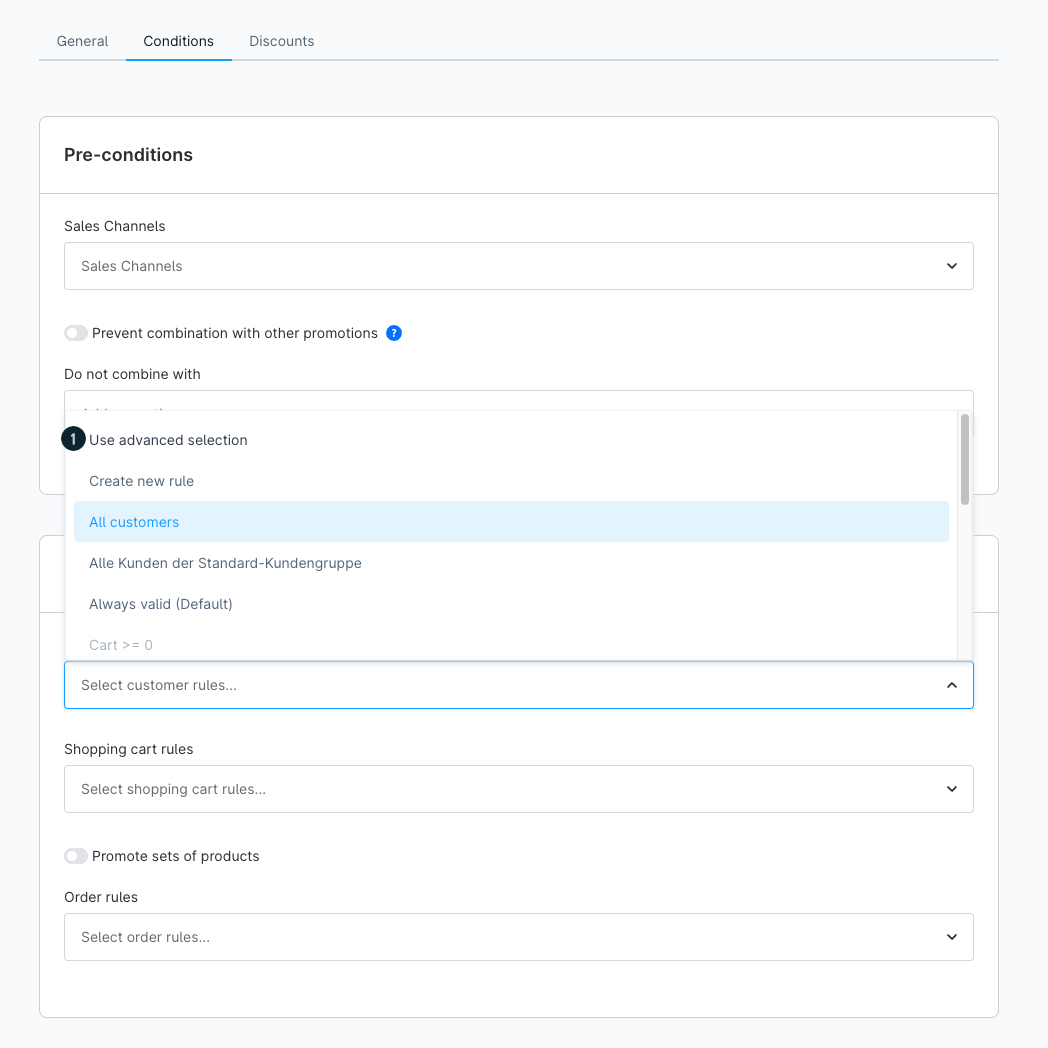
Clicking on the advanced selection opens a new window in which all available rules from the Rule Builder are displayed.
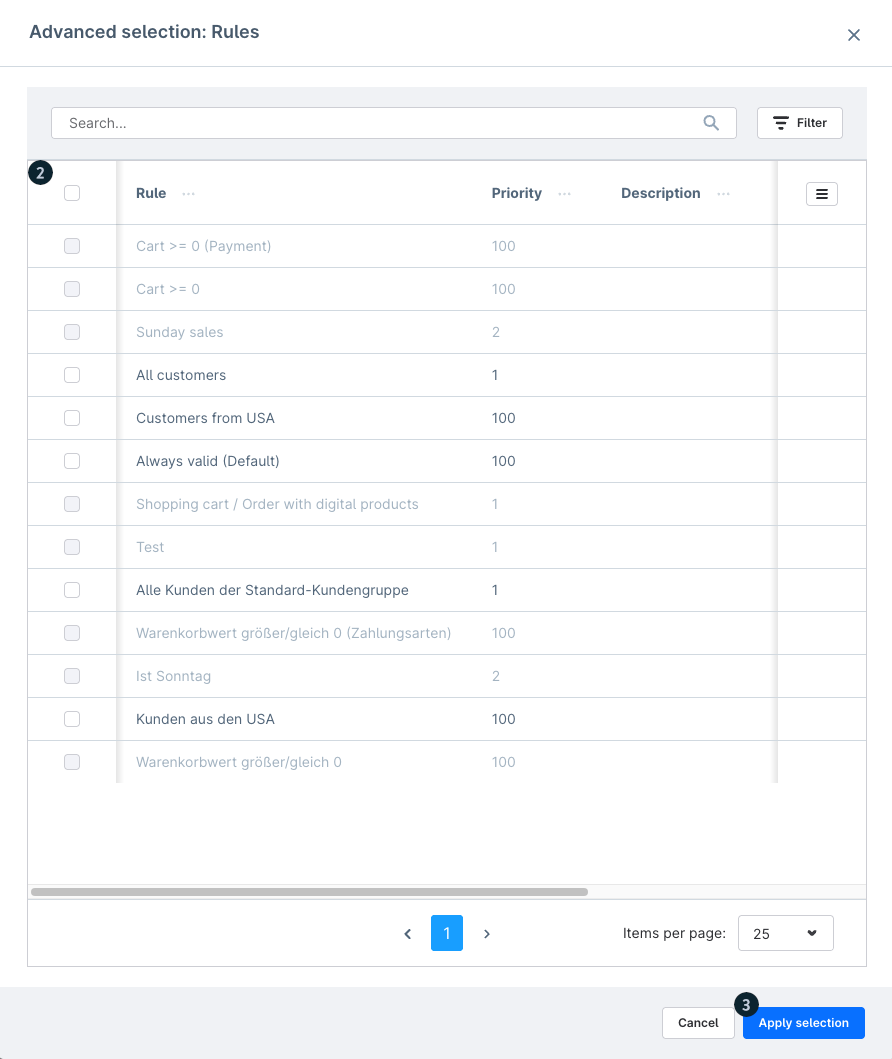
You can select the desired rule in the selection field (2) and then confirm by clicking on the Apply selection (3) button.
Discounts
With the sub item discounts you can define when a discount is offered and what is discounted.
A distinction is made between percentages, i.e. pro rata discounts, and absolute discounts.
You can store these here with a value and determine what they are to be applied to.
It is possible to run multiple discounts at the same time through a discount promotion. To add another discount, simply press the Add Discount button.
Please note that you cannot change the discount settings after the promotion has been used for the first time in an order.

Apply to (1): Here you can choose on which products the discount should be applied. On the entire shopping cart, on the shipping costs, on the entire product set (i.e. on all existing set groups) or on one of the existing set groups defined in the conditions in the shopping cart section.
Apply to specific range of products only (2): Here you can specify that the discount is only applied to certain products. If you activate this option, the fields Product rules, Apply to and Sort by are also available.
- Product rules: In this way, it is possible to break down the discount promotion even further to specific products. To explain the difference to the product rules in the conditions, the following example: If the rule is set in the shopping cart conditions that black T-shirts must be in the shopping cart, then the condition is met as soon as there is a black T-shirt in the shopping cart. However, this does not mean that the discount only applies to this black T-shirt, but could theoretically be applied to the entire shopping cart.
If you were to apply the discount to selected products in the discount settings and apply the product rule for black T-shirts again, then the discount would really only be granted for black T-shirts, even if there are other items in the shopping cart that are still charged normally. - Apply to: In the event that there are several products for which a discount is granted, it can be stored here that, for example, a discount is only granted for every second/third/xth product. The order is determined by the setting Sort by (price ascending or descending).
- Sort by: If there are several products on which a discount can be granted, the products to be discounted are sorted by price in ascending or descending order. This setting becomes more important in combination with the settings apply to and maximum application.
Type (3): Here you specify whether the discount should be an absolute discount, a percentage discount or a fixed price or fixed unit price. If you decide on a fixed price or fixed unit price, the price cannot be higher than the undiscounted/normal total or unit price.
Value (4): This field indicates the actual value of the discount. For example, if you enter 20 here, then depending on the selected type, a basic discount of 20 euros would be granted or a discount of 20% or a fixed (unit) price of 20 euros.
Maximum discount value (5): If a percentage discount is specified as the type, the Maximum discount field is displayed. This allows you to set an upper limit for the discount so that the discounted percentage cannot exceed the amount specified here.
Open advanced prices view (6): Here you can set the value of the discount for each currency individually.
Common examples of discounts
Below we list the most common discount campaigns with a corresponding example. You can find more examples in our tutorial.
Time limited "20% off everything except..."
The aim of this promotion is to provide a limited time discount promotion on all items except a specific range of products.
General:
In the general sub-tab, we first assign the name of this discount promotion and set it to active. In the fields valid from and valid until we enter the period of the promotion. Then we save this promotion for the first time.
Conditions:
Since this promotion should apply to "all" products, we only need to specify in the Conditions sub-tab which sales channel the discount promotion should apply to. The exception rule for items that should not benefit from this promotion are set later in the discounts tab.
Discounts
In the Discounts tab, we apply the discount to the entire shopping cart. The apply to selected products only button is set to active.
In the drop-down field product rules that is now available, we click on the item create new rule.
A new modal opens, which is essentially similar to the view of the Rule Builder.

Here we assign an appropriate name for the rule, set the priority and optionally a description.
As a condition, we select the option line Item as an example. The operator is is none of and then we add all products here that we want to exclude from the discount promotion. Then we save the new rule. More detailed information on how to use the Rule Builder can be found in the corresponding documentation.
Now we click on the drop-down field Product Rules and this time select the rule we have just created. In this way we have ensured that the discount promotion is applied to all products in the shopping cart except for the products just defined in the rule.
In the Type field we select the Percentage option. In the Value field we enter the percentage. If necessary, we can set an upper limit for the discounted amount with the field maximum discount value. Finally, we click on Save again to complete the configuration of the discount action.
At this point the question might arise why we have included the exception in the product rules for discounts and not as a condition for shopping cart and/or set groups.
If we had specified the same product rule as a condition for the shopping cart, this would mean that the discount promotion can no longer be triggered as soon as there is even one product in the shopping cart that has been defined as an exception.
If there were also products in the shopping cart that should actually be discounted, these would also no longer be discounted. The exception products would first have to be removed from the shopping cart so that the condition is "true" again and the discount promotion is therefore valid.
Promotions with a minimum order value
In this example, we create a discount promotion that can only be triggered when a certain minimum order value has been reached. In our example, this would be from an amount of 100 euros or more.
General:
So when we create the promotion, we enter the to use relevant fields like name and promotion period in the general tab again and set them active and save to unlock the conditions and discounts tabs again.
Conditions:
To create a promotion that should only be valid from a certain minimum order value, it is sufficient to define a shopping cart rule in the conditions tab in the rule based conditions section.
In the shopping cart rules drop-down menu, we select the option create new rule to open the rule builder modal.
Here we assign a name for the rule and set the priority.

Depending on your own preferences, two condition types can now be considered for this promotion - the total or subtotal of all items types.
The total type takes into account the actual total amount including all non-product-related items except shipping costs. Subtotal of all items only takes into account the actual value of all products in the shopping basket. Other items such as shipping costs or discounts (e.g. other discount campaigns, vouchers) or surcharges (e.g. cash on delivery charges) of any kind are not taken into account.
Once you have selected the right type for you, select the correct operator. In our example, this is the greater than/equal to operator.
We enter 100 as the value here as an example. We then save the settings to create and apply the rule.
Discounts:
Finally, define the discount that suits you in the discounts tab and save the promotion to apply the changes.
3 for 2
The creation of a "3 for 2" action is done with a set group. How this is configured in detail is explained in the following example.
General:
With the exception of the name, the settings in the general section are optional. Therefore, we will not elaborate further. Information on this can be found in this documentation above in the section creating a new discount promotion > general.
Conditions:
First of all, the setting in the area conditions > rule based conditions are relevant for the actual configuration.

Activate the button promote sets of product sets (1) to activate the extended configuration.
Here you can now specify how the set is to be composed. In our example, from the quantity (2) of products, store 3 as the value (3).
The sorting (4) determines how the individual sets, to which the discount is then applied, are formed. To ensure that the cheapest product in the shopping basket is always discounted, select price, ascending here.
Use the product rules (5) to determine which products are to be included in the promotion. In our example, there should be no restrictions.
Discounts:
The following settings are required in the Discount section:

The discount is to be apply to set group-1 (1).
For further configuration, activate the check box apply to specific range of products only (2).
The discount is to be apply to 1.item (3) and the sorting is in ascending order (4). Optionally, you can specify whether the discount should only be applied to a limited number of products in the shopping basket. If you select 1x, for example, your customer will only receive 1 product free, even if they buy a total of 6 products. Without this limitation, your customer will receive the two cheapest products for free in this case (one free product for every 3 products).
As item picking mode (5) we use horizontal. In this way, the cheapest products are added for free in multiples of 3 products. The following table illustrates how the discounting behaves in the two modes:
| Product | Price | Free with Vertikal | Free with Horizontal |
|---|---|---|---|
| 1 | 10 | X | X |
| 2 | 20 | X | |
| 3 | 30 | ||
| 4 | 40 | X | |
| 5 | 50 | ||
| 6 | 60 |
The discount is of the type (6) percentage with the value (7) 100.
Optionally, you can set a maximum discount value.
After you have saved and activated the action, your customers can benefit from the discount.
Apply discounts in the Storefront
Depending on the discount configuration, it may first be necessary to activate the discount by entering a code.
This is possible in the OffCanvas shopping basket and in the normal shopping basket view by entering the code in the field Enter voucher code (1), then confirming the entry by clicking on the tick button (2).
OffCanvas shopping cart

Shopping cart

After successful entry the discount (1) is listed in the article overview.
OffCanvas shopping cart

Shopping cart

You can find more examples of discounts and promotions in our tutorial.
Display of voucher codes already redeemed
Action codes that have already been used can be displayed in different ways. This can be interesting, for example, if you want to know on which order a general or individual code has already been used.
Individual promotions codes
To see who has already used the individual code of your promotion, you only have to open the actual promotion below Marketing > Promotions.

Underneath Redeemed you can now see which of your codes has already been successfully used in an order.
Now you probably want to take a look at the corresponding order. To do this, simply note or copy the voucher code and go to the order overview.
Using the filter function in the right-hand area, you can now filter for orders with this code via the item promotion code and have only this order displayed.

Fixed promotion code
If you have a fixed promotion code, you can copy this code and go directly to the order overview. Again, you can use the filter function to search for orders with this code.
In contrast to the individual promotion code, you will now find more than one order here, depending on the configuration of your promotion.