
B2B Components
The B2B Components offer you the opportunity to equip your store with the most important B2B functions.
The B2B Components also offer store customers, who have been authorized accordingly by the store operator, a variety of functions to map their own company structure. These include roles and contacts (sub-accounts for the customer's employees), orders including the approval process as well as order lists and individual order numbers.
The B2B Components are available to you as of the Shopware Evolve plan via the Shopware Commercial extension.
Activation for single customers
If you would like to assign B2B Components functions to single customers, you can do so by selecting a customer in Admin under Customers > Overview and activating the individual options.
Approval per customer group
In the customer groups in your administration under Settings > Shop, you can directly preset whether and which B2B functions a customer group should receive when registering. To do this, you must activate the customised registration form for the desired customer group.

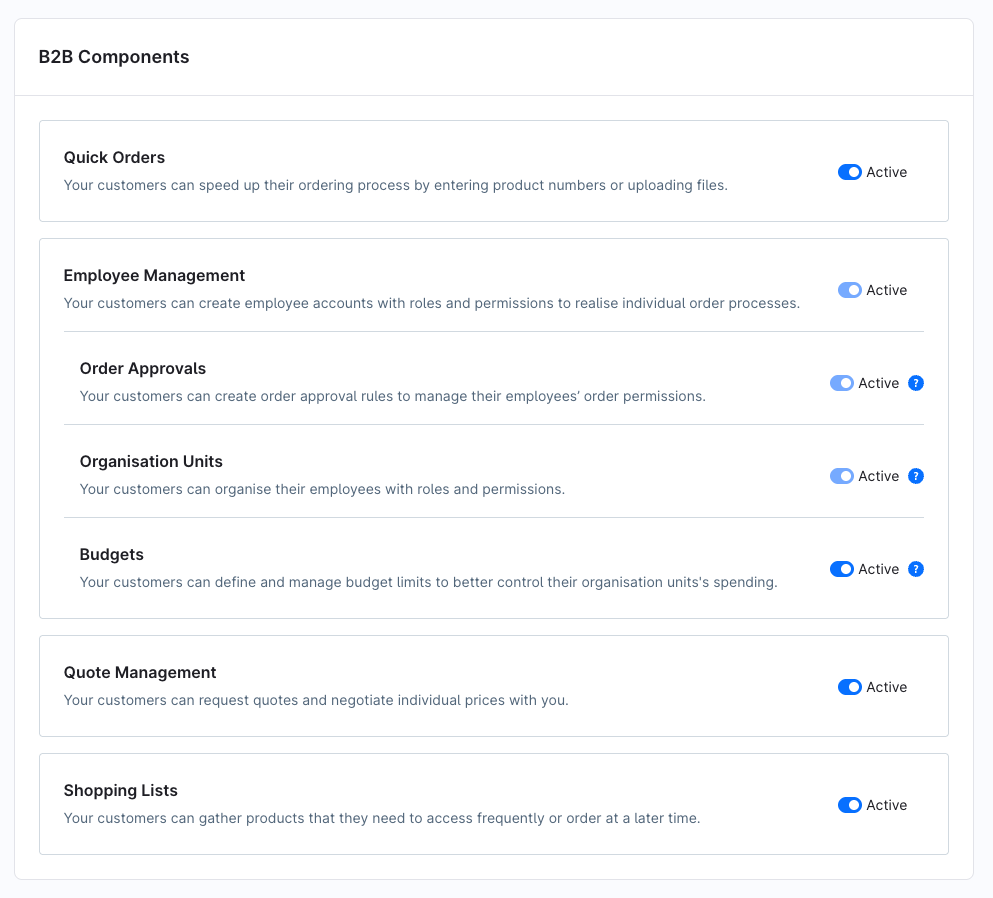
To do this, you can activate or deactivate the individual functions Quick Orders (1), Employee Management (2), Quote Management (3), Order Approval (4), Shopping Lists (5) and/or Organisation Units (6), which are described below in this article.
Quote Management
If you have an evolve plan, the new quota management is available.
Often, B2B customers' requirements are so unique that the ordering process cannot be handled by default in the online shop but requires personal consultation with the supplier. In addition, B2B customers often aim for long-term business relationships where customised price offers enable closer cooperation and specific agreements tailored to their long-term needs. It is precisely for this communication that Evolve's new Quote Management feature comes into play. Here, you can exchange prices between buyer and merchant via the shop.
Request prices
As a logged-in B2B customer, you have the option to request a specific price for the items in the shopping cart.

To send a quote request to the dealer, click on Request quote and then on Send.
If you want to add a specific comment, write it in the comment field.
In the next step, you will see all your quotation requests in your customer account under Quotes.
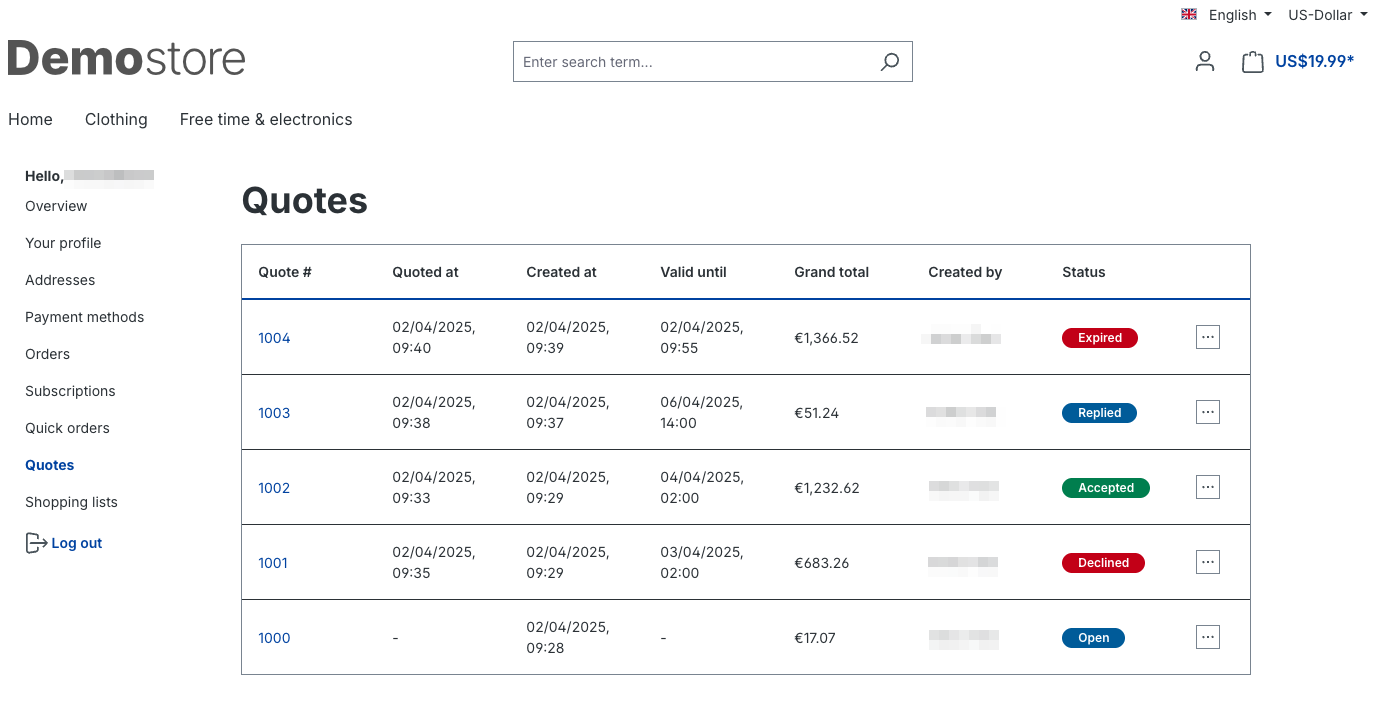
There are a total of 5 statuses: Open, Replied, Accepted, Declined and Expired.
Edit quotes
As a merchant, you have the possibility to view and edit the offers in the admin in the area Orders > Quotes. Here you have a complete overview of all received offers.

In the next step, you can edit the requests and enter an individual price or discount. If you agree with your price adjustment, you can send the quote back to the customer by clicking the button Send Quote.

You can set a time limit for your offer by entering an expiry date in the next step.
If you would like to add a comment to the offer, you can do so in the message field.

Employee Management
From Shopware version 6.5.6.0 and the Evolve plan, it is possible to use the employee management. This allows you to create employees and assign roles to them. In order for the Company tab to be available for the respective customer, the employee management must be activated in the customer's edit mode.

You can invite a new employee to the company by clicking the Add employee account button (1). For this purpose, the first name, last name and e-mail address must be entered. The role is optional. In the overview, you can check the status of each employee. After the invitation has been accepted within 2 hours, the employee is part of the organization. Via the three points, you can deactivate it if necessary.
You can create a role via the button Add role (2).

First, you enter the name (1) for the role. You can also decide whether this role should be used as the default role for new employees (2). Furthermore, you can set the permissions (3) for the employee here. These are limited to the areas of employee management, role management and orders.

In the frontend, the respective employee can also create roles and manage employees. To do this, first log in and go to the your account icon (1). Here you can then go to the respective employee management (2) or to the role management (3). The configurations here are the same as in the admin.
Order Approvals
As of Shopware version 6.5.8.0 and the Shopware Evolve plan, it is possible to use the approve orders function. This enables your customers to activate this function for a B2B account.
The function can be activated for each customer by first going to edit mode in the admin's customer overview and then setting the "Order approvals" function to active.
Activation in the frontend
You must then create a role in the activated customer account in which you activate the corresponding functions. The role is created by clicking on Roles --> Add role in the overview. Alternatively, you can also create the role in the Administration.

Approval rules
You use the approval rules to define who is authorised to grant order approvals and for whom. You use the roles you have defined for this assignment.

Click on Create rule to create a new approval rule. If you have already defined rules, they will be listed here. You can edit or delete an existing rule via [...]
Create a new rule
If you want to create a new rule, the following fields must always be filled in.
Name (The name of the rule should be chosen so that you can immediately recognise what function the rule has)
Priority (The priority determines which authorisation rule has priority. The higher the number, the higher the priority of the rule. For example, if two rules apply, the rule with the higher priority is applied)
Gives order approvals (Here you select the role that can grant the approvals | e.g. managing director, purchasing manager, etc.)
Needs order approvals (Here you select the role that requires approval of the order | e.g. trainee, buyer, etc.)
Applies to (The options are All orders, in which case it is always applied, or Custom condition, which allows you to set up rule-based authorisations)
Status (This shows you whether a rule is active or inactive)

Custom condition
If you select Custom condition for the Applies to item, further selection conditions are displayed. The functionality corresponds to that of the Rule Builder, which you already know from the Shop Admin.

Condition (in the dropdown you can choose between different items to determine when the authorisation rule should be applied. You can select Total, Total, Shipping costs, Subtotal of all items, Shipping method used, Payment method used, Total volume of all products or Total weight of all products).
Operator (the selection differs depending on which condition you have previously selected. For example, if you want to react to a sum, "is equal to" or "is greater than or equal to" would be available here. If the condition is dependent on a dispatch type, you can choose between "is one of" and "is not one of").
Value (here you enter a comparison value. If you have selected a sum, you define a monetary value. When comparing to a shipping method, you choose between your shipping methods and for other selections (e.g. volume) you enter the appropriate unit).
B2B customer accounts can then only order orders with approval. The B2B accounts will then also see this in the order completion.

The main B2B account is then shown this and has the option of accepting or rejecting it.

Organisation units
With the organisational units, larger companies or organisations can better map their internal structures in the online shop - but smaller companies also benefit if, for example, they want to separate several locations, departments or teams from one another.
Why is this important?
Many B2B customers - such as public daycare centres - consist of several facilities (e.g. individual daycare centres), each of which would like to purchase separately. Without organisational units, all users see the same data and could inadvertently place an order for the wrong facility.
What can this function do?
It allows you to divide a customer account into several organisational units (e.g. each daycare centre as a separate unit).
Each unit only has access to its own orders, addresses and users.
This ensures that each organisation can only order for itself - without being able to view other units.
Example:
A retailer sells playground materials to various daycare centres belonging to a provider. With organisational units, each daycare centre can be created as a separate unit in the system. An employee of daycare centre A only sees and orders for her own daycare centre - not for daycare centre B or C.
Configuration in the storefront
If the organisational units function is activated for your customer, they can set up and manage their organisation independently in the storefront.

All existing organisational units are clearly displayed in a list. You can easily create a new unit by clicking on ‘Create unit’.

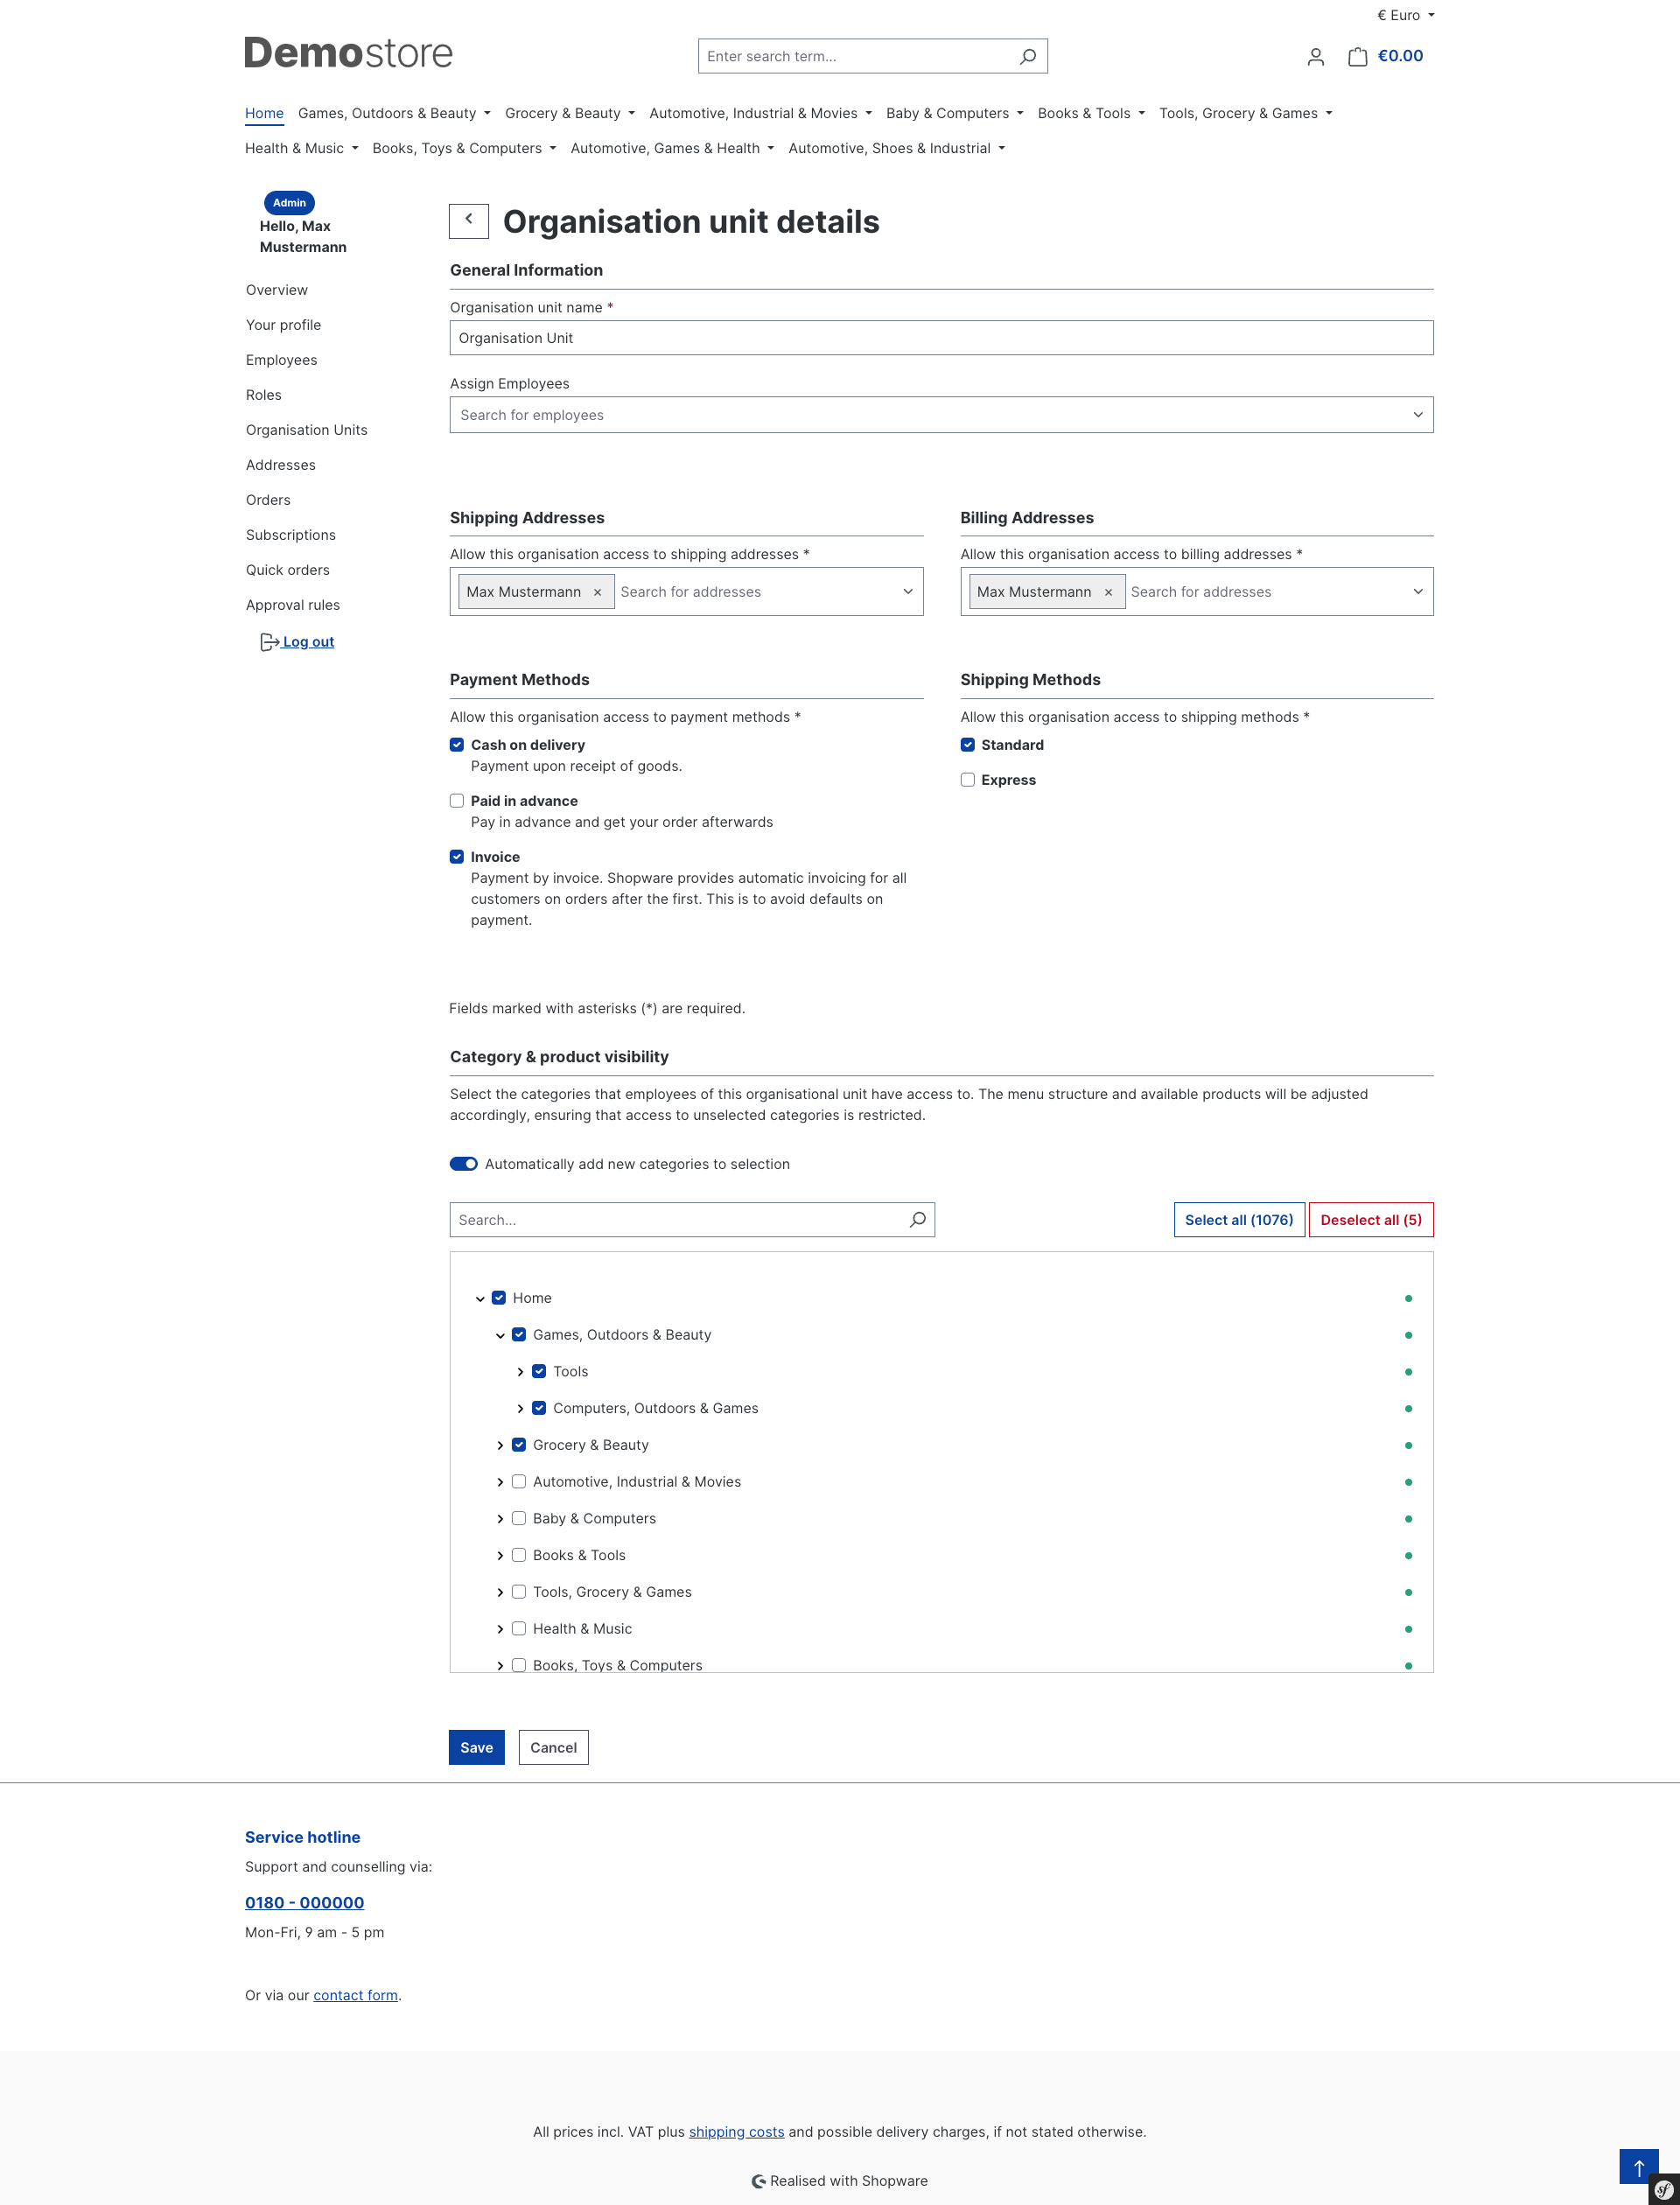
The name of the organisational unit is first assigned here and then the employees who are to belong to this unit are assigned.
At this point, the shipping and billing addresses, as well as the desired payment methods and shipping methods, are also defined. Only the addresses, payment methods, and shipping methods stored here are available to the employees of an organisational unit.
An employee can currently only be assigned to one organisational unit. Assignment to several units at the same time is not possible.
Configuration in the administration
In the admin area, you can find the organisational units of a customer in the ‘Company’ tab within the respective customer profile.

By clicking on ‘Edit’, you can edit the respective organisational units and carry out exactly the same configurations as your customers directly in the storefront.
Advanced product catalogues
With the advanced product catalogues, certain product categories can be specifically enabled or disabled for individual organization units. This makes it possible to precisely control which products employees are allowed to see and order in the storefront. This provides more control, an overview and individual product selection for each organization unit.
Settings in the storefront
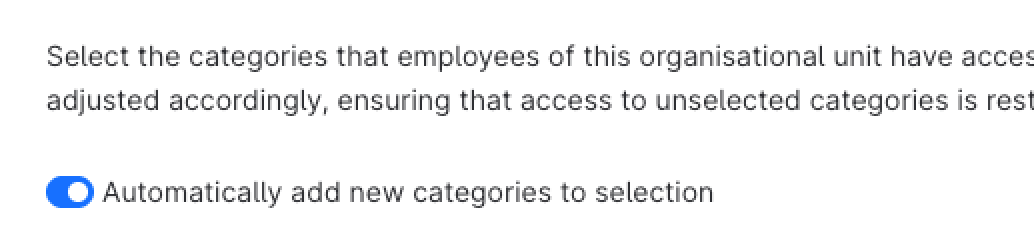
The feature was implemented in the storefront on the detail page of the respective Organisation unit, in the “Category & product visibility” area. The released product categories can be individually configured there.
With this switcher, newly created categories will be automatically “checked,” which means you allow employees to see them.
When an employee of that organization unit logs in, they will see only the allowed categories in the navigation.
If they try to access other categories or products outside of these allowed categories — whether via direct link or any other way — they will be blocked, and a 404 Not Found page will be displayed.
Settings in the administration
In the administration, the function has been implemented in a new tab on the detail page of the respective organization unit. The visible product categories can be controlled centrally there.

Budget
From Shopware version 6.7.4.0 and the Shopware Evolve Plan onwards, it is possible to manage budgets for your organisational units.
Budget management enables you to establish spending limits for organisational units, providing greater control over the purchasing process. This feature helps to enforce company spending control policies directly in the ordering process.
A budget defines how much an organisational unit is allowed to spend within a certain period. If this limit is exceeded, an order can only be completed with approval. The system automatically informs the responsible persons and allows approvals to be managed directly within the system.
Budget configuration
In the administration area, you can view the budgets of a customer with activated B2B functions by opening the desired customer under Customers > Overview and then selecting the Company tab.
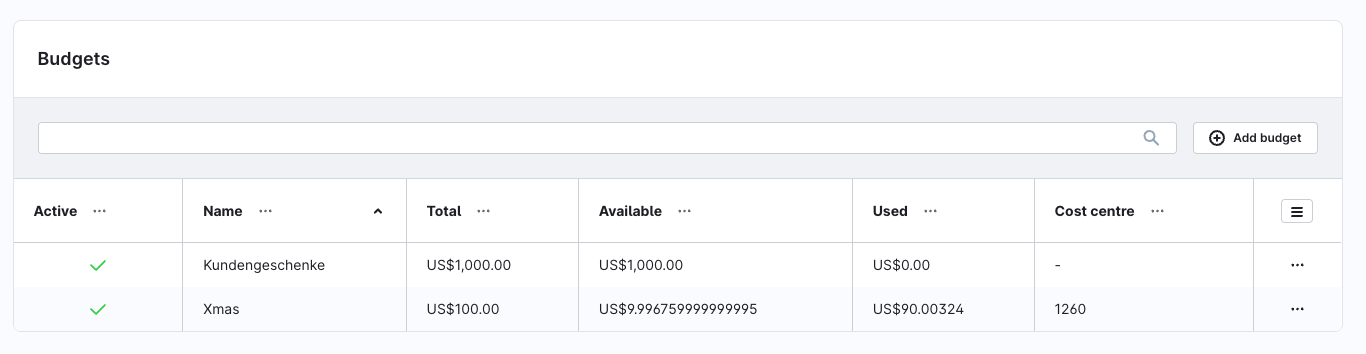
The view in the storefront is identical in content for your customers and differs only in its presentation.
The overview displays all created budgets, including information on status, name, total amount, available amount, amount used, and cost centre.
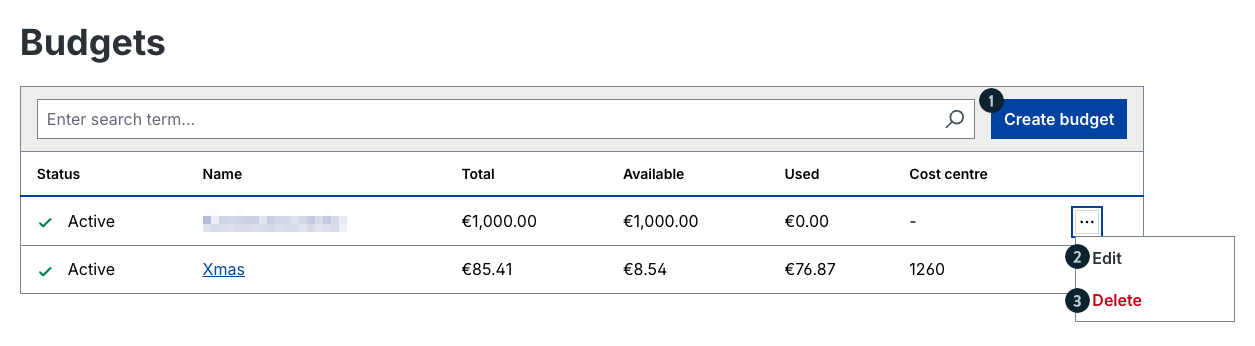
Here you can create new budgets (1) and edit (2) or delete (3) existing budgets using the context menu ‘...’.
When you click Create budget, the input mask opens, allowing you to configure a new budget and specify all relevant details.
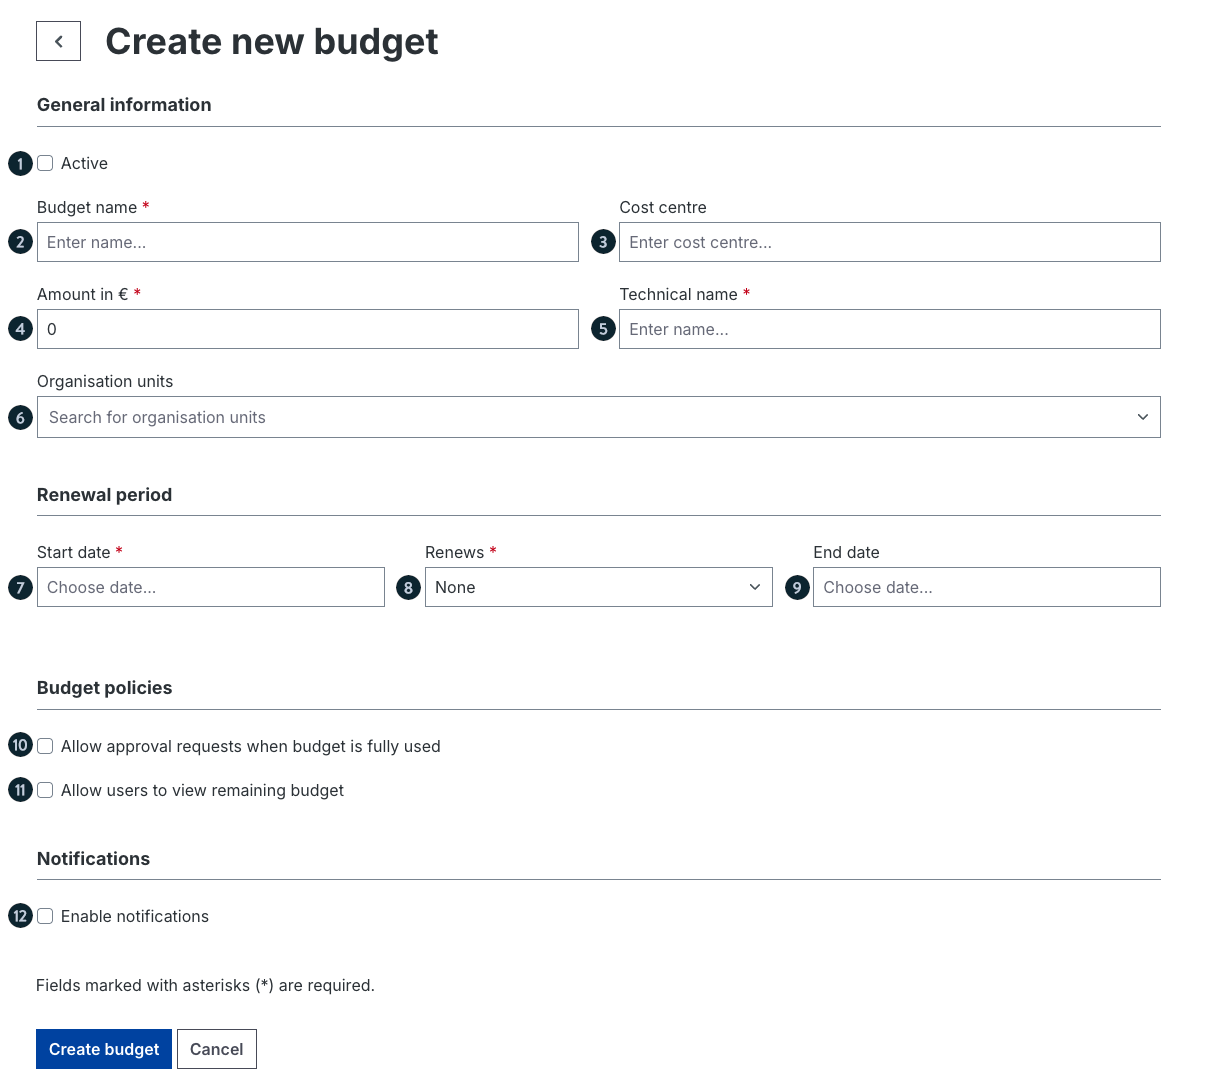
Active (1): Defines whether the budget is active.
Budget name (2): The visible name under which the budget appears in the overview and during checkout.
Cost centre (3): Optional field for internal organisational assignment.
Amount in € (4): The maximum available budget amount.
Technical name (5): Internal, unique identifier for the budget.
Organisation units (6): Selection of the organisational unit for which the budget applies.
Start date (7): The date from which the budget becomes valid.
Renews (8): Defines the interval at which the budget automatically resets. You can choose between None, Weekly, Monthly, Quarterly, Biannual, and Yearly.
End date (9): The date when the budget expires.
Allow approval requests (10): Allows orders to be submitted for approval when the budget is fully used.
Show remaining budget (11): Displays in the storefront how much budget is still available.
Enable notifications (12): Activates email notifications to assigned contacts when budget thresholds are reached.
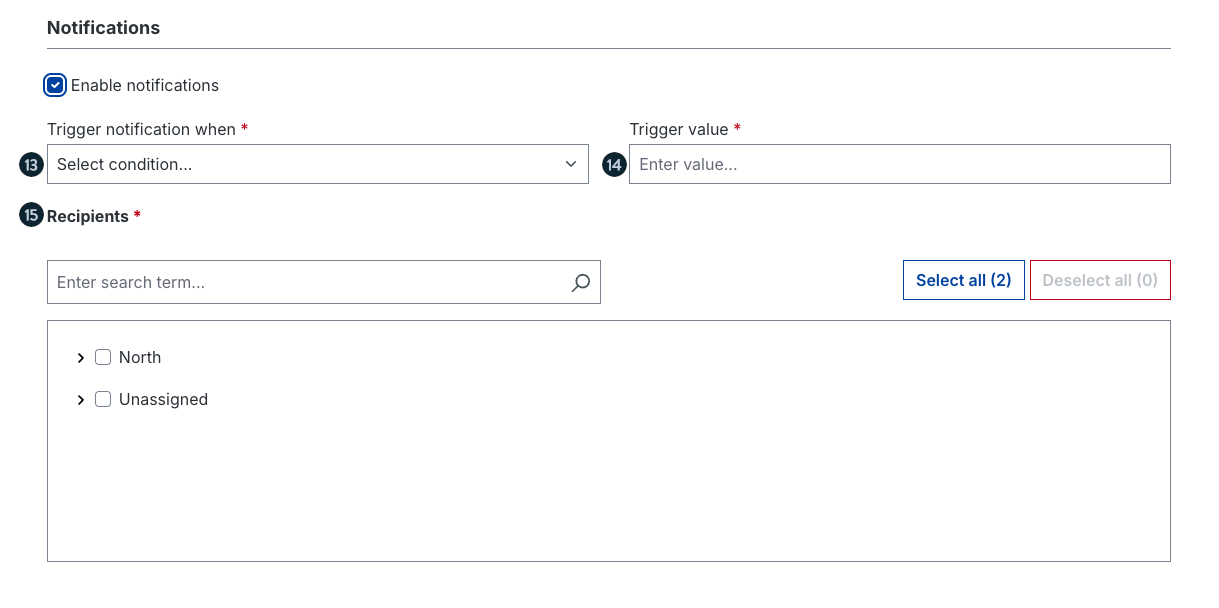
Trigger notification when (13): Defines the condition under which a notification is triggered. You can choose between X percent of budget used, Specific notification date and X days before end date.
- Trigger value (14): Specifies the threshold value at which the notification is sent, for example, ‘80’ for 80% of the budget.
- Recipients (15): Selects which users or organisational units should receive the notification. You can search for individual contacts or add multiple recipients at once using Select all.
Budget selection at checkout
In the checkout area, customers with activated B2B functions can select an available budget to complete their order within the defined spending limits. The system transparently displays how much of the budget has been used and how much remains available.
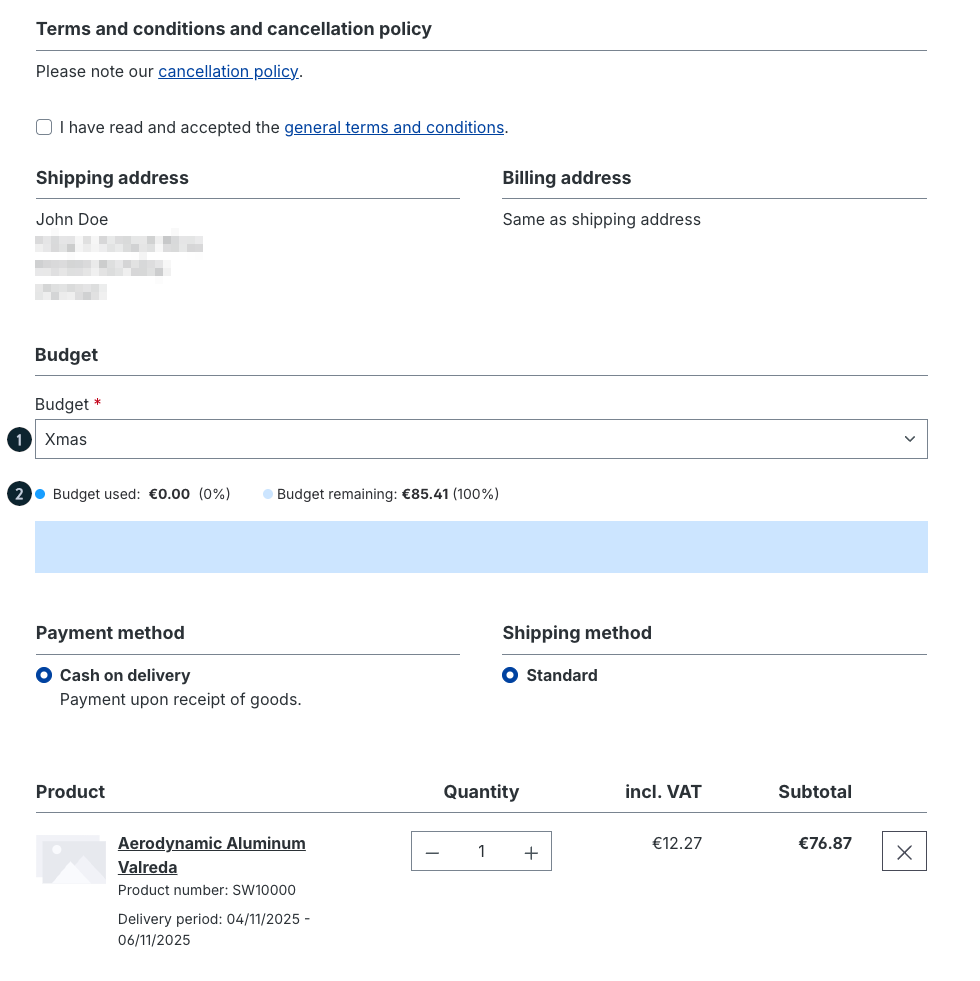
Budget selection (1): Using the drop-down menu, the customer can select the desired budget to be used for this order. Only active budgets with sufficient credit are available for selection.
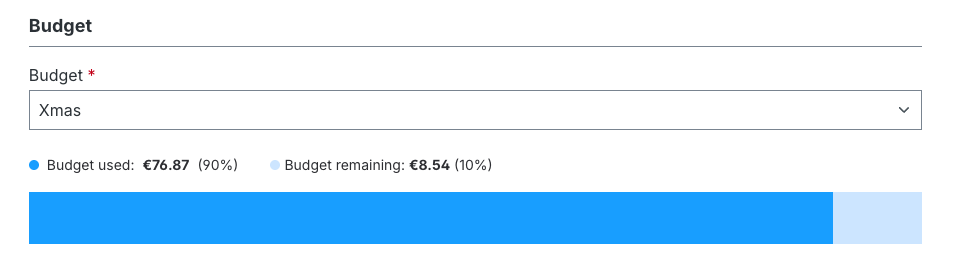
- Budget status (2): Shows the current status of the selected budget, broken down into used budget and remaining budget. The progress bar visualises the percentage of usage.
Individual Pricing
From Shopware version 6.7.8.0, individual prices are available to you, provided that you have activated the organisation units in the employee management.
You can configure percentage-based, fixed, or tiered discounts based on defined rules and assign them to specific organisation units or customer tags.
This allows you to display negotiated conditions directly in the storefront – without any manual adjustments.
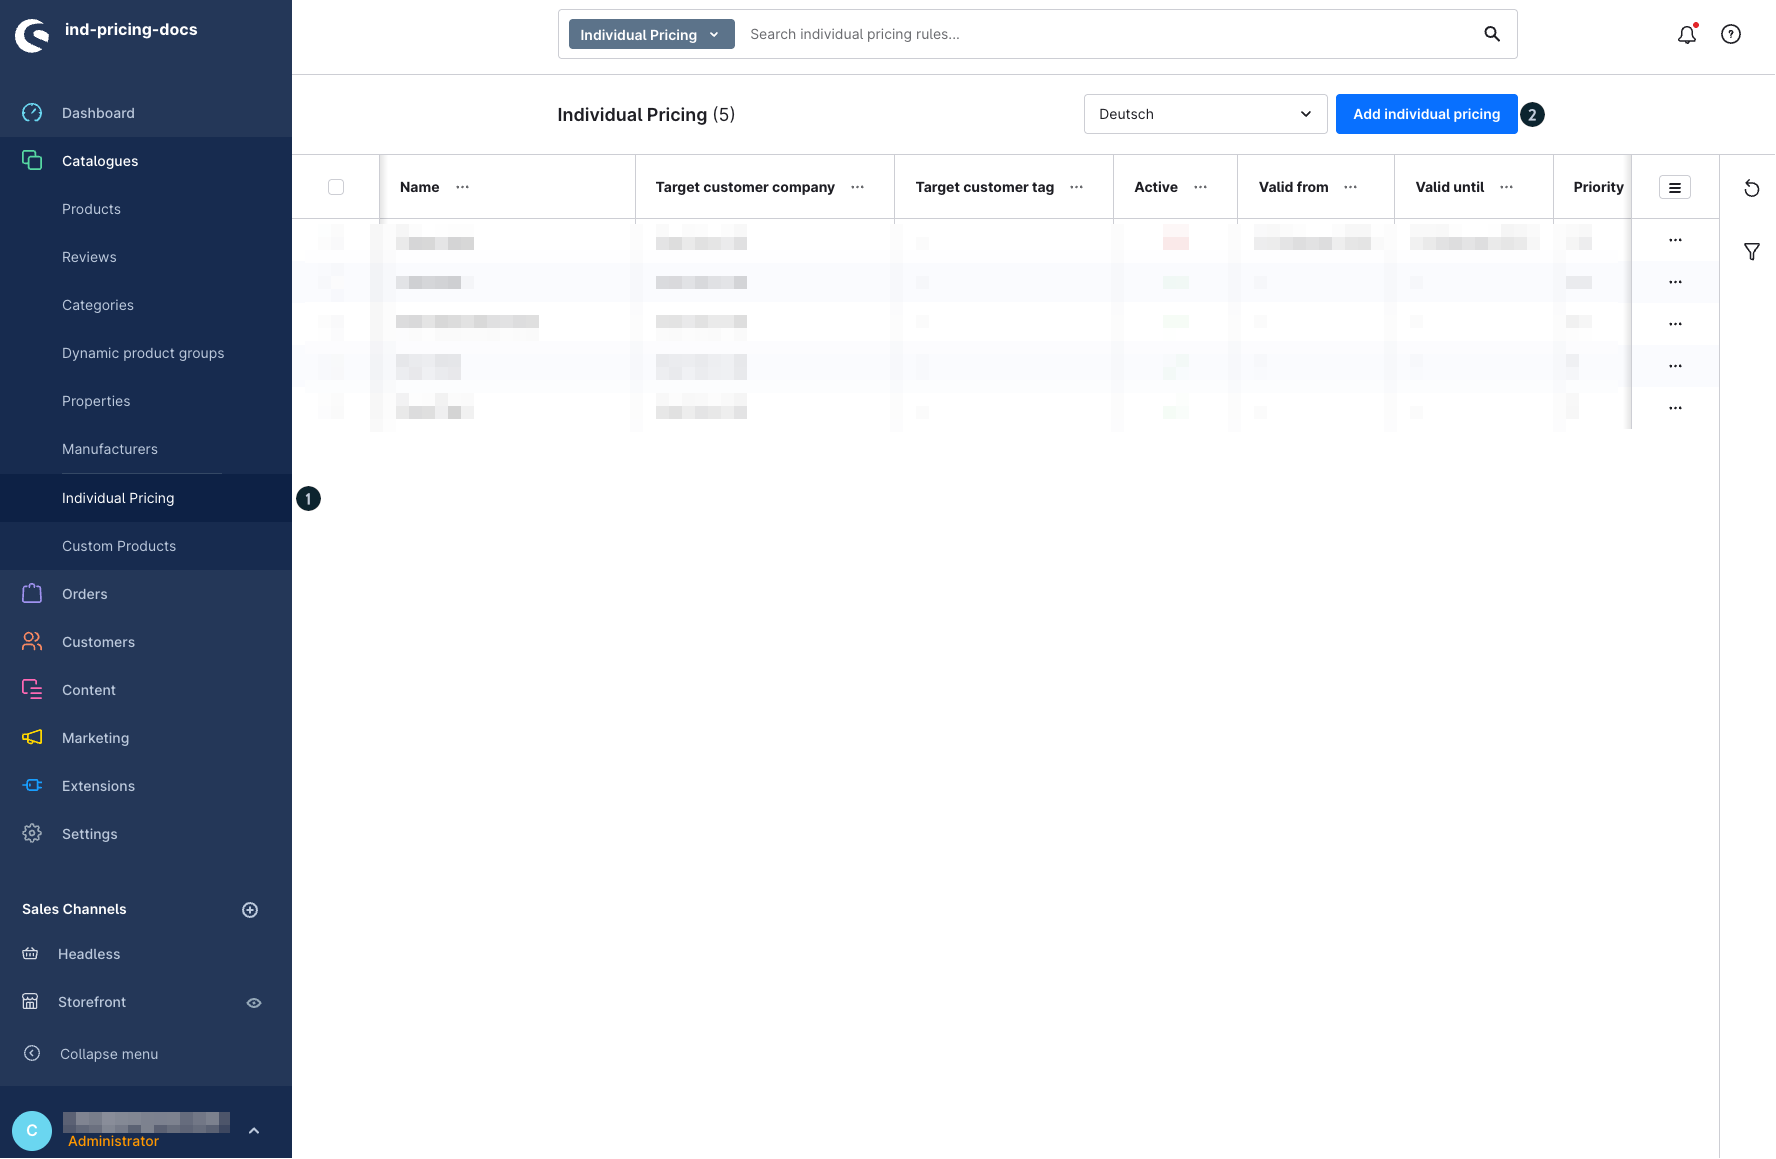
You can find the individual prices in the admin under Catalogues > Individual pricing (1).
To create an individual price, click on Add individual pricing (2).
Create new individual pricing

After clicking Create new Individual Pricing, the price rule creation window opens.
In the General (1) tab, you will find the General settings (2) as well as the Target assignment (3).
In the General settings (2) section, you can activate or deactivate the individual pricing rule and optionally display list prices for your products. You also define the name of the pricing rule and set its priority here.
You can also define a validity range. In the Description field, you can enter your own description for the price rule.
In the Target assignment (3) section, you select the desired target group for the individual pricing rule. You can choose between Companies and organisation units, as well as Tags.
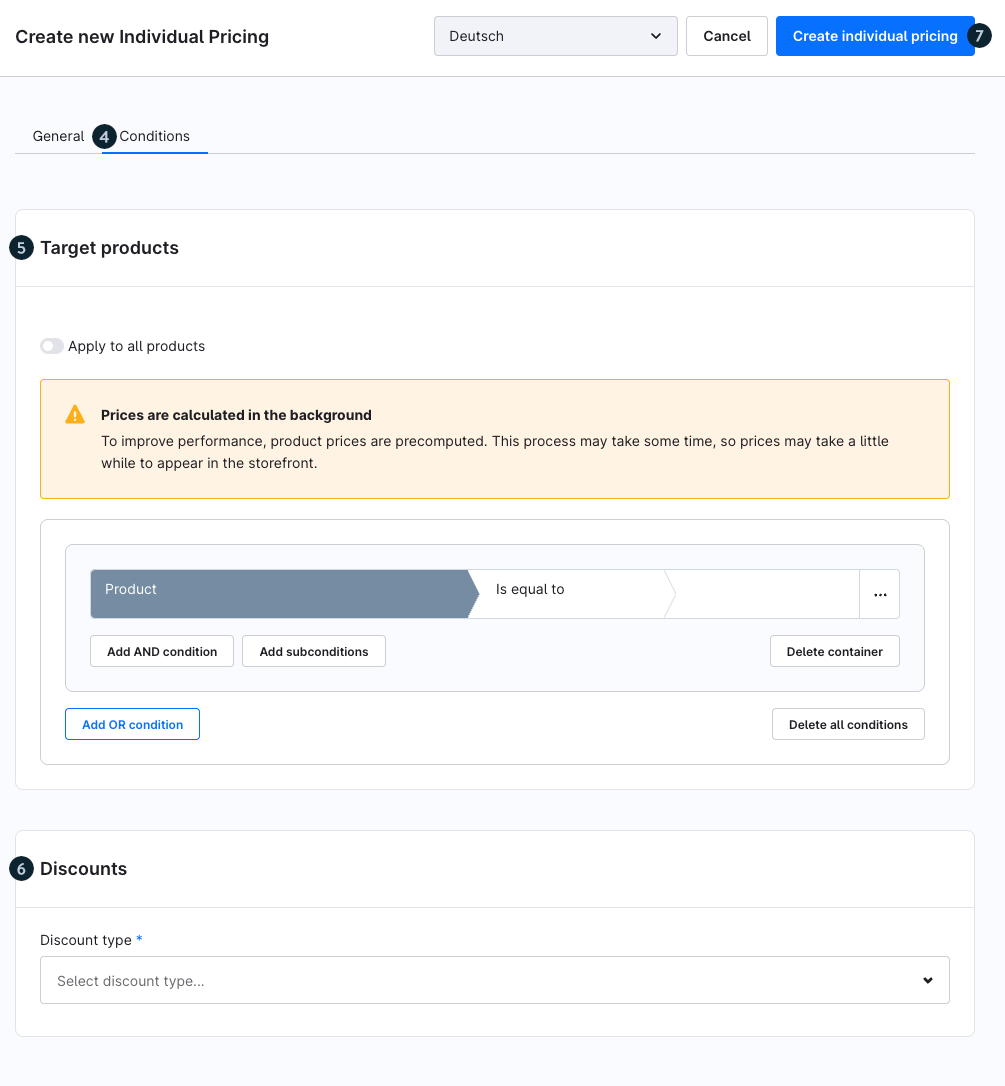
In the Conditions (4) tab, you configure the settings for the Target products (5) as well as for the Discounts(6).
In the Target products (5) section, you can define whether the desired discount should be applied directly to all products or only if a specific rule is met. When configuring a rule, you can select various conditions and operators that are also used in the Rule Builder.
In the Discounts (6) section, you can choose a discount type. The following discount types are available: Percentage off, Fixed amount off, Final price to fixed value, or Volume pricing.
After entering all required information for your price rule, click Create individual pricing (7) in the top-right corner to save the pricing rule.
Example configuration:
Here we show you an example of what such a configuration might look like. In this case, you want to grant a customer a percentage discount of 2% on a specific product.
The prerequisite for assigning a company or organisational unit is that your customer is either registered as a company or has set up organisational units in their customer account.
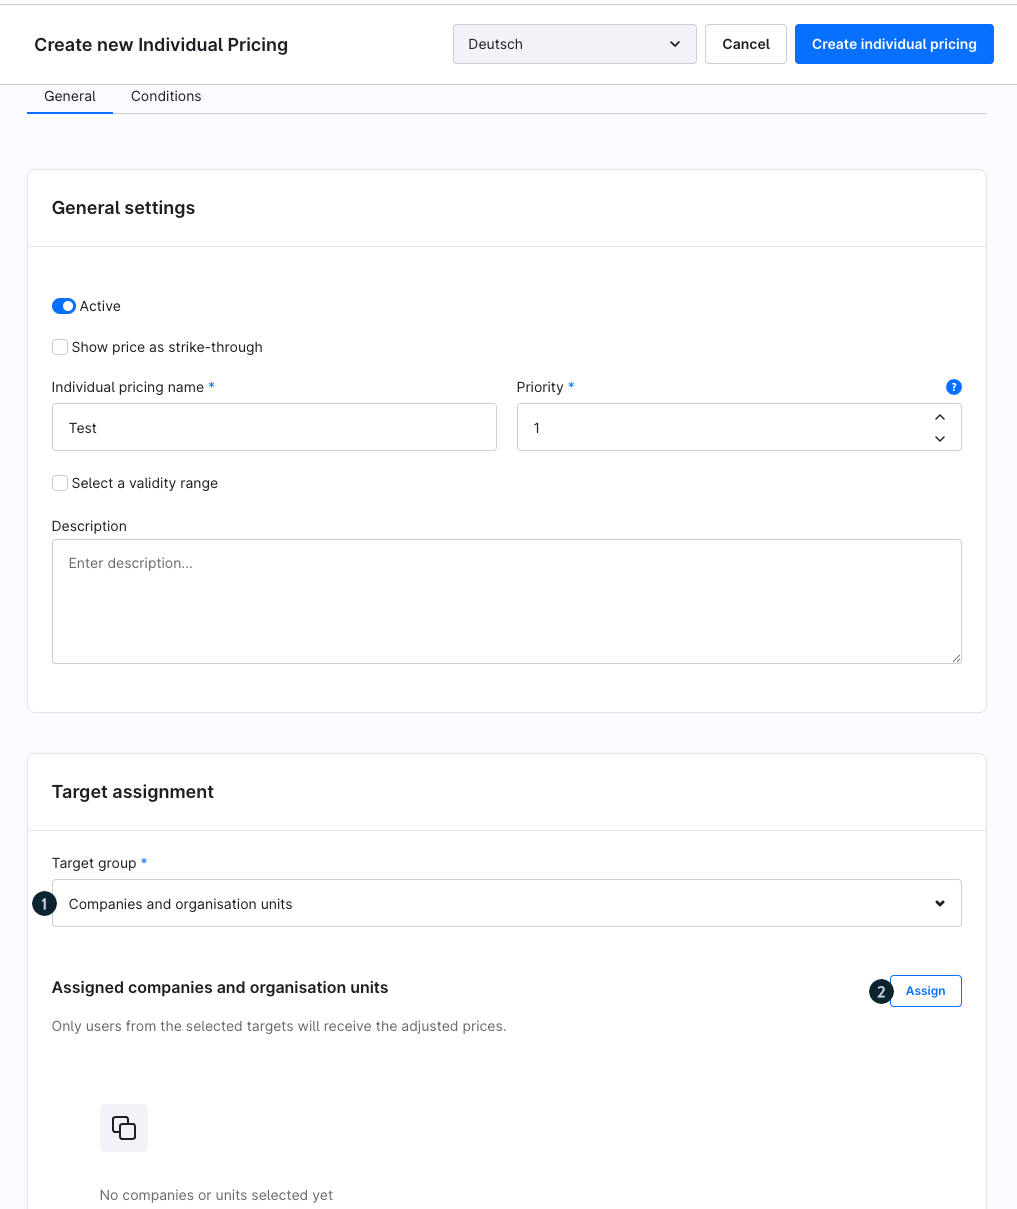
In the Target Assignment section, select the target group Companies andorganisation units (1), as the customer is registered as a company and you want to grant a discount to users throughout the entire company. Then click on the Assign (2) button. A new window will open.
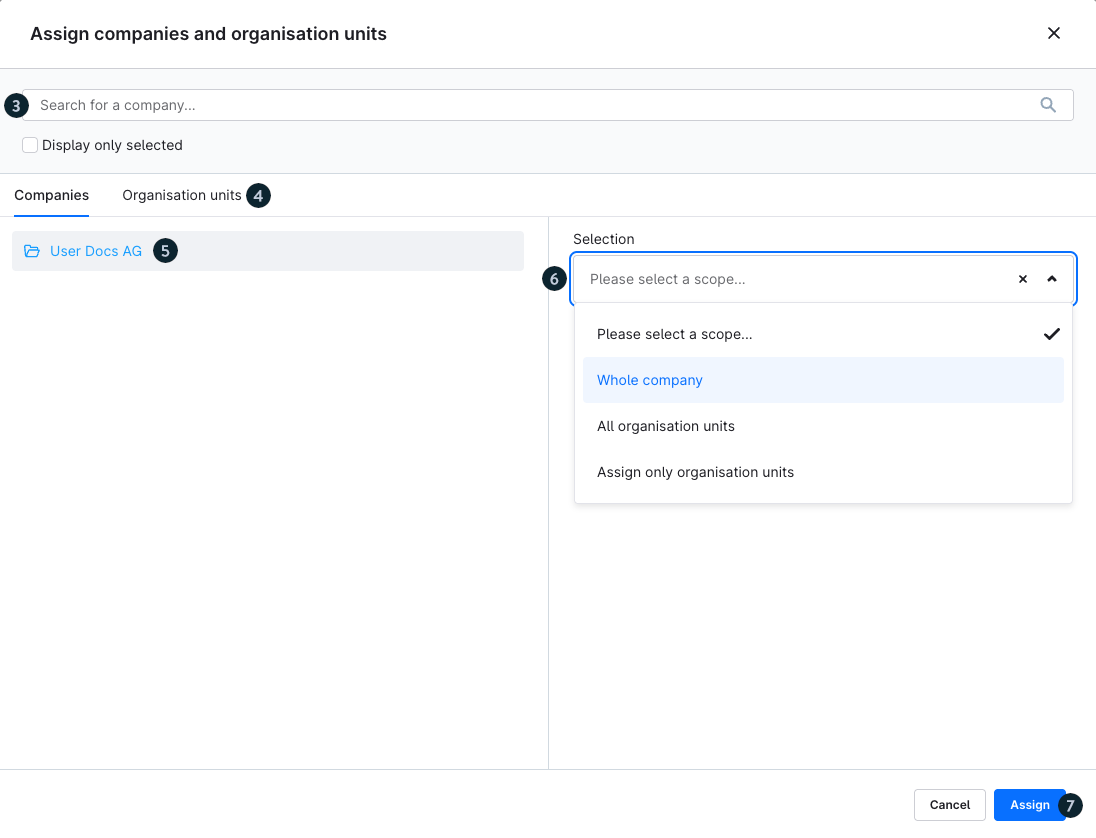
First, search for the desired customer in the search field (3), then select them in the Companies/Organisation Units (4) area by clicking User Docs AG (5). After selecting the company, you can use the drop-down menu (6) on the right-hand side of the window to select that you want to grant the individual price rule to the entire company. Then click on the Assign (7) button.
The window closes, and you will see the assigned company (8) in the Target assignment.
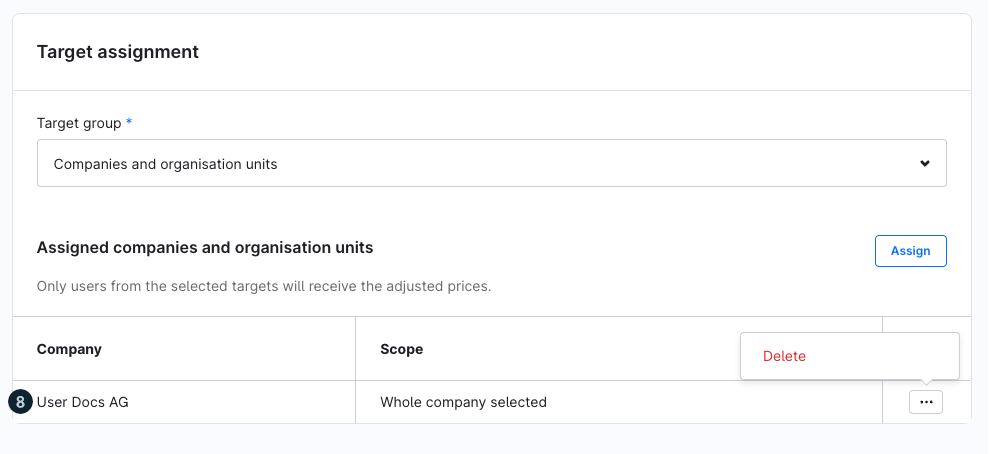
There, you can also delete the assigned company again via the context menu if necessary.
Now switch to the Conditions (9) tab.
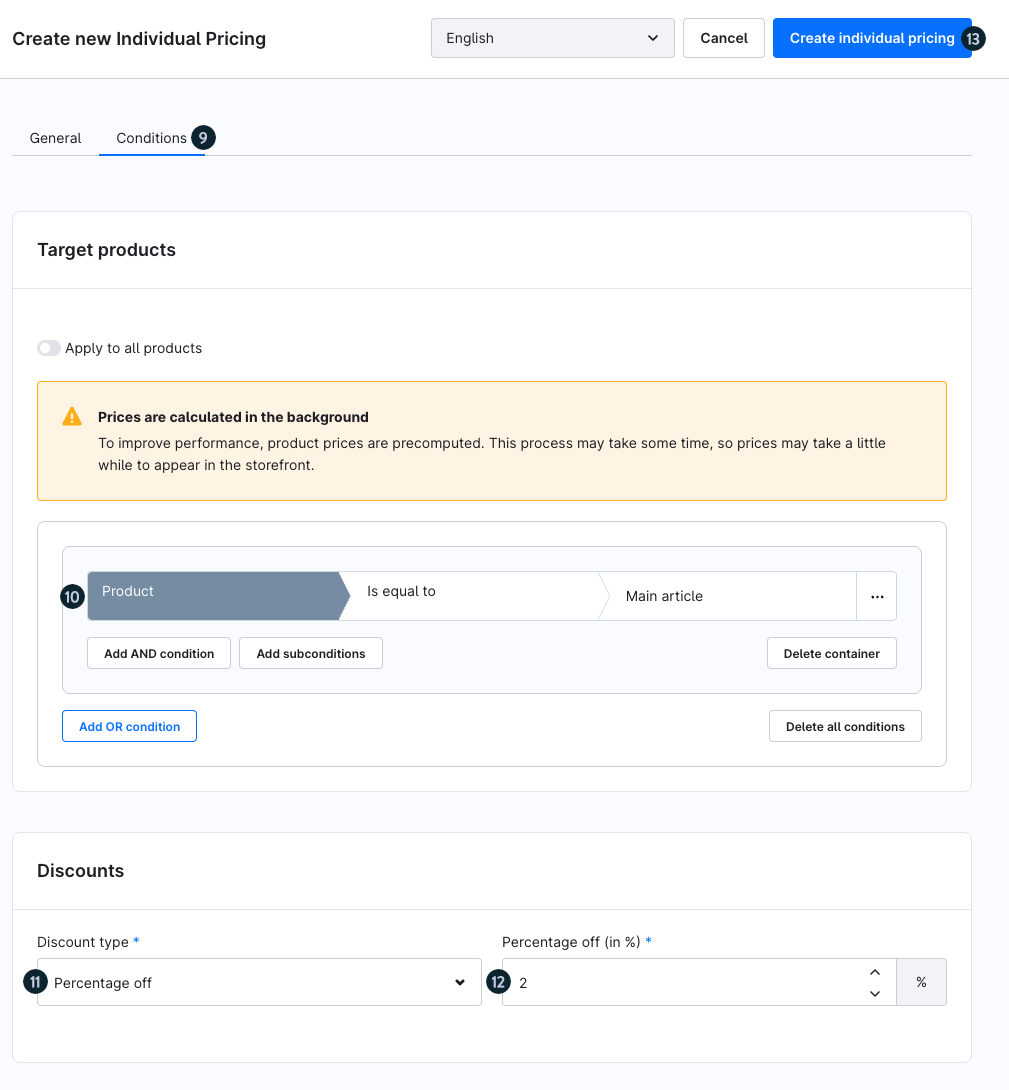
Since you do not want to apply a discount to all products in your shop, but only to a specific product, select the condition ‘Product’ and the operator “Is equal to” in the Rule Builder (10). In the third field, select the product ‘Main item’. Further down, finally select the discount type Percentage off (11) and enter the value ‘2’ for 2% in the field (12) next to it. Finally, click on the Create individual pricing (13) button to save your price rule and make it available.
View in the storefront
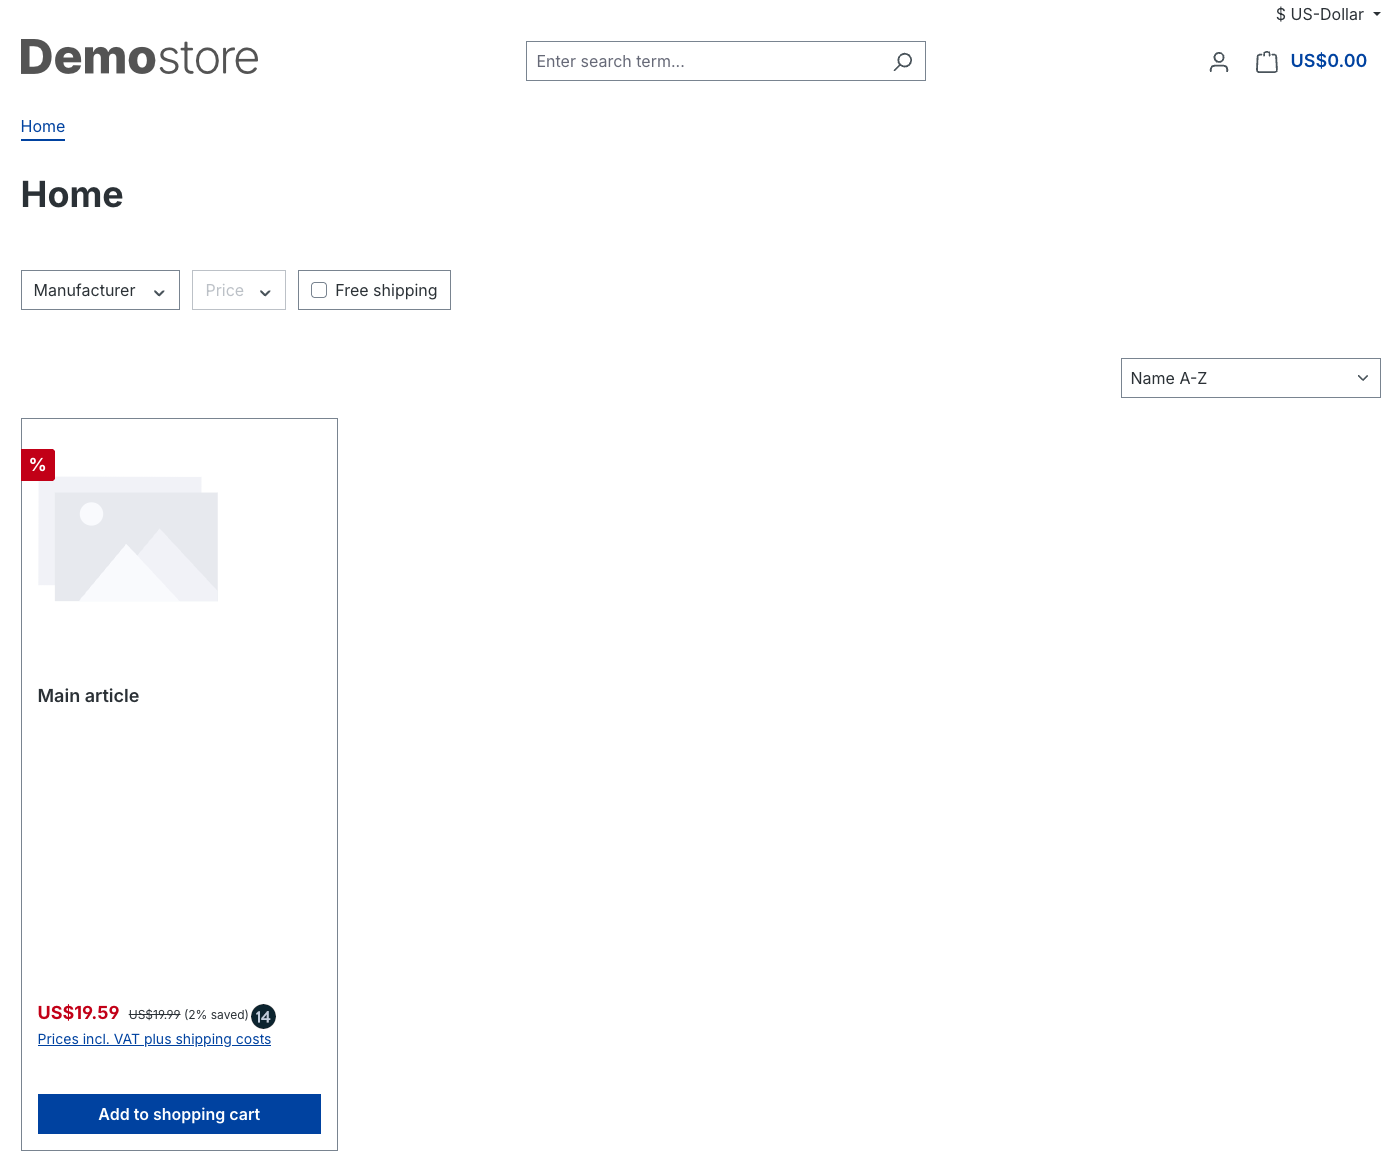
In the storefront, your logged-in customer will now see the discount you have granted (14), which in this example is 2%.
Quick orders
Starting with Shopware version 6.5.4.0 and the Shopware Evolve plan, it is possible to use the quick order function.
This allows your customers to expedite the ordering process by adding items to the shopping cart via item number or a CSV file.
Activation
The function can be activated per customer by first entering edit mode in the user configuration in the admin and then setting the "Quick order" function to active.
Frontend view

In the frontend, you can access the feature by clicking on the account icon (1) and then selecting Quick Orders (2).

To speed up the general ordering process, you can search for products by name or product number (1) and adjust the quantity (2) directly. With the Add to list button (3), you can add the products to an existing shopping list or alternatively create a new shopping list and then add the products. As soon as all products have been selected, you can add them to the shopping cart (4).
You can upload a ready-made CSV file using the Upload file function (5). After clicking on the button, a window will open where you can upload your file. The file must contain the columns ‘product_number’ and ‘quantity’. You can also download a template there. If you want to delete the list, click the Clear list button (6).
Shopping list
From Shopware 6.6.3.0 you can use the shopping lists in the B2B Components.
On the one hand, the shopping list can be used by B2B users to create a shopping list for a later purchase. On the other hand, the retailer can use the shopping list to provide an order suggestion for specific use cases.
Activation

You can decide for each customer whether the shopping lists should be used. Open the customer in the administration and activate the slider for the shopping lists, as shown in the screenshot.
Frontend view

In the front end, you can access the feature by clicking on the account icon (1) and then selecting Shopping lists (2).

If you have not used shopping lists before, you can start directly by clicking on Create list.
As soon as the first shopping list has been created, you will see this view:

You can also create a new list via Create list. For each existing shopping list, you can access the context menu via ... . Open shows you which products you have saved. If you want to use an existing list as the basis for a new one, you can obtain a copy of the selected list with Duplicate. If you are not happy with the name, you can use Rename. If a list is no longer required, you can delete it with Delete.
An order with the selected products is created when you execute Add products to cart.
Admin view
As a store owner, you can create or edit shopping lists for B2B customers in the admin.

Once you have activated the shopping lists for the relevant customer in the B2B Components area, you will receive an additional Company tab (1) in the customer account.
This tab shows the list of all shopping lists (2) for this customer. This contains an overview of how many products the list contains, the total value of the list and who created the list. As soon as you are in edit mode (3), you can add list (4) or edit an existing list (5).

When you edit or create a new list, you can first define the name (1) in the General tab. For new shopping lists, you can also specify the sales channel (2) they are intended for. For existing lists, this is fixed and cannot be changed.
In the Items section (3), you can add or remove products and similarly change quantities to the order overview.
You can either save the list directly using the Save button (4) or save the changes as a new list or as a duplicate using the right arrow.
Add products to a shopping list
To add products to your shopping list, you can directly click on the grey plus sign in a category list. In the product detail view, you will find a plus sign labelled Add to list.

Under Add to you will find the names of your existing shopping lists. Simply click on the name of the list to which you would like to add the product. If you want to create a new list, you can use the last menu entry for this.
Sales Agent
Sales agents and independent dealers can access B2B relevant customers via the Sales Agent Login. This function can be set up as a separate installation.
It is set up on your own server or subdomain by your agency or administrator and linked to your store.
You can find more information in the article Sales Agent.