
You are currently viewing the article on an older Shopware version!
Category
Introduction
The category administration provides a structured way for hanging your items. Here you can use as many main and subcategories as required, assign headlines and text to each as well as optimise them for search engines.
Settings
Category overview
In the left column you'll find the complete category overview, the highlighter (1) shows you, in which category you are working. Inactive categories (2) will be shown in light grey.

Creating a category
If you haven’t already created a category in Shopware and the category tree is empty, you will have to create the main categories. In the default Shopware installation, the system’s category is named “Shopware”, and the corresponding category is “English”. Click on English (1) on the left and assign the name of the new category in New subcategory (2). Click on Create subcategory (3) to create the new category.
The first level under "English" is your "scaffold" in Shopware and will be shown in your frontend’s main category table (in all default templates and if the categories are active and visible). The root category "Shopware" cannot be used as scaffold for your shop.
The category "English" is your shop’s default homepage. This is important to know when creating banners, defining keywords, descriptions and other SEO relevant content.
After you build the structure of your scaffold, you are able to create additional subcategories within subcategories. When the category is saved, the tab "item mapping" becomes active, which allows you to assign items to your category. After you created a new category, the settings area can be used to assign additional settings that weren’t possible when creating the category structure (i.e. active, filter options, product layout, etc.). When you create a new category, it will always be displayed as a simple category. When you want to move an existing category, you have to manually create a subcategory in order for the category to get a folder icon. Only when your category has a folder icon can you move categories via drag & drop.
Renaming a category
To rename a category, click left on the desired category. This opens the details on the right, where you can rename your category. Don’t forget to save your changes.
Moving categories
If you want to change the category order, you can do this simply using drag & drop. After repositioning your categories, a popup message will appear asking you to confirm your changes. The categories will reposition after you confirm.
In Shopware, you also have the possibility of migrating entire category trees. Doing this is as simple as moving a category – just drag & drop the category tree together with its subcategories and save your changes.
Categories can only be moved into categories that already have subcategories, otherwise it won’t be possible to drag & drop into the category.
Duplicating categories
To duplicate a category, first choose the desired category in the left category tree with a click and click on "Duplicate". In the following popup you can choose the destination category, under which the duplicated category will be placed. You can also choose whether or not you want to copy the item associations as well.
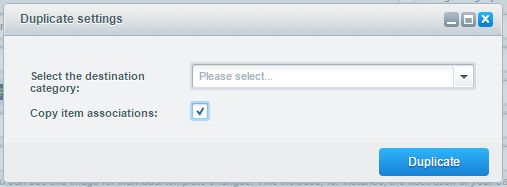
Note, that duplicating categories works recusively, so all subcategories will also be copied.
Deleting categories
To delete a category, just select your desired category from the tree on the left and click "Delete category".
Assigned items will never be deleted, only the category and the category assignment of the assigned items will removed!
Default settings

- Active (1): Here you can set your category as active or inactive. Please note that disabled categories lose their SEO power! Subcategories are still active, but are no longer displayed in the category tree since you disabled the main category. Additionally, the main items assigned the subcategories will still be available and active!
Items that are assigned to a disabled category can still be searched for in your online shop and/or will still appear in Shopping Worlds. Items must be disabled manually.
- Blog category: (2) here you can set whether the category is a default item category or a blog category. In blog categories, only blog articles can be displayed. If you set your category as a blog category, you can provide blog articles with the blog module in Content > Blog
- Description: (3) this is the name of your category. The name can also be changed here.
- Product Layout: (4) This option inherits the template selection of the Emotion Template lets you choose between the different item layouts (detailed information, only important information, only image, parent setting). With the parent setting, you can build a setup where you only provide a selection for the main categories and all subcategories inherit the layout from their parent.
- Product Stream: (5) with this setting, you can assign a product stream to your category, since Shopware 5.1.4 this works also when your category has sub-categories. If your category has no assigned stream, it will get assigned items based on the settings of your sub-categories automatically.
- Link to an external site: (6) with this setting, you can allow your category link to an external site in the frontend. If you do this, the URL has to start with http:// or https://. Note that you can't link the main category (i.e. "English") to an external site.
- Image: (7) you also have the option of assigning an image to your category. This image will be provided in the advanced menu of the responsive template.
- Do not display in top navigation: (8) here you can make your category invisible in the top navigation in the frontend. By default, it will still be displayed in the sidebar navigation. This setting only works for categories on the 1st level.
- Hide filters: (9) with this setting, you can either activate or inactivate the filters of this category.
CMS functions
In the CMS function, you can provide SEO relevant content for your visitors, giving your category a headline and a description. The text should match the categories content, since your visitors and search engines can read this content.

Do NOT simply copy & paste your content from other websites or word documents, otherwise you may paste external formatting and destroy your template by doing this.
Provide meta information
In providing meta information, you optimize your category for search engines. This is because only search engines "see" this information. For this reason, it’s important you provide useful content. If you don't provide meta information, keywords will be left empty and the description and title will be inherited from the CMS description in the category name. Keywords must be separated by a space – in the description, regular text without HTML commands is allowed. If you do not provide meta information for the shop’s main category, Shopware will inherit the meta text snippets from the snippet manager.

Additional free text fields
By opening the area free text fields (1) you can fill up to 6 free text fields. You can use these fields in the frontend, SEO engine, URL structure, etc.

Item mapping
Mapping in the category module
In the item mapping, you can quickly and easily map items to your category. Using Searching (1), you can search for the order number and item name. To map items, mark items in available items (2) and either click the arrow icon or use drag & drop to move them to mapped items (3).

An item can be mapped to as many categories as necessary. However, take care to map items to appropriate categories since the search also uses category mappings. An item in Shopware can only be mapped in the lowest level category, since main categories inherit all items mappings from their lower level categories. Mapping in main categories is not supported.
The drag-and-drop function for the assigned articles is only used to remove the article assignment and does not affect the sequence of articles. If you move an article to a higher row, the article assignment will be removed.
Mapping in the item module

In the tab "categories", you can define in which categories your item should appear. Just choose your desired category (1) in the left column and drag & drop it to the hatched zone (2). You can also click the green + Icon In the block mapped categories (3), all active mapped items will be shown. If you mapped more categories per shop, you can define a SEO category of the product, which will be used for generating the SEO URL for the desired shop. Please note that changing SEO URLs may cause problems with your SEO ranking when indexed SEO URLs can no longer be reached. Here you can decide on your own how the SEO URL should be generated for your item. First, choose your Shop (4) and Category (5) that should be used for generating the SEO URL.
Restrict category
Here you can define the customer groups that can see the category in the frontend. This is to ensure that certain customer groups do not see the category in the frontend. Mark the Available customer groups (1) and drag & drop the desired customer group into the Block category for (2). You can also use the arrow icon to move the customer group. After doing this, save your changes.

This setting won't concern the mapped items, If you want to restrict these too, you have to do this for each item separately in the article module.
Filter/ Sorting
Custom sortings
You can choose an individual sorting for a specific category.

- Hide sortings: The sortings will be displayed in the category.
- Active: Activates the option.
- Available sortings: Choose one of the default sortings via dropdown (multiple selection possible).
- Apply to subcategories: The chosen sortings will be applied to the subcategories.
Custom filter

- Hide filters: The filters will be displayed in the category.
- Active: Activates the the filters.
- Available filter: Choose one of the available filters (multiple selection possible). The filter will be applied if minimal one item have the filter property.
- Apply to subcategories: The chosen filters will be applied to the subcategories.
You still can filter for your individual properties, which can be added in the Item properties. For filtering the option "filterable" must be active.
Tips & Tricks
Sorting in the category listing
You can set the default sorting here:
Configuration > Cache / Performance > (Tab) Settings > General > Categories > Listings
By default, Release date is set.