
First steps in Shopware
Now that you have installed Shopware, we will take the first steps together in your new system.
First Run Wizard
The First Run Wizard guides you through the initial setup of your new Shopware installation. Here you can set up basic things in the store. The First Run Wizard is only opened for admin users for new installations and appears automatically after the login process, for updates it is always deactivated.
Languages
At the first step the wizard shows you all available language plugins for your Shopware version. These plugins are community driven translation of the Shopware snippets, so it's backend and frontend. If you setup your shop for one of these countries, you can just install the desired plugin.


When you install a language plugin and proceed, the wizard asks if you want to switch the wizard to the downloaded language. Alternatively you can also switch to German or continue in English.
Demo data
Here you can install demo data for testing purposes. After the installation you should activate the demo data directly, so that they are also available after the First Run Wizard.
When you installed Shopware for a production environment, we don't recommend to install demodata, but for test environments you can install these data here as a plugin.

PayPal
If you want to use PayPal as a payment method in your store, you can connect directly. Click on Start now.

Then enter your access data for your PayPal account, click on save and then on continue.

Recommendations
These are are recommendations from Shopware which may be helpful for you. If needed, you can install them directly:

Further you will see Country-specific recommendations, this are plugins, which will be used often in the desired country. Just select your country to get an overview of the available plugins and install one, if needed.

Configuration
In the area Shop settings you can set the basic informations of your shop like the name, e-mail address, address, bank details and the company.
In the Theme configuration you can set the primary and secondary color of your theme and the shop logo. Primary for example are Buttons, active and primary links and headings while secondary are secondary buttons, running text and other links.

The bank details are used by default in the order confirmation mail in case of prepayment. Please fill this field HTML compliant to make sure, that breaks in HTML mails will look correctly.
The set Shop logo is used for all viewports by default. if you want to set divergent logos for single viewports, you can do this afterwards in the Theme Manager.
Mind the image size! While the theme and the most webmailers will display it correctly, applications like Outlook will display the image in full size, because they cannot interpret the related CSS property.
Done
The wizard is finished now and he shows you further steps to go: Visit the Community Store, create a Shopware Account, visit the forum or open the documentation. By clicking Finish you complete the wizard and will be forwarded into the Shopware backend.

Revisiting the wizard
If you want to revisit the wizard, you can reactivate it using the basic settings in Configuration > Basic settings > System > Backend by activating the First Run Wizard-option and clear the cache. After reloading the backend the wizard will show up again.

Opening the Backend
After installing Shopware you can open your Backend with the URL http://www.yourshop.com/backend and login with the data you entered in the Installer.

Configure Backend
After installing Shopware you have to configure your shop. We'll show you here, which basic settings you should check and may change.
Currencies
At first, check your active currencies, that all of your target users can pay in their currency. This setting you can find in Configuration > basic settings > shop settings > currencies (1). Here you define all of the needed currencies which can be assigned to the desired shops later.
Never delete the default currencies!

Further informations to currencies can be found here.
Taxes
Check the configured taxes, the setting can be found in Configuration > basic settings > Shop settings > Taxes (1).
Neverdelete the two default tax rates! You can add new tax rates or define different tax rates for each country. The default rate "19%" is declared as the default tax rate for goods, while the "7%" rate is the low tax rate for e.g. books and food in germany. Please check, if you need both of them, but never delete one of them!

Further informations to taxes can be found here.
Customer groups
Customer groups are an important component to manage your users, e.g. separation of customers and resellers. Since they may have different item prices you can set up the customer groups as you need them.
Open the Settings in Configuration > basic settings > Shop settings > Customer groups (1) and check, if you have all neccessary customer groups created.
The customer group "EK" is a systems customer group and must never be changed or deleted!
Customer group keys can't contain spaces, umlauts or special characters, since this can lead to massive problems in the database!

Further informations to customer groups can be found here.
Shop settings
With the shop settings you set up fundamental settings, if you want to set different settings then provided in the installer, you can do so, but normally you don't need to make changes here.
Open in the Backend Configuration > basic settings > Shop settings > Shops and verify the data.
NEVER delete the default shop! You can change the data if you need to, but in case of deleting, the shop will be massively damaged.

Further informations to shop settings can be found here.
Provide basic information
The basic information contains important information of your shop like the name, address, bank account, company and the "FamilyFriendly"-Tag for search engines.
Switch in the Backend to Configuration > basic settings > Shop settings > Basic informations and enter your data.

Further informations to basic informations can be found here.
Configure payment methods
It's time to set up your desired payment methods. In Configuration > Payment methods you'll find an overview of all installed payment methods. If you need additional payment methods, you can take a look into our Store, where you can download other payment plugins. The payment methods will only be provided in the frontend checkout, when your customer fits the payment requirements:
- Enabled in the shipping methods
- No Risk Management restriction
- No restriction through the payment method itself (plugin)
Further informations to payment methods can be found here.
Shipping methods
Now configure the shipping methods, which should be available in your shop. You can find the shipping methods in 'Configuration > Shipping costs, please make sure, that you used payment methods are enabled for the desired shipping methods, otherwise this can cause in problems. If you're missing shipping methods, you can take a look in our Store and add your desired shipping method.
Further informations to shipping methods can be found here.
Forms
Forms are used at multiple places in the frontend, e.g. the contact form. You can / should edit this forms that they're suitable for you. To do this, switch in the backend to Content > Forms and change (1) your email-address, to who the form will be sent. If needed, you can also individualize the form as you want to.

Further informations to forms can be found here.
email templates
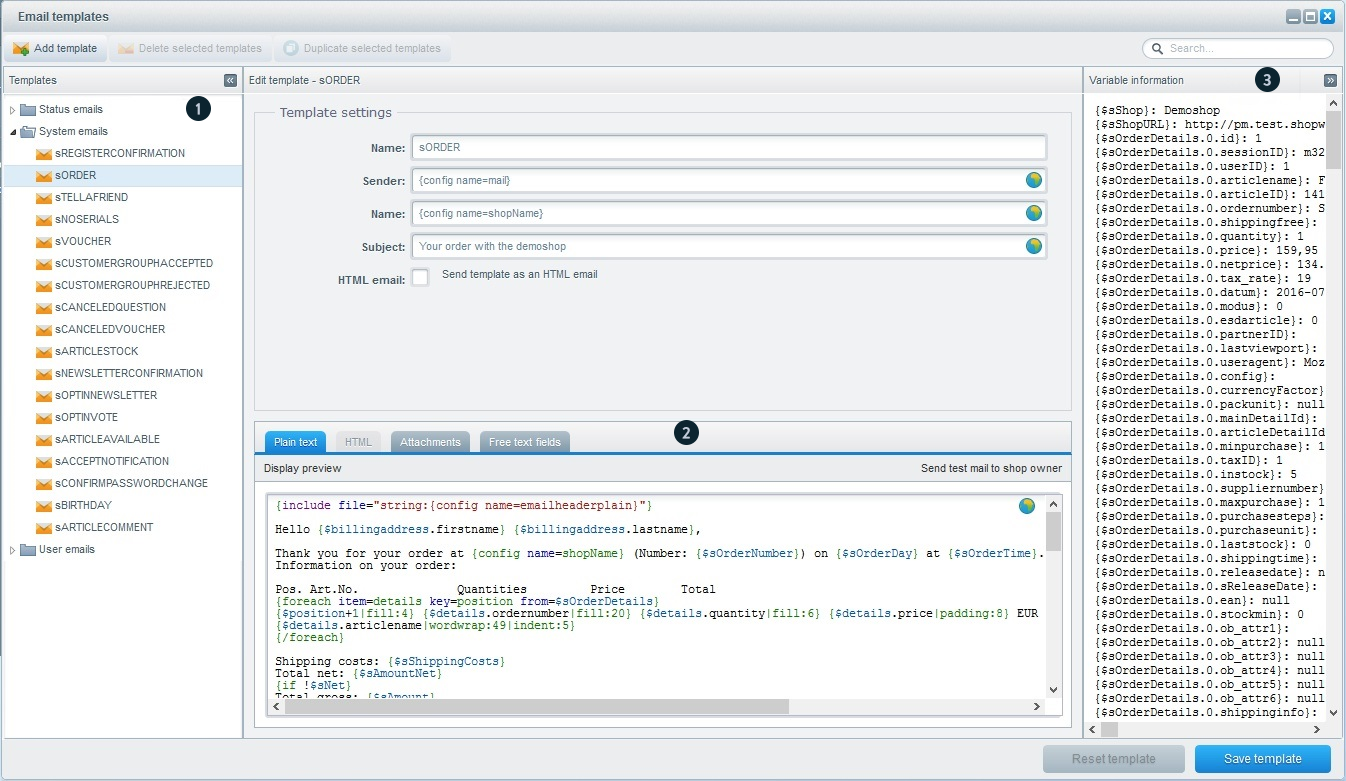
Email templates are an important component of your shop, because all of your email template will be defined here, e.g. the order- or register confirmation.
Configure your Status- and System emails (1) templates in Configuration > Email templates, you can switch between plaintext and HTML (2) format. Which variables are available you can see in Variable information (3) after expanding. To see all available variables, this email must be sent at least once.
Further informations to email templates can be found here.
create category structure
In Items > Categories simply create your desired categories.
Further informations to email templates can be found here.
create items
Items can be created at Items > Create or Items > Overview > Add item. Doing this, you should think about some things like the minimum data and rules for item numbers.
Further informations to items can be found here.
Configure the Frontend
After we configured the backend settings, we now devote to the frontend.
choose Theme
Open the Theme Manager at Configuration > Theme Manager and choose the desired shop first, before you choose the desired theme for this shop. You can individualize the theme itself by clikcing configure theme.

The Bare Theme is only a base and contains neither Styling nor JavaScript! The Bare Theme is only for Theme developers who want to build theid own theme from the scratch by derive from the basic structure!
Further informations to the Theme Manager can be found here. If you want to write your own Theme or individualize the theme following our conventions, we recommend to read our Designer`s Guide.
Change shop logo
Since Shopware 5 the logo must not be changed in the code, but in the theme settings (see: change Theme).
Meta Informations in the source code
In the source code of the shops frontend you will find the following code:
<meta name="author" content="#IndexMetaAuthor#" />
<meta name="copyright" content="#IndexMetaCopyright#" />
<meta name="keywords" content="#IndexMetaKeywordsStandard#" />
<meta name="description" content="#IndexMetaDescriptionStandard#" />
This are meta informations which are relevant for search engines, this informations are not defined by default, so you have to switch to Configuration > Snippets' and search for the snippets like IndexMetaAuthor for the author of the site and edit the snippet.
Edit the footer
The most links in the footer are snippets, form links or shop pages.

Service Hotline
This text is editable at Configuration > Snippets, by searching the snippet sFooterServiceHotline you can simply edit the snippet as you want.
Shop Service
In this menu you'll find links to the forms e.g. the contact form. You can change the link to the form in Content > Shop pages > English bottom pane (Shop service) or delete the group assignment.
Further informations to Shop pages can be found here.
Information
In the Information menu you find links to shop pages, which are editable in Content > Shop pages > English bottom pane (Information).
Further informations to Shop pages can be found here.
Internationalise Shopware
There are a few things to consider when it comes to internationalisation. For this reason, we have created a detailed guide that explains the necessary steps.