Sales channel
The sales channels offer you the possibility to connect different sales channels via a shop system. This can be the classic storefront on the one hand. But it is also possible to transfer data to comparison portals (e.g. billiger.de or Google Shopping) or to integrate social shopping (e.g. Instagram).
Overview

In the menu of the Shopware Administration you will find the item Sales Channel. You can click on the plus symbol to create a new sales channel. Already created sales channels are displayed below the point Sales Channels and can be edited by clicking on them.
Customer assignment
In the settings under Shop > Log-in/sign-up > Bind customers to Sales Channel you have the possibility to bind your customers to your sales channel.

If this option is activated, your customers can only log in to the sales channels in which they have registered. This also applies if the option should be deactivated later.
If the option Bind customers to Sales Channel is disabled, all customers who register now will be able to log in to all sales channels, even if the option is enabled later.
If a customer registers with the same e-mail address in two different sales channels with the option activated, they will be treated as two different customers. The customer exists twice in your system, but for different sales channels.
In your administration under Customers > Overview you can display the column for the sales channel via the list settings.

To do this, first open the list settings (1) and then activate the option for the sales channel (2).
Then the column Sales channel will appear, in which you can see for which sales channel your customer has registered.

Add a sales channel
To create a new sales channel, click the plus symbol next to the menu point Sales Channel.

In the pop-up window, you can choose whether you want to create a new Sales Channel with HTML storefront or a headless sales channel that only provides an API interface. You can also create a product comparison here. This is used to export your products to comparison portals and marketplaces. Further information about this function is available here.
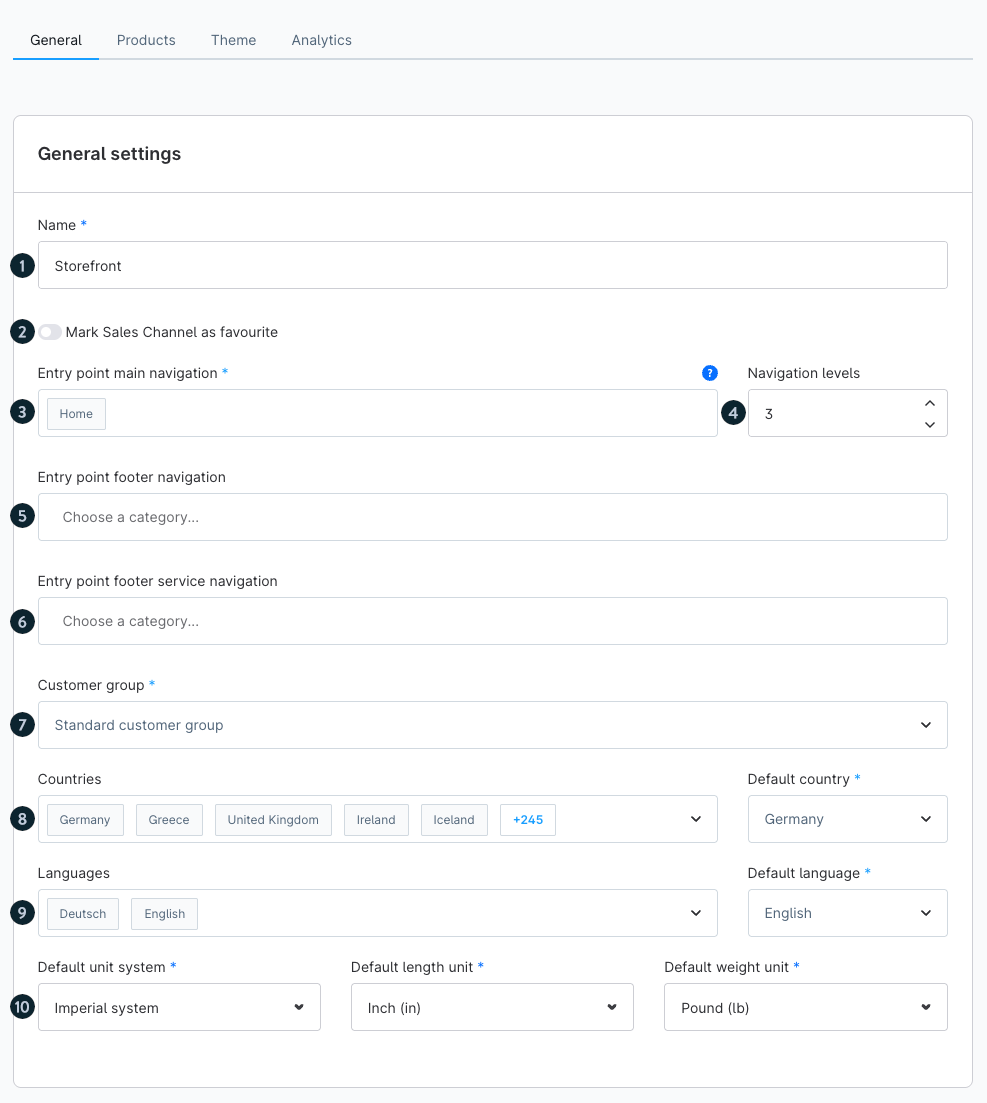
General settings

Name (1): This is the name of the sales channel. It is used internally at all places where you can store settings for this sales channel.
Mark Sales Channel as favourite (2): Activating this option will cause this sales channel to be displayed in the admin in the left sidebar under sales channels.
Entry point main navigation (3): This is where the main navigation begins. In the standard Responsive Theme, the main categories correspond to the level below the category selected here.
Navigation levels (4): Enter the number of levels to be displayed below the currently selected level in the main navigation. The maximum possible number of levels depends on the theme used.
Entry point footer navigation (5): Enter the start category for the Footer Navigation here. In the Standard Responsive Theme, the level below this selected category contains the footer navigation items and the level below contains the clickable menu items.
Entry point service navigation (6): Here you specify the level at which the Service Navigation should start. In the standard Responsive Theme this category is displayed inthe bottom right.
Customer group (7): Enter the standard customer group of your sales channel here. New customers and unannounced visitors are assigned to this customer group.
Countries (8): Indicate which countries should be available in your sales channel and select a default country.
Languages (9): Indicate here which languages should be available in your sales channel and select a default language.
Standard units of measurement (10): Enter the standard units (Default unit system, Default length unit, Default weight unit) for your sales channel here.
Payment and shipping

Payment methods (1): Specify here which payment methods should be available in your sales channel and select a default payment method. You can edit the available payment methods under Settings > Payment methods.
Shipping methods (2): Specify here which shipping methods should be available in your sales channel and choose a default shipping method. You can edit the available shipping methods under Settings > Shipping methods.
Currencies (3): Specify which currencies should be available in your sales channel and select a default currency. You can edit the available currencies under Settings > currencies.
Tax calculation (4): Establish how taxes should be calculated for orders in this sales channel.
An example to illustrate the different calculations:
Line by line (horizontal) calculation
NetQuantity VAT rate Net Gross Net total plus vat Gross total 5 7 1,49 - 5*1,49 plus vat 7,45+0,52 7,45 0,52 7,97
GrossQuantity VAT rate Net Gross Net total plus vat Gross total 5 7 - 1,59 7,95/1,07 7,95-7,43 5*1,59 7,43 0,52 7,95 - Column by column (vertical) calculation
NetQuantity VAT rate Net Gross plus vat Net total plus vat Gross total 5 7 1,49 1,59 0,10 5*1,49 5*0,10 7,45+0,50 7,45 0,50 7,95 Quantity VAT rate Net Gross plus vat Net total incl. vat Gross total 5 7 1,49 1,59 0,10 7,95-0,50 5*0,10 5*1,59 7,45 0,50 7,95
Hreflang

The Hreflang metatag is important if there are several language versions of your shop. The tag is used to clearly assign the content to the respective language. It prevents Google from classifying multiple language versions of your shop as duplicate content.
After you have activated the option, all your domains are displayed in the drop-down menu. Then select the default domain here, which will serve as a fallback for all languages.
Domains
Please note that a self-hosted version differs from a cloud version in the domain settings.
Self-hosted instance

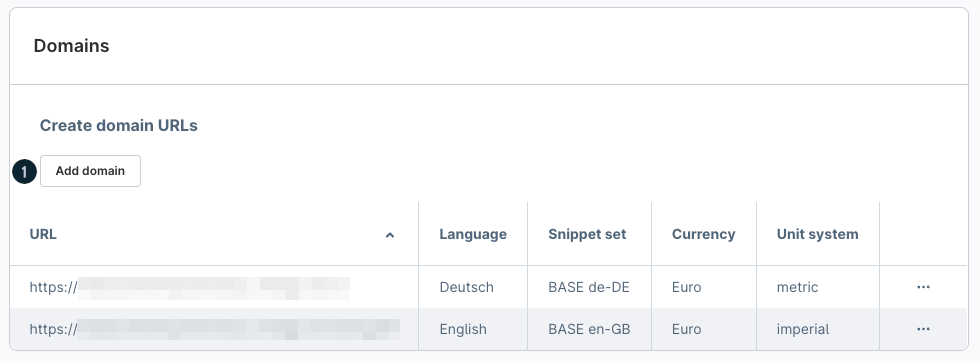
Under the item Domain you can create several domains for your sales channel, each with its own virtual URL, language, currency, snippet set and its own unit system.
This is necessary if way you can create multiple language shops for one shop.
You can open the window for creating an additional URL by clicking the button Add Domain (1).
It is recommended that the domain be deposited with only one internet communication protocol (https:// or http://), otherwise duplicate content may be created.
Cloud Instance

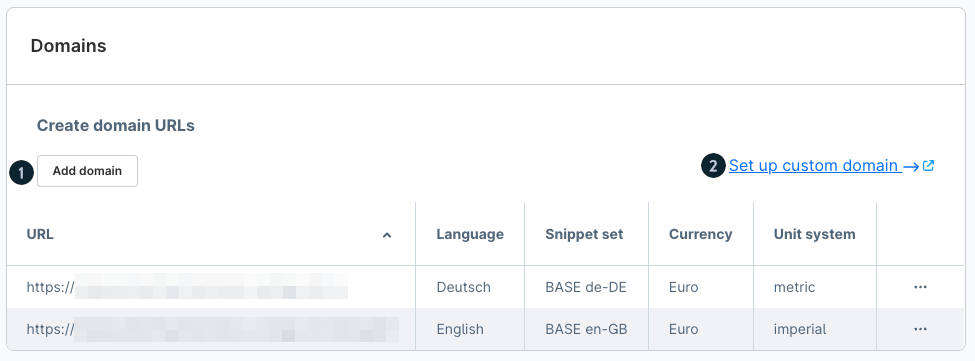
In a cloud instance, a URL is already stored in the standard system. This is generated automatically when the instance is created.
If you want to use your own, individual domain, you can do this by clicking the button Add domain (1).
The prerequisite for this is that you have already added your own domain under Settings > System > Domains. Alternatively, you can reach the corresponding menu by clicking on the link Set up individual domain (2).
Information on how to set up your own domain can be found here
A server-side forwarding ensures that the connection is always established via https://.

In order to assign a domain to the sales channel, it is necessary to define some settings:
URL: In the text field for the URL (1), enter the desired domain and any subdomain. By clicking on https (encrypted) you can change the protocol to http (unencrypted).
Language: Specify the Language (2) in which the store should be accessed via this URL. At this point, you can choose from all the languages that were assigned to the sales channel in the basic settings above.
Currency: Define which Currency (3) should be used when accessing the store via this URL. You can choose from the currencies available under Settings > Localisation > Currencies.
Snippet: You use the Snippet (4) to specify which snippets are to be used. The snippets available under Settings > Localisation > Snippets can be selected.
Hreflang localisation: Here you can define how the localisation (5) for the hreflang attribute should take place. This allows you to transmit the correct translations to Google, for example, when using multiple languages in your store. A distinction is made here between localisation via the ISO standard or purely via the browser language used. Localisation via ISO is useful, for example, if you use different (country-specific) language variants that may use their own country-specific terms (e.g. in English or French)
API access

Here you can generate an API Access ID for this sales channel. For more information on how to use your own API accesses, please refer to our developer documentation.
Status

Here you can temporarily disable the sales channel. It is then temporarily inaccessible for visitors and the API. In addition you can activate the maintenance mode here. The frontend will then only display the maintenance page layout. You can grant access using the whitelist for selected IP addresses.
Be mindful when using a proxy server
In order for the IP whitelisting to work correctly when using an additional proxy server, it is necessary to store the IP address of the proxy in the .env configuration file (in the Shopware main directory) as a trusted proxy. This is possible via the entry TRUSTED_PROXIES=IP_of_the_proxy".
Alternatively this is also possible using the PHP settings. More information on how to do this in PHP can be found at https://symfony.com/doc/current/deployment/proxies.html#solution-settrustedproxies
Delete Sales Channel

If you delete the product comparison using this button, it will be irrevocably removed. You should only do this if the sales channel is no longer needed.
The preinstalled Headless sales channel should never be deleted! Many extensions use this particular iteration of a headless channel - among them our B2B-Suite.
If desired, you can hide the Headless channel in the Admin panel by setting one or more other sales channels as favourites. All non-favourited sales channels will no longer be displayed then (Although they can still be accessed via the dedicated Sales Channels menu).
Want to dive deeper?
You’ll find an interactive learning path on this topic in the Community Hub. Explore it step by step, try out features directly, and grow your knowledge in a playful, hands-on way.
Products
In the Products tab, you can assign products directly to the sales channel without having to edit each product individually.

Under Products you will first see an overview of all products that are already assigned to the sales channel. You can use the search (1) to search for specific products in order to remove them. You can add further products or entire product groups via the Add products button (2). On the left side (3) you can mark one or more products to remove them from the sales channel. Using the context menu (4) on the right-hand side, you can either remove the products or directly call up the product details of the respective product.
Add products

Product selection (1): All products that have not yet been assigned to the sales channel are displayed here. You can select all products to be added and then add them.
Category selection (2): Your category tree is displayed here. You can select complete categories whose products are to be added to the sales channel.
Product group selection (3): All the dynamic product groups you have created are displayed here. You can add previously defined product groups to the sales channel.
Manage Sales Channels

You can use the Manage Sales Channels button to display all of your sales channels. Whether storefront, marketplaces or social media.

You also have the option of defining one or more sales channels as your favorites (1). If you activate this option, the sales channel will automatically be displayed on the left in the sidebar (2) and those that are not favorites are not displayed. This allows you to customize your menu in the sidebar and access it even faster.
Theme
In the Theme tab you can assign a theme to your sales channel.

First of all you will see the theme that is currently assigned to the sales channel. If you click on the preview image of the theme or on Change theme, you can assign one of the installed themes. Click on Edit themes to go directly to the theme configuration.
Analytics
When using Analytics, Universal Analytics (discontinued by Google on 01 July 2023) or Google Analytics 4 can be used.
Events
Analytics tracks the following interactions and events in the shop as standard:
add-to-cart.event.js
add-to-cart-by-number.event.js
begin-checkout.event.js
begin-checkout-on-cart.event.js
checkout-progress.event.js
login.event.js
purchase.event.js
remove-from-cart.event.js
search-ajax.event.js
sign-up.event.js
view-item.event.js
view-item-list.event.js
view-seachr-results.js
Configuration
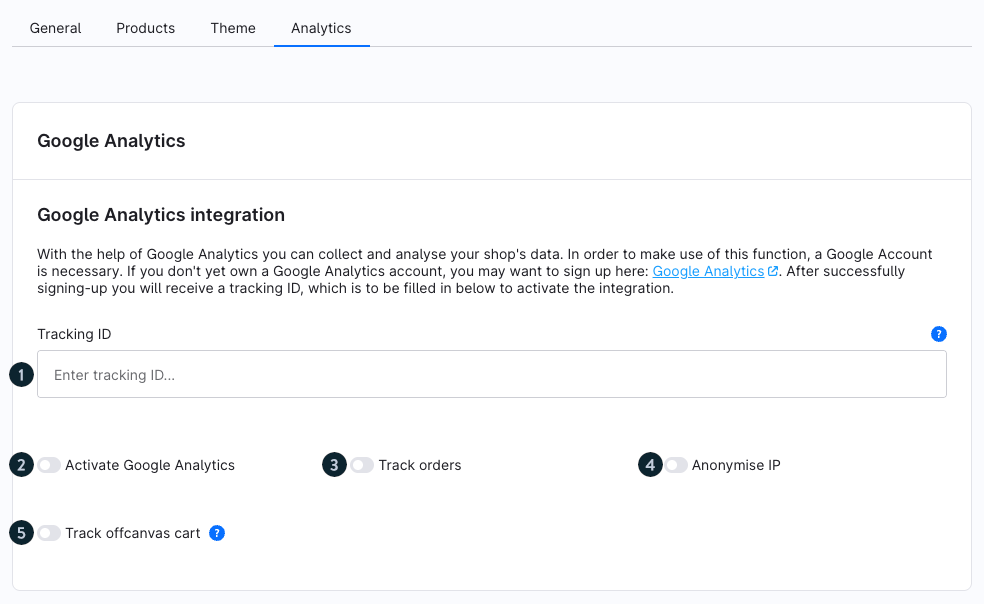
In the Analytics tab you have the possibility to connect a Google Analytics account by integrating a tracking code. This allows Google Analytics to run a continuous analysis and statistical evaluation of your store. You can get more detailed information about Google Analytics under the following link:
Get started with Analytics

Tracking ID (1): After logging into your Google Analytics account you will receive a tracking ID. Enter this ID here to connect your Google Analytics account with your store. To find your Tracking ID click on Administration in the lower left corner of your Google Analytics account and click on Tracking Information > Tracking Code in the middle column.
Activate Google Analytics (2): Activate this option to use Google Analytics to analyze your store.
Track orders (3): If you activate this option, orders from your store will be included in the analyses of Google Analytics.
Anonymise IP (4): If you activate this option, the last two groups of digits of the customer IP addresses are zeroed. Ex. 94.31.0.0. This means that visitors are no longer clearly identifiable by IP.
In some countries, such as the EU, there are legal regulations that prohibit the storage of the complete IP address of customers. If in doubt you should activate this option.Track offcanvas cart (5): When this option is enabled, a “view_cart” event is also triggered when the off-canvas shopping cart is opened, not just on the shopping cart page. Useful for detailed funnel analysis, but may increase shopping cart views.
Google Tag Manager
Analytics is implemented via the Google Tag Manager. User-defined events or scripts cannot be stored via this. This is possible via extensions from our store.
Enhanced ecommerce
Using gtag.js, advanced e-commerce reports can be tracked on the following topics:
Impression data
Product data
Action data
Action types
Please note the following article from Google: Link
