
You are currently viewing the article on an older Shopware version!
Users & Permissions
The menu item Users & Permissions can be found in the Shopware Administration under
Settings > System > Users & Permissions and offers you an administration for all users of your administration.
When you call up the item, you will find a structured overview of these users and now have the option of creating additional users and assigning them permissions or withdrawing permissions.
User
In the user area you can see an overview of all already created users. Here you can edit and remove existing users or add new users to your Shopware Admin.
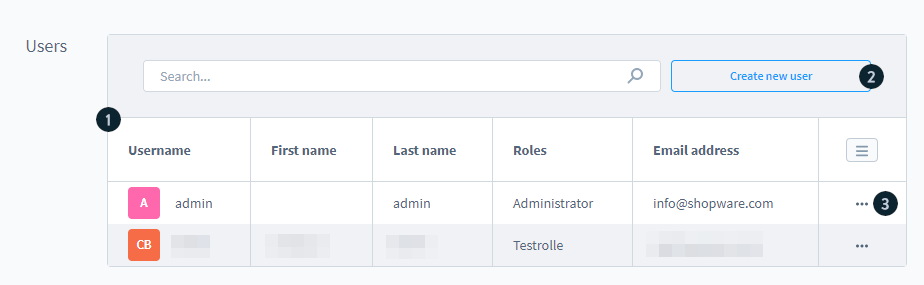
User overview (1): Here you see an overview of all created users with the most important information like name, role or e-mail address.
Create new user (2): With this button you open the mask for creating a new user.
Context menu (3): On the right side of each user you will find a context menu where you can remove or edit the respective user.
New user
With a click on the button Create new user next to the search field, the mask opens up for you to create a new user. Here you first enter the following basic information
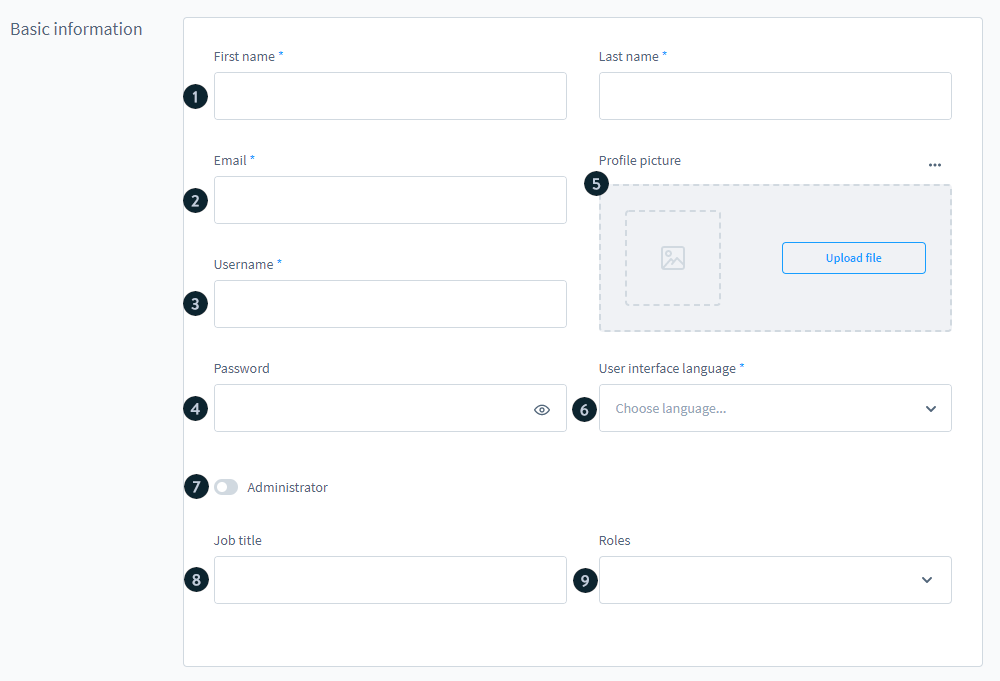
First name/Last name (1): Specify here to whom this user belongs.
E-mail address (2): In case the password has to be reset, it is necessary to enter an e-mail address.
Username (3): The user uses the username to log in to the login mask.
Password (4): The user needs the password to log in to the login mask. He can change this later in his personal profile at any time.
Profile picture (5): For better differentiation you can give the user a profile picture. This will be displayed in the user list. If the user is logged in, he will see it in the lower left corner next to the name he uses to change his personal profile. The user can also change this picture at any time.
User interface language (6): Select here which language the operator interface of the user should have. He can change this himself at any time in his profile.
Administrator (7): Here you can specify if the user is an administrator. Users with administrator have all available permissions. No role can be assigned to them. A user cannot assign or revoke the status Admin.
Job title (8): Here you can specify which job the user is doing internal in your company.
Roles (9): If the status Administrator is not set for the user, you can assign any number of previously created roles to the user here. So you can give the user the specific permissions he should have.
Integrations
In order to establish an API connection to external integration to which the user should have access, an API-Key is required.
With the button New Access Key you can create a new access ID, including a new security key. You should note down the security key directly, as it will not be displayed after saving. Using the context menu next to the created access keys, you can remove or regenerate the respective key.
You can find out how to access the Shopware API in our developer documentation.
Roles
In the Roles section, you can create different user roles and assign them access permissions for the various areas of the Shopware Admin.

Role overview (1): Here you see an overview of all created roles, listed by name and description.
Context menu (2): Next to each created role there is a context menu on the right side where you can remove or edit the respective user.
Create new role (3): With this button you open the mask for creating a new role.
New rolls
If you click on the button New role, the mask for creating new roles opens. Here you enter the basic information in the first step.
Enter a meaningful name as well as a short description of the role. This information is displayed in the role overview.
Authorisations
The permissions area is the heart of the roles. Here you specify which permissions users who have been assigned this role should have. All areas of the Shopware Admin are listed for this purpose. For each area, you can then specify exactly which permissions this role has or does not have in this area.
In addition, some areas are divided into sub-areas for which the authorisations can be assigned in even more detail. You can either assign the permissions for the complete area by activating the checkboxes in the line of the area or for each subarea individually by activating the checkboxes directly at the respective subarea.

Catalogues (1): On the left hand side are all areas from the Shopware Admin. Some areas have additional sub-areas, for which permissions can be assigned individually.
View (2): If a user only has the right to view, he can see the configurations of the area, but cannot change them.
Edit (3): With the right Edit a user can change configurations of an area. In the example of the Products area, the user can change configurations such as price or stock, but cannot add or remove new products.
Create (4): With this right the user can create entities like products but cannot delete them.
Delete (5): The Delete permission enables the user to remove entities such as products.
All (6): If this checkbox is set, the user gets full access to the respective area.
The permissions build on each other from left to right. That means, if you give the permission Edit, the user automatically gets the permission View. If you assign the permission Create, the user automatically receives the permission Edit and View.
Only the permission Delete does not build on all permissions. For the permission Delete, only the permission View is granted automatically.
Additional permissions
The additional permissions include some general authorisations that cannot be assigned to a direct area. In these areas, the right to edit can be assigned generally. Therefore, no distinction is made here between viewing, editing, creating and deleting.
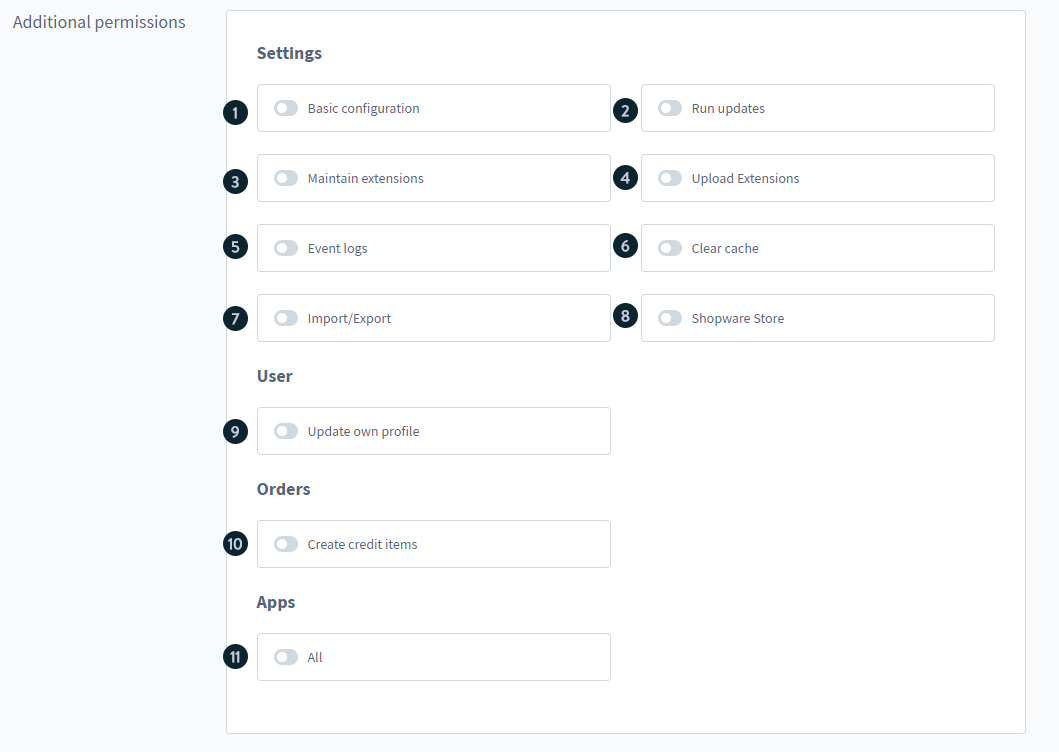
Basic configurations (1): With this permission, the user can change the basic settings from the Shopware Administration. In the area Settings>Shop these are the settings under Addresses, Login/Registration, Products, SEO, Sitemap, Master Data and Shopping Cart. Under Settings>System, the areas Mailer and Shopware Account fall under this right.
Run Updates (2): With this right, the user can search for and install updates under Settings>System>Shopware Update.
Maintain plugins (3): With this authorisation, the user can carry out all settings under Settings>System>Plugins. Among other things, he can install, uninstall, activate and deactivate plug-ins.
Upload extensions (4): Users who are given this right can upload extensions via zip file in the Extensions>My Extensions section.
Logging (5): Users who are given this right can access the shopware and system logs under Settings>System>Logging.
Clear cache (6): Users with this right can access all settings under Settings>System>Cahes & Indexes
Import/Export (7): With this right users can import and export data under Settings>Shop>Import/Export. They can also create and remove new import/export profiles.
Shopware Store(8): With this right users can access the store under Extensions>Store.
Update own profile (9): Only if a user has this right, he can make changes in his own profile in the bottom left corner of the menu.
Create discounts (10): This right allows the creation of voucher items in the orders module. If the user opens an existing order there and clicks on Edit, he can create a new voucher item in the product section.
Apps(11): With this right users can access the entire Extensions area.
Detailed permissions
In this view, permissions can be configured in detail. This configuration is only necessary in exceptional situations. For example, if extensions are used in the system that add new records but have not assigned privileges for them, they can be configured here. All greyed out checkboxes are permissions that were already assigned in the tab "General".
So here you can find all permissions with their technical name. Just like the area permissions, you can assign the rights read, write, create and delete for each function.

Especially when extensions are used in which the permissions have not been set properly, it can happen that the user has been given a permission but then cannot exercise it in the admin. In this case, the error message usually shows which authorisations are still missing in detail. These can then be set subsequently using the detailed privileges.

In this example the user does not have the permission to delete orders.